

Salesforce is only available for Advanced plan and above.
The Salesforce integration allows you to connect your Salesforce account with your respond.io workspace.
With this integration, you can:
Automatically sync Salesforce contact fields into respond.io Contact fields whenever a contact is created or updated in Salesforce.
View Salesforce contact fields like email, phone number, lead source, and more directly in respond.io.
Reduce platform switching by accessing contact data inside the Inbox and Contacts modules.
What You’ll Need
Admin access in Salesforce.
Owner or Manager access in respond.io.
API access in your Salesforce account, required to view Salesforce fields in respond.io.
Apex access in your Salesforce account, required for Contact sync.
Limitations:
Contact sync only applies to contacts created or updated in Salesforce after you turn it on. It doesn't backfill contacts that already exist in Salesforce. To bring those in, import them into respond.io.
You can map up to 100 Salesforce fields per Workspace.
At least 1 field mapping must remain.
To sync a Salesforce field to Lifecycle, enable Lifecycle in your Workspace first.
Lifecycle values must match between Salesforce and respond.io. A Salesforce value without a matching respond.io Lifecycle stage won't sync for that Contact.
Setting Up the Integration
Install the Salesforce Integration
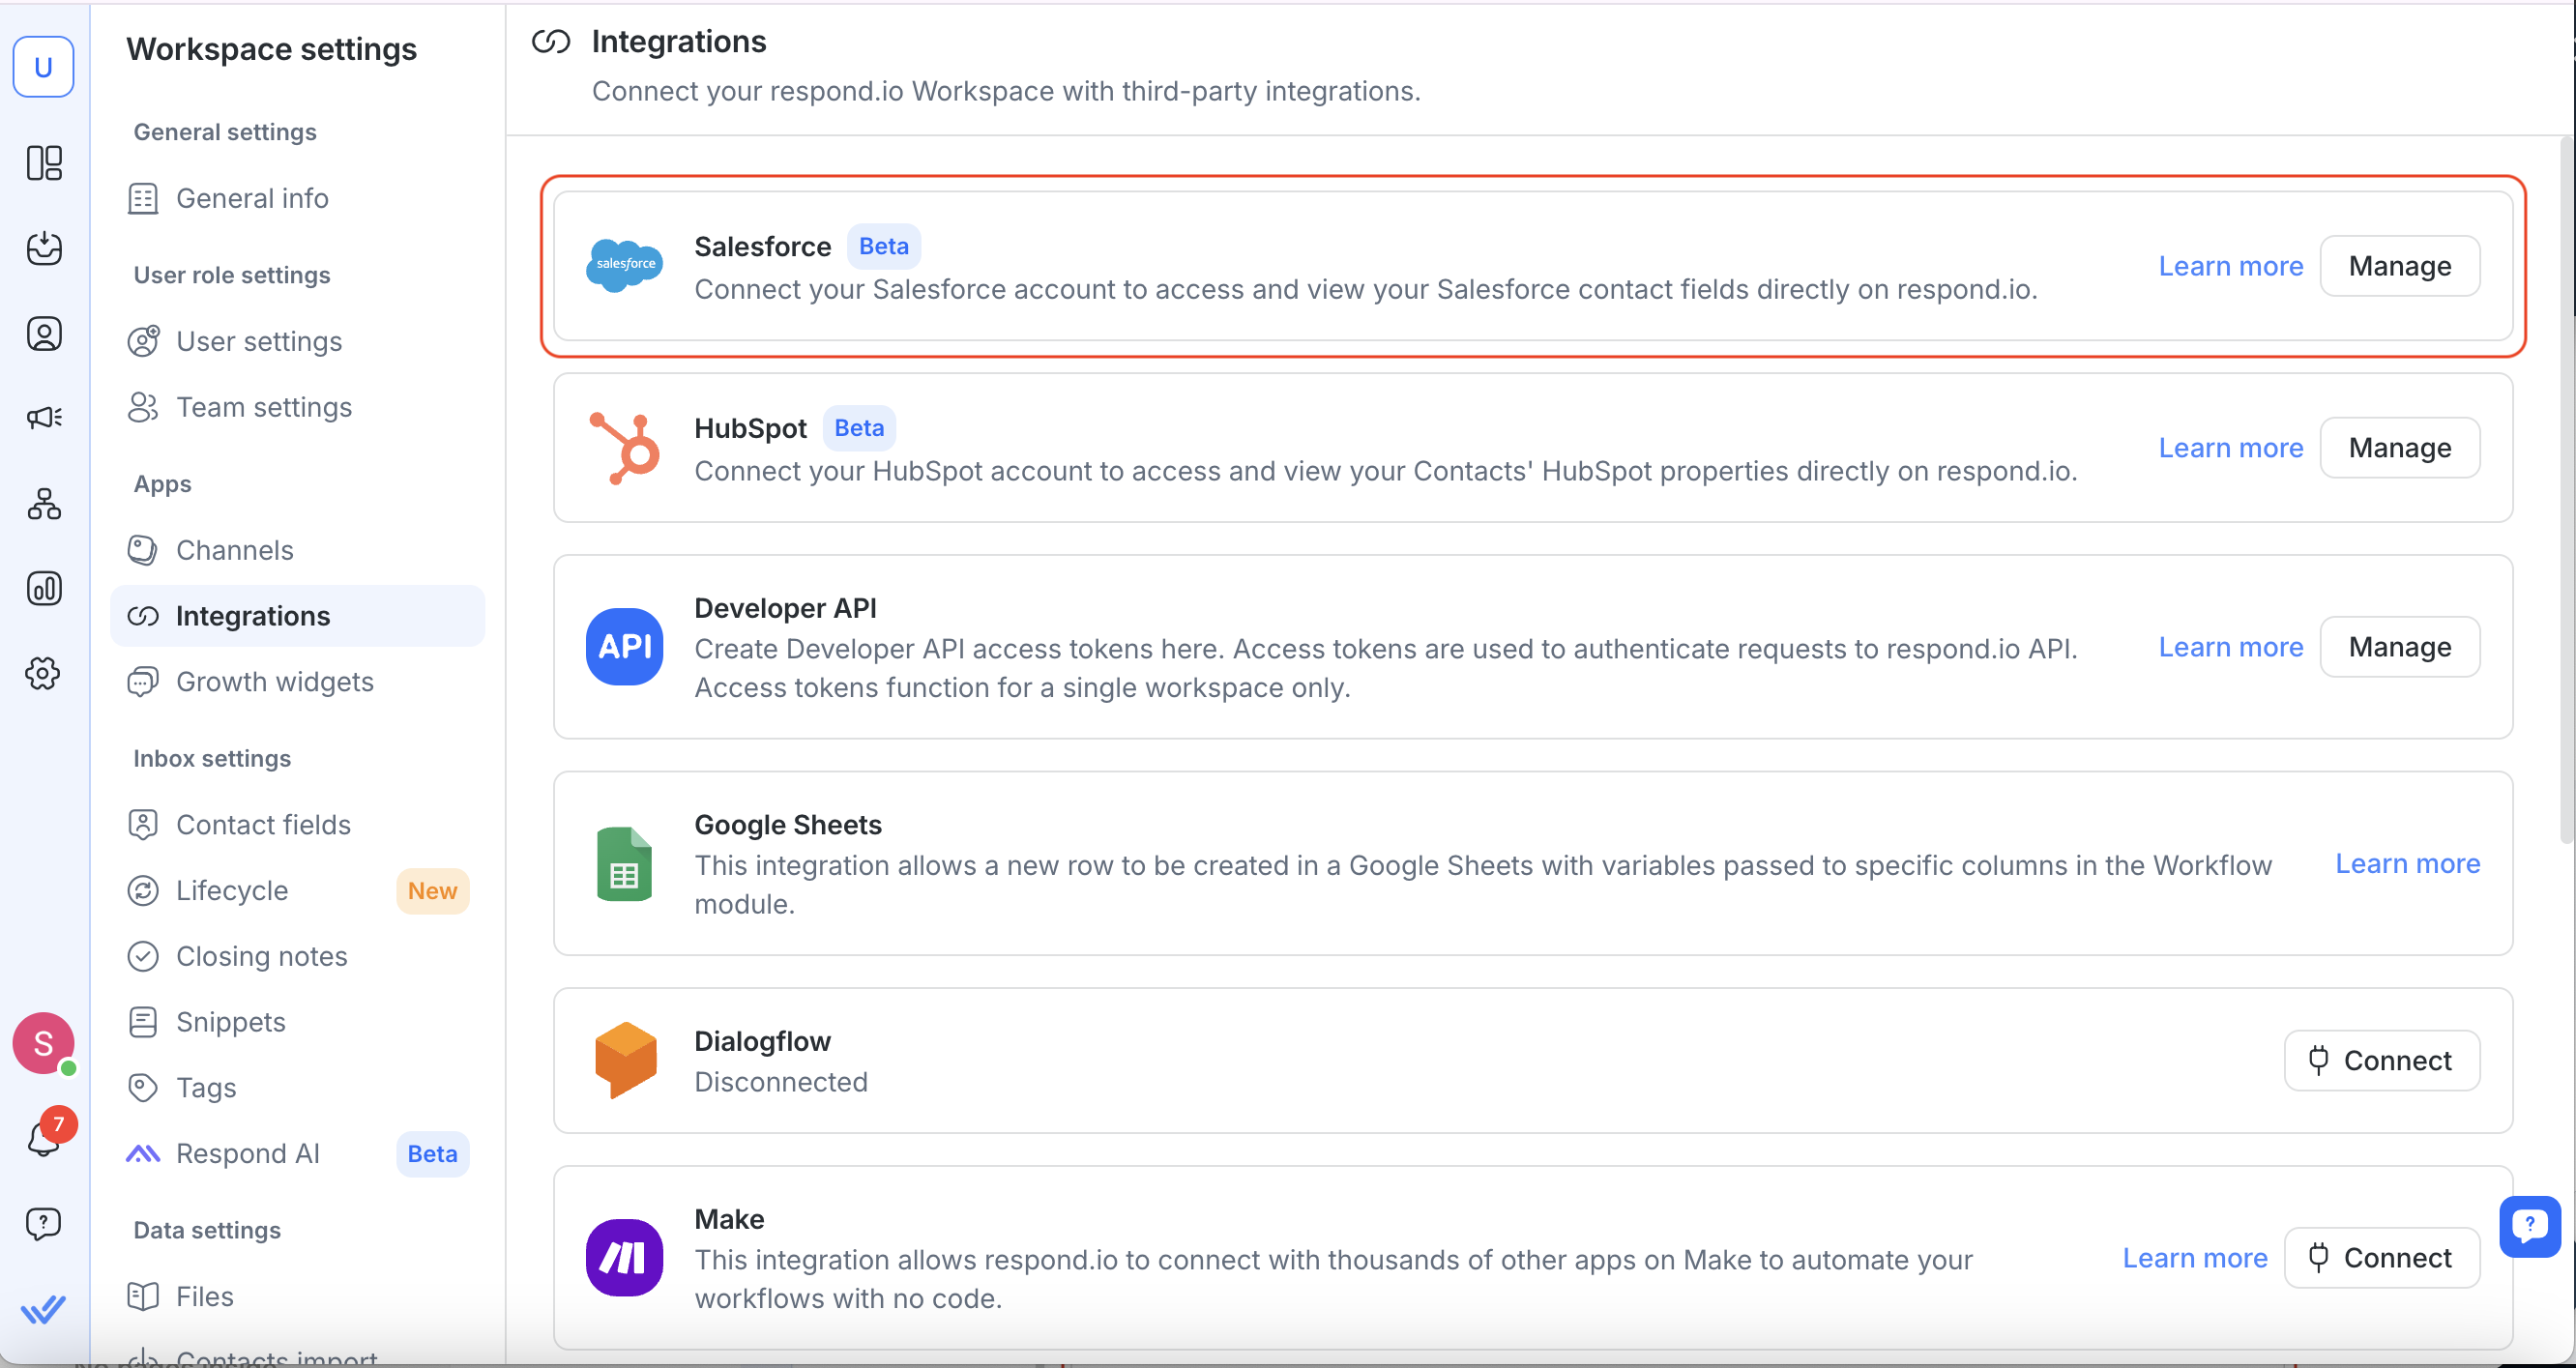
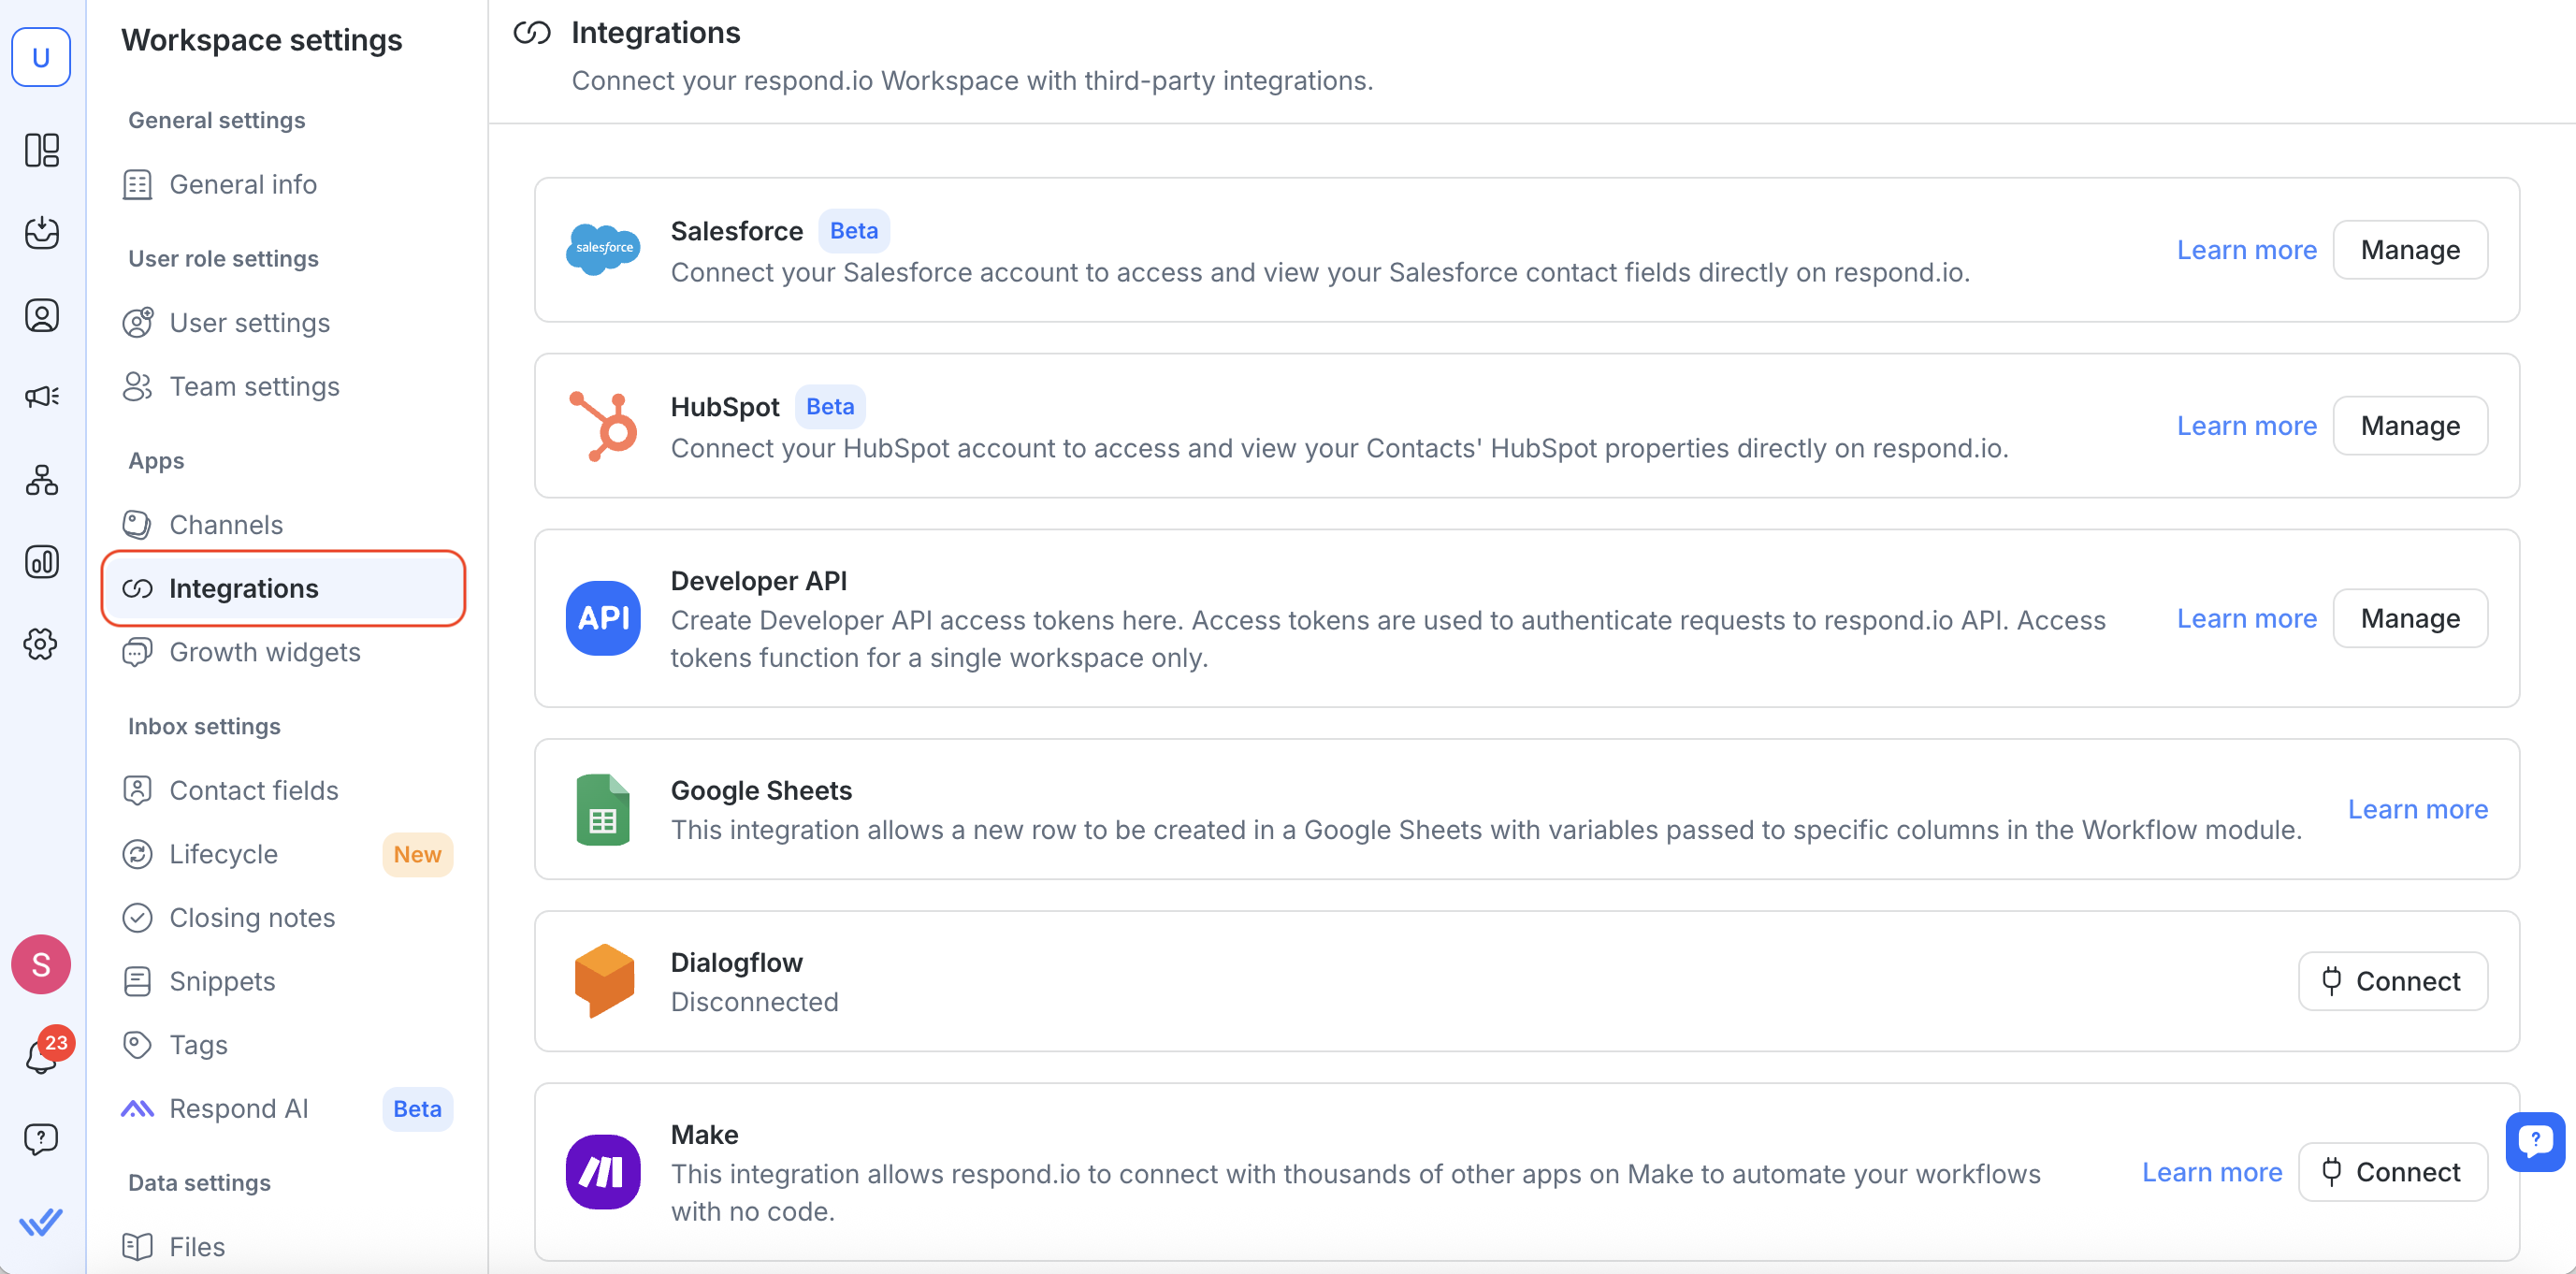
In your respond.io workspace, go to Workspace settings > Integrations.

2. Find Salesforce and select Manage.
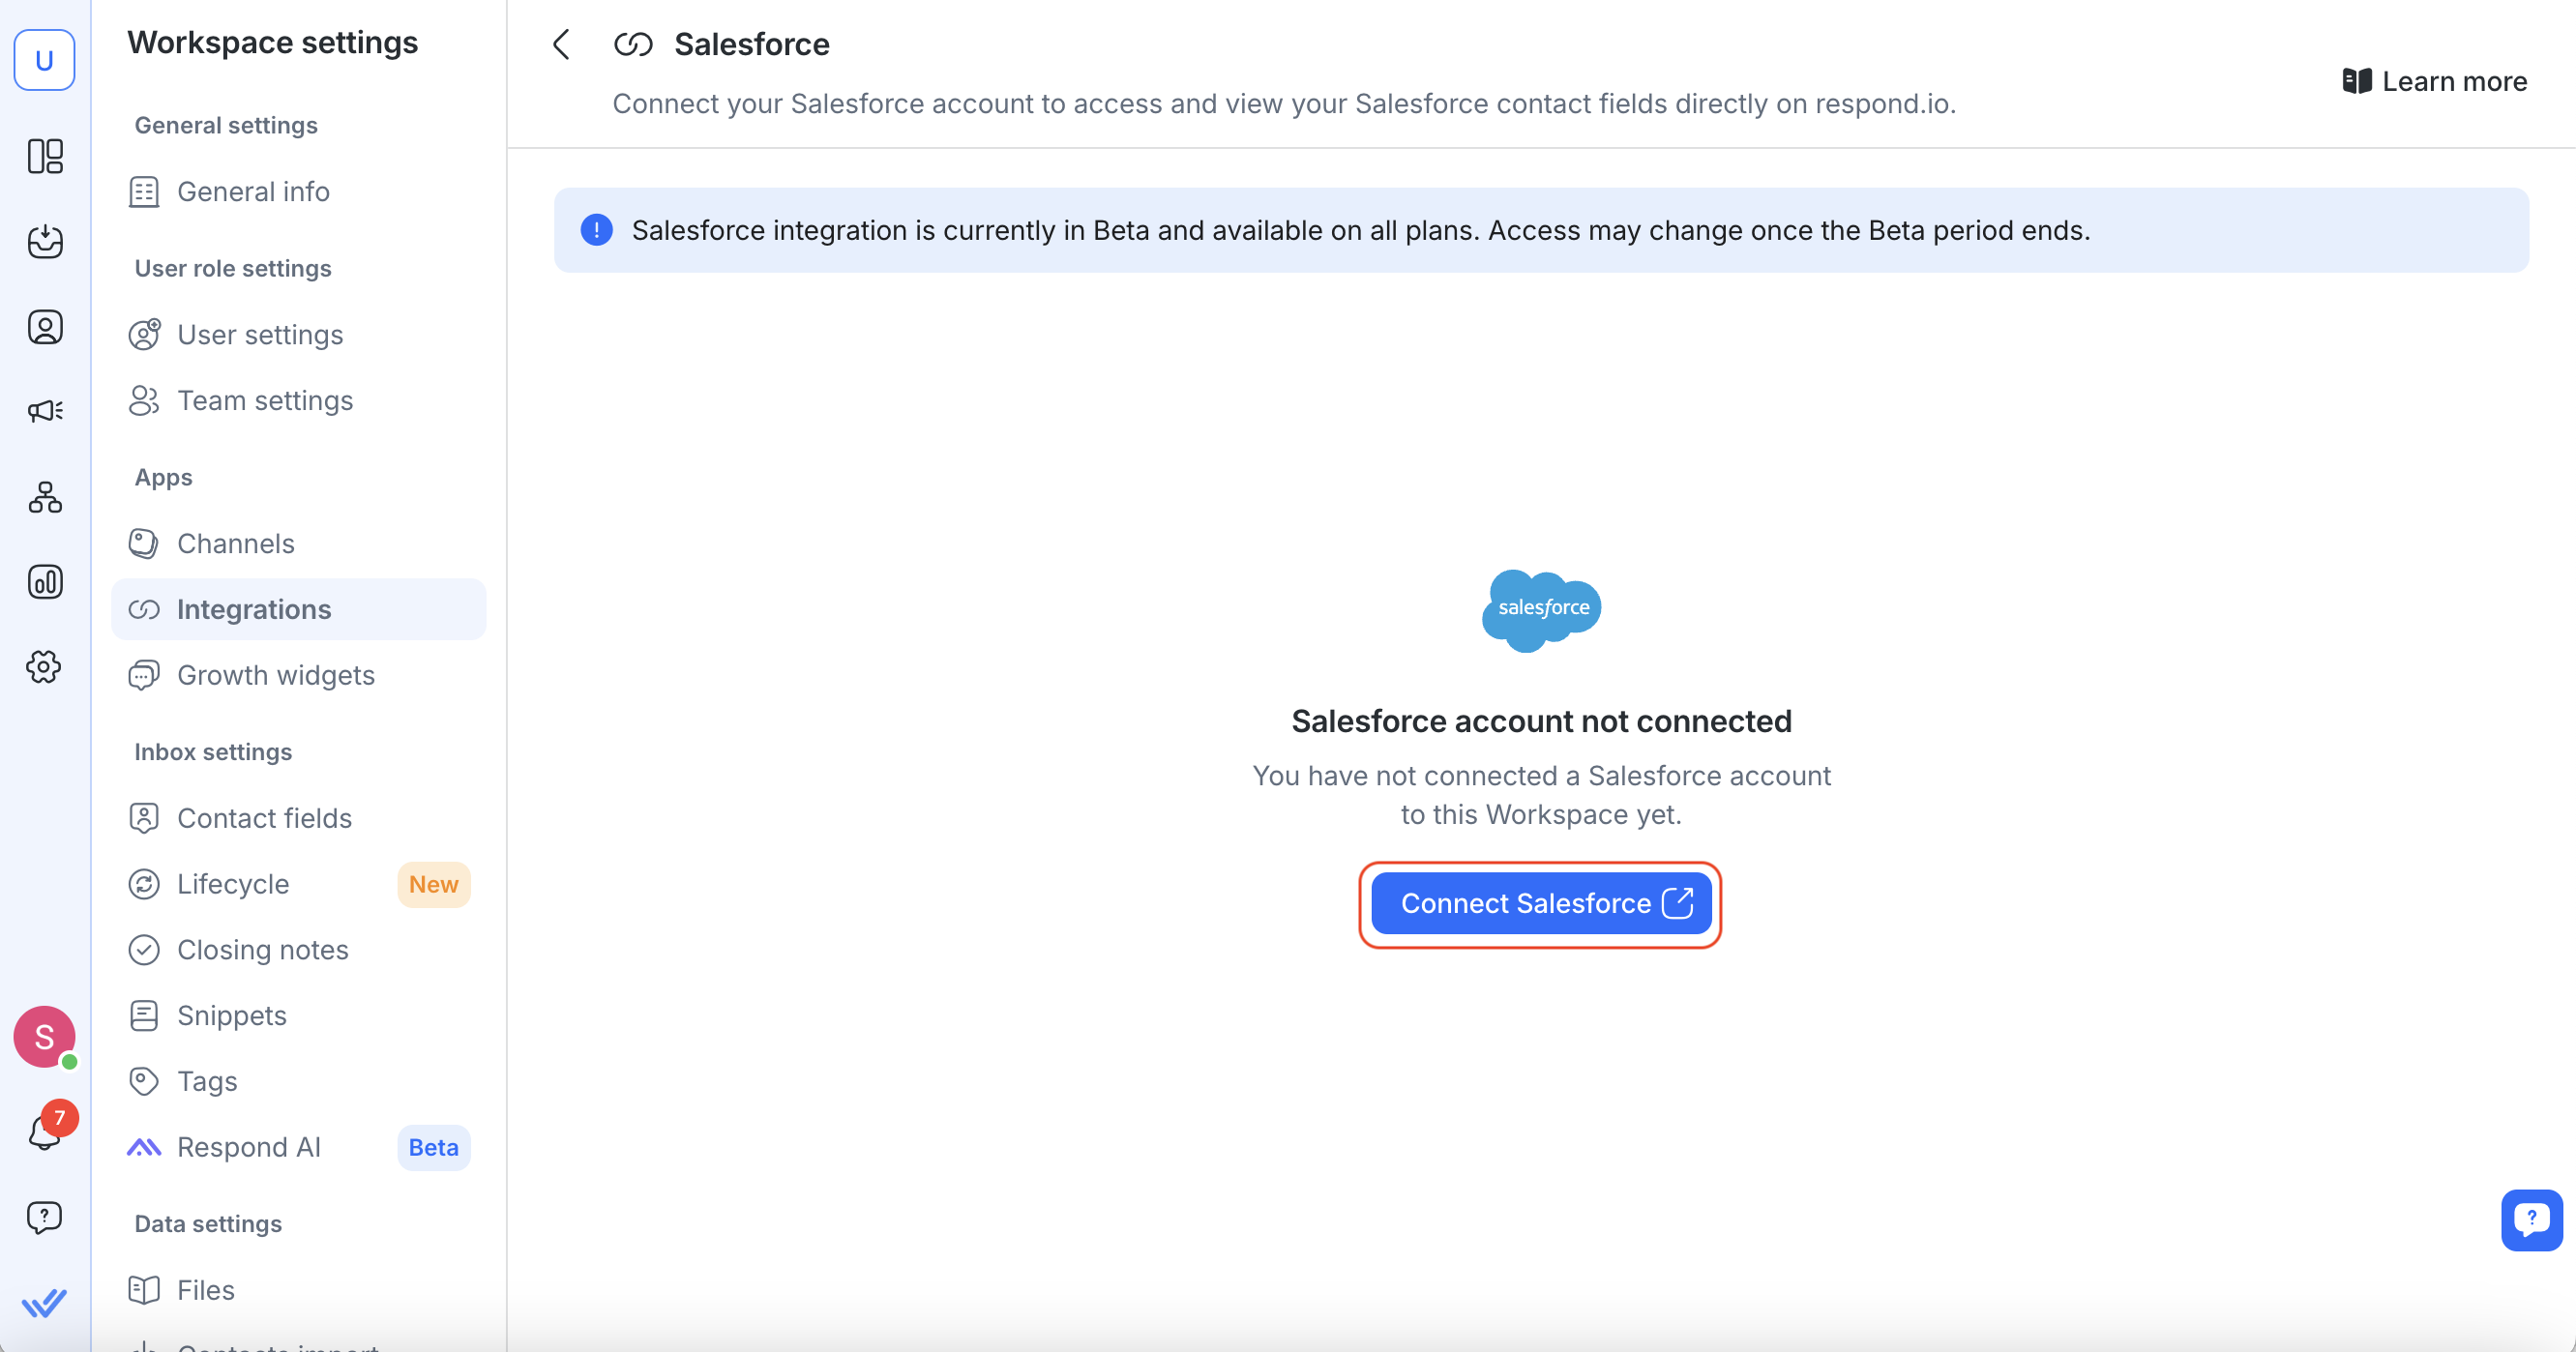
3. Click Connect Salesforce.
4. A new tab will open—sign in to your Salesforce account and authorize respond.io.
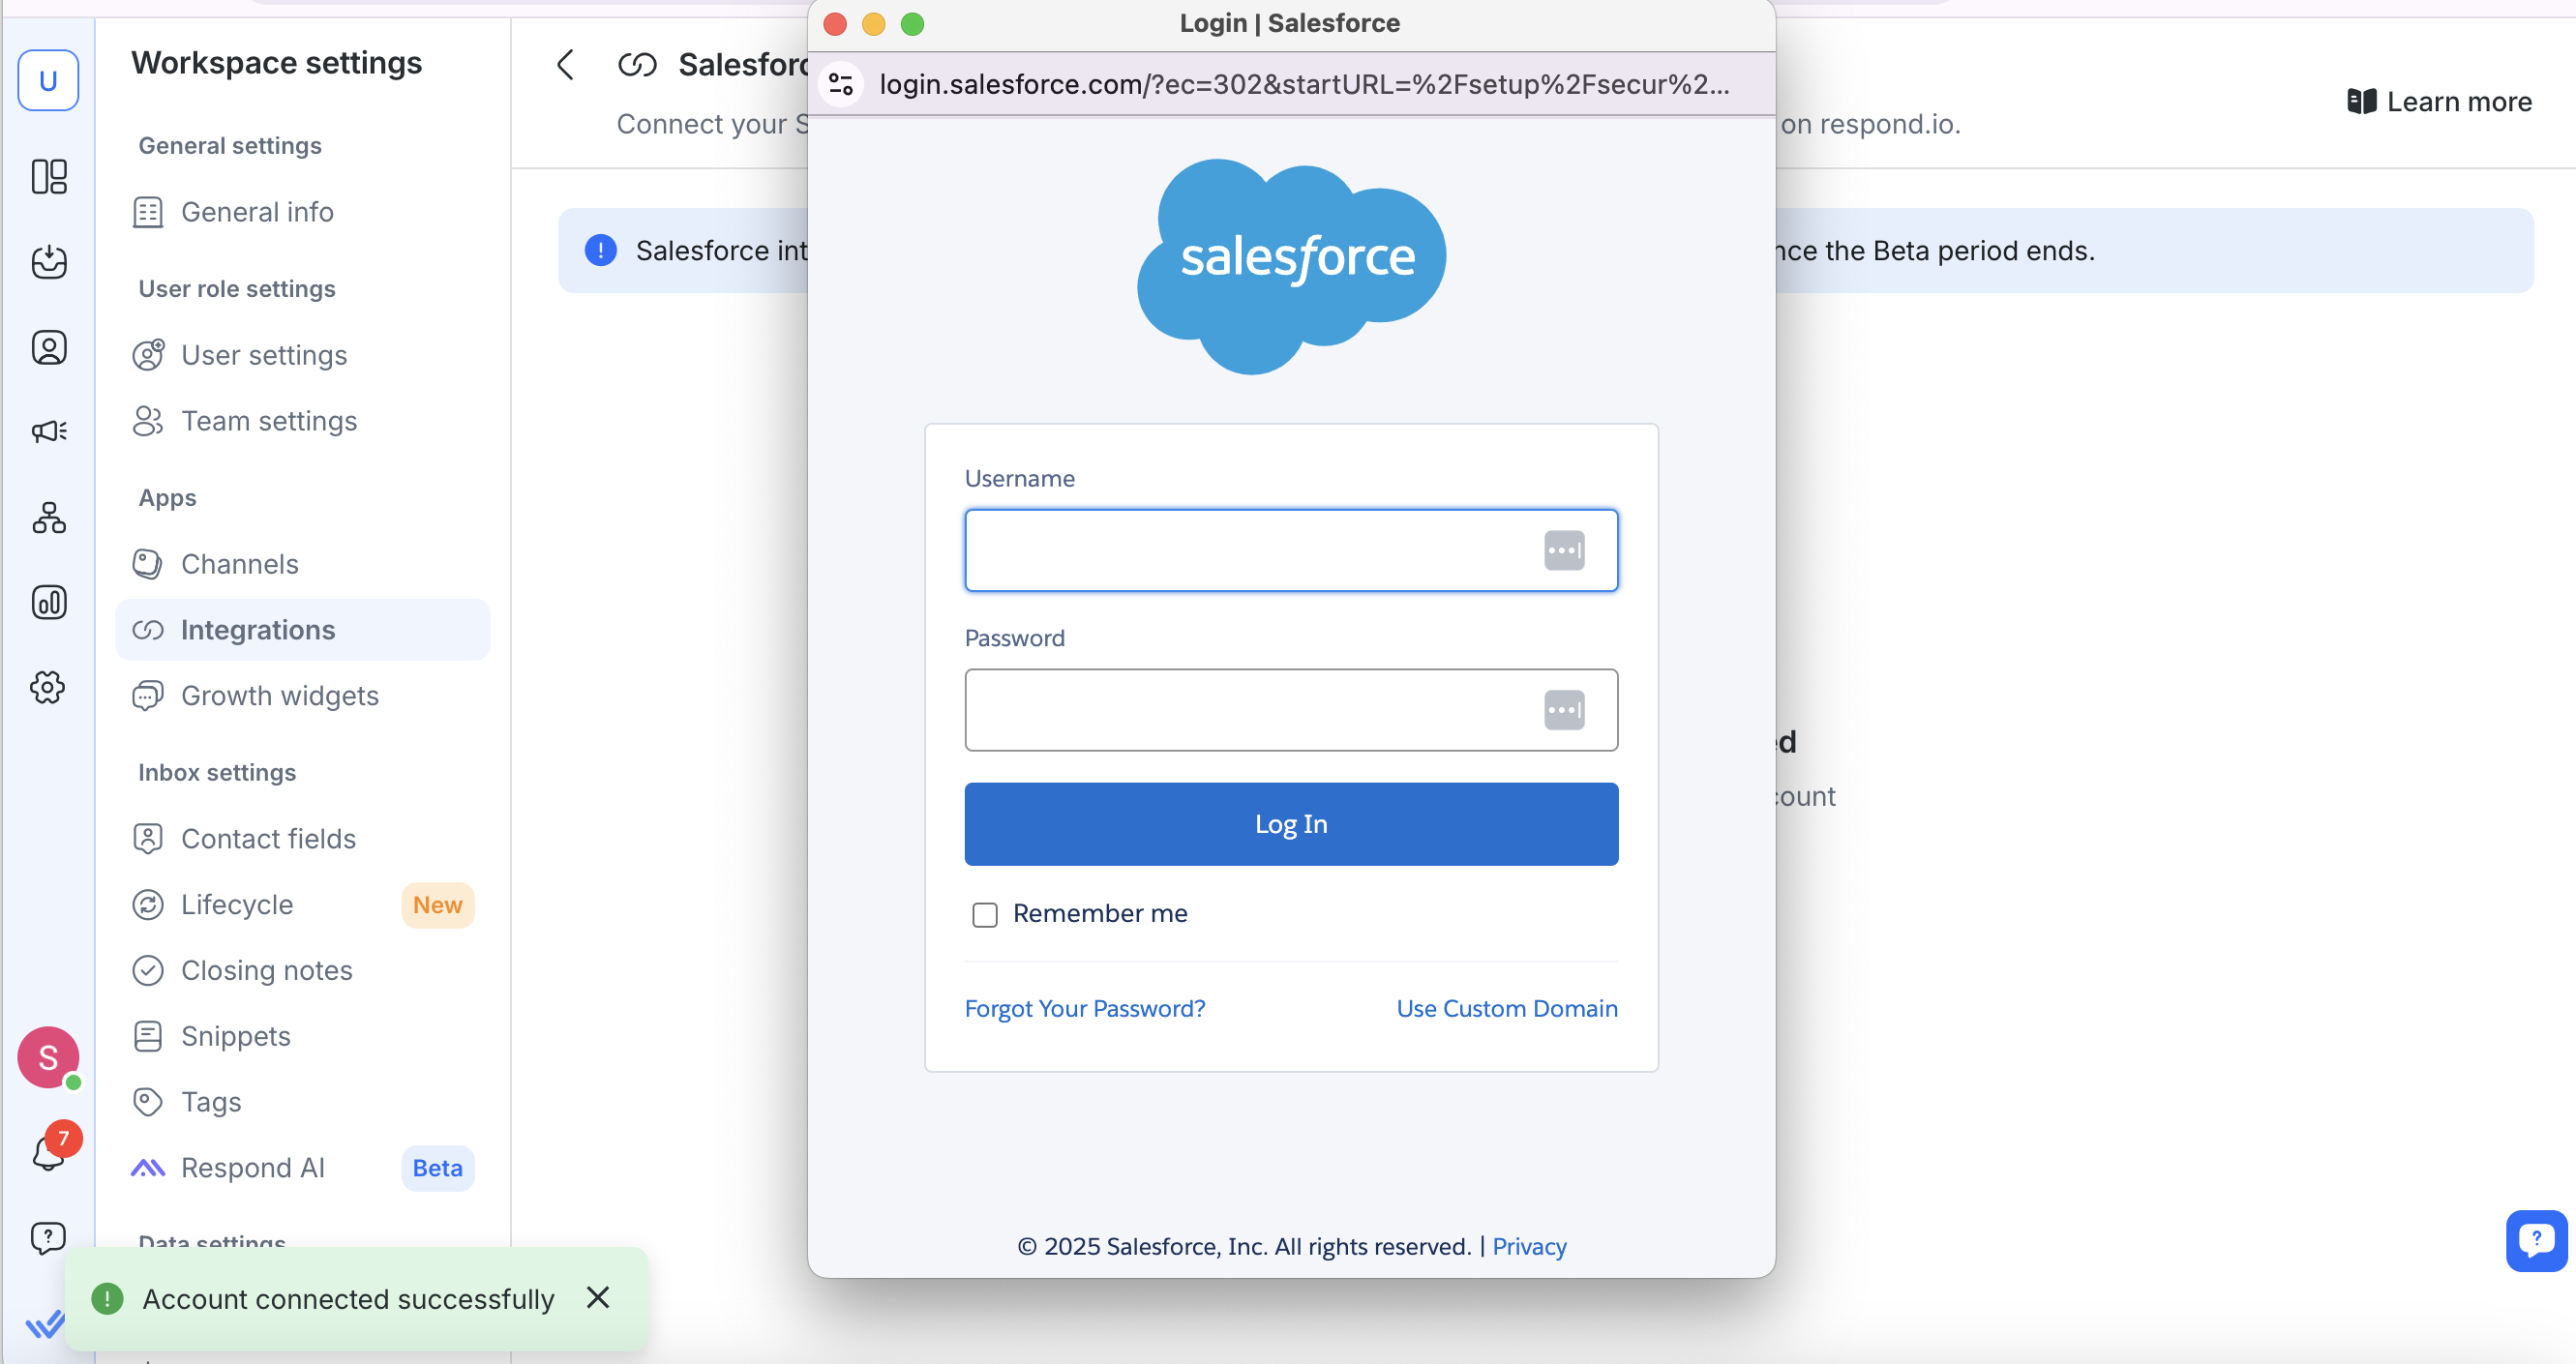
5. Once connected, you’ll see a confirmation message with your Salesforce account details.
Note: Each respond.io workspace can connect to only one Salesforce account.
Viewing Salesforce Contact Fields in respond.io
You can view Salesforce fields in both the Inbox and Contacts modules.
Inbox Module
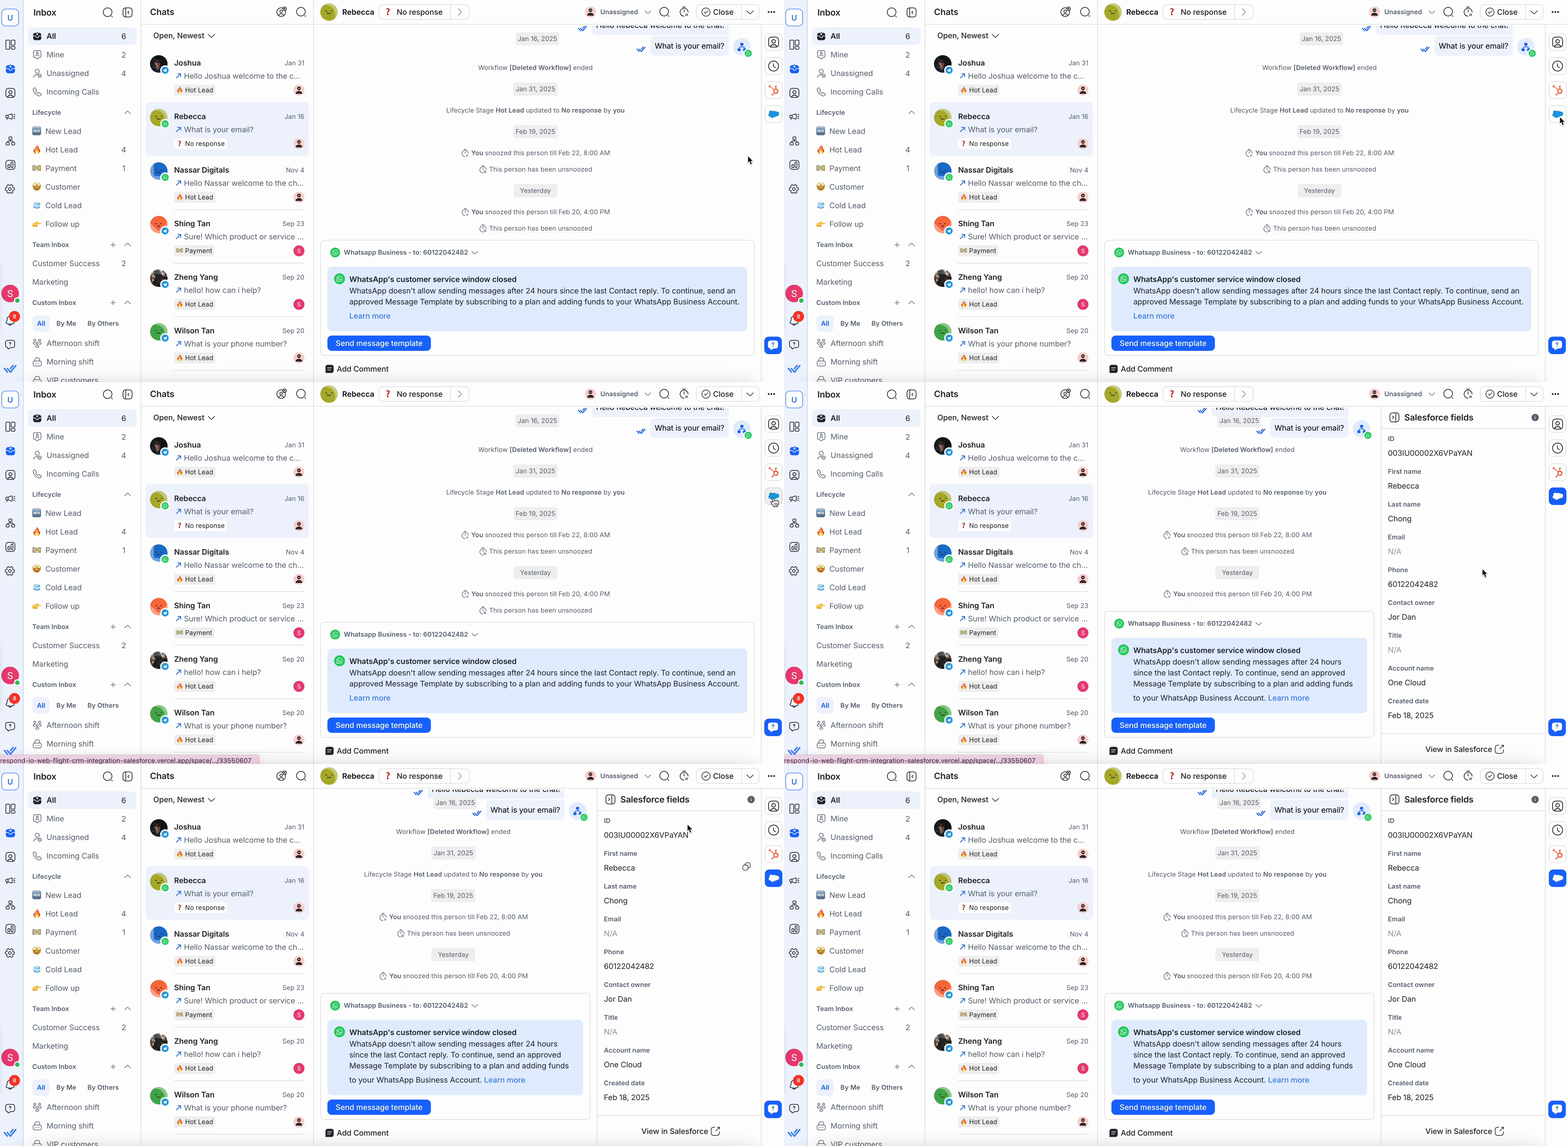
Open a conversation in Inbox.
Click on a Contact to view their Salesforce fields in the right sidebar.
Contacts Module
Navigate to Contacts.
Select a Contact to view their Salesforce fields in the right sidebar.
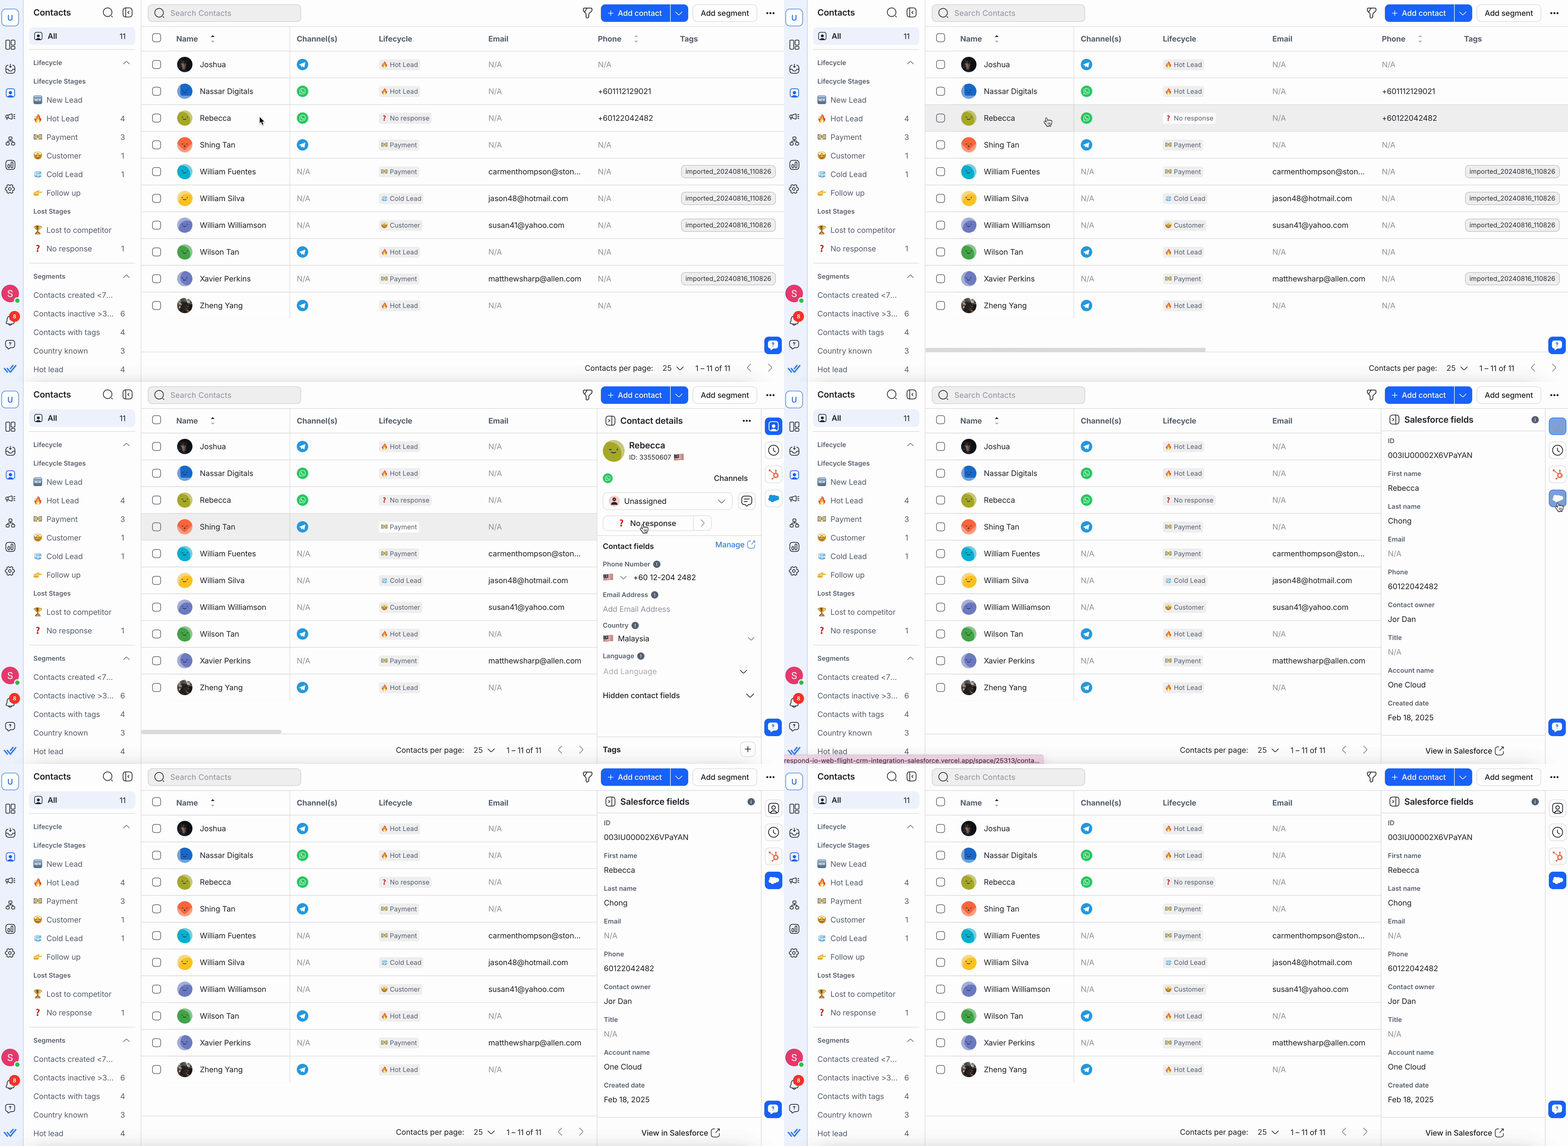
For both Inbox and Contacts modules:
If a match is found, Salesforce fields will appear automatically.
If no match is found, verify that the contact’s email or phone number matches exactly between respond.io and Salesforce.
You can click View in Salesforce to open the full profile in Salesforce.
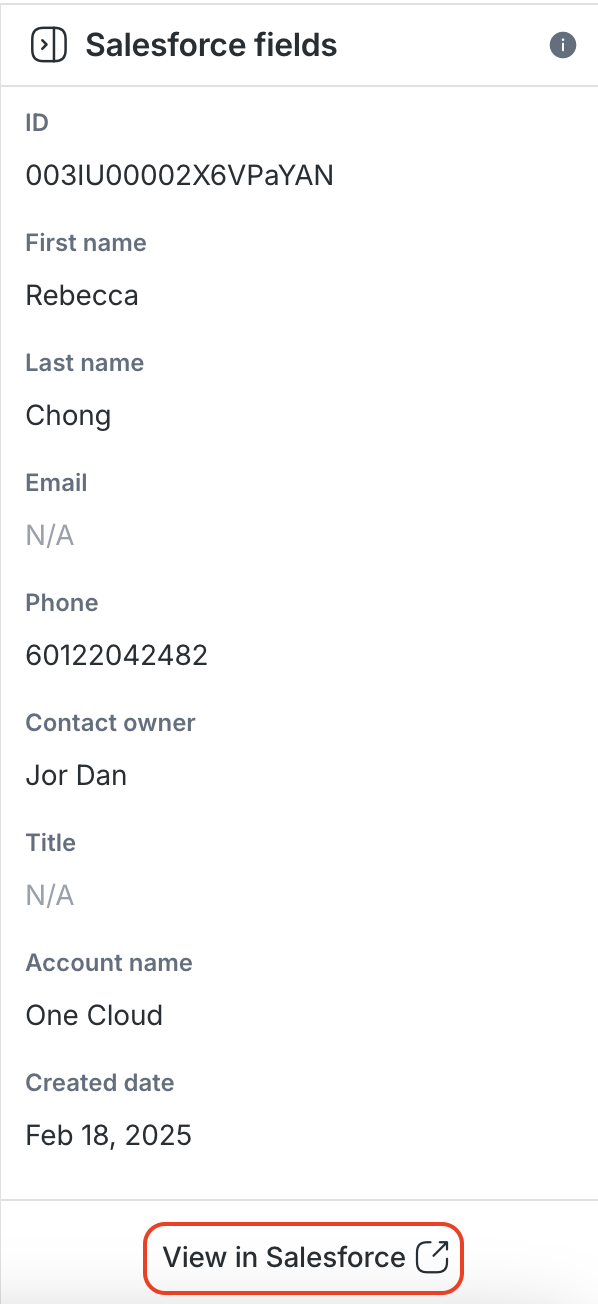
Note: Salesforce fields in respond.io are read-only by default. To edit them here, a Workspace admin turns on Allow users to edit Salesforce fields. Email and Phone Number fields stay read-only.
Selecting and Editing Salesforce Contact Fields in respond.io
You can now select specific Salesforce contact fields to display in your respond.io workspace and edit these fields directly within respond.io.
If you already have a Salesforce account connected in respond.io, you’ll need to refresh permissions to enable these updates.
Here’s how:

Go to Workspace settings > Integrations
Select Salesforce
Refresh your access token
Selecting Salesforce Contact Fields
Navigate to Workspace settings > Integrations.

Click Manage next to Salesforce.

Under View Salesforce fields on respond.io, find Customize visible fields. Click Customize view to choose which Salesforce fields appear, and in what order, in the Inbox and Contacts modules.

Click Save to apply your preferences.

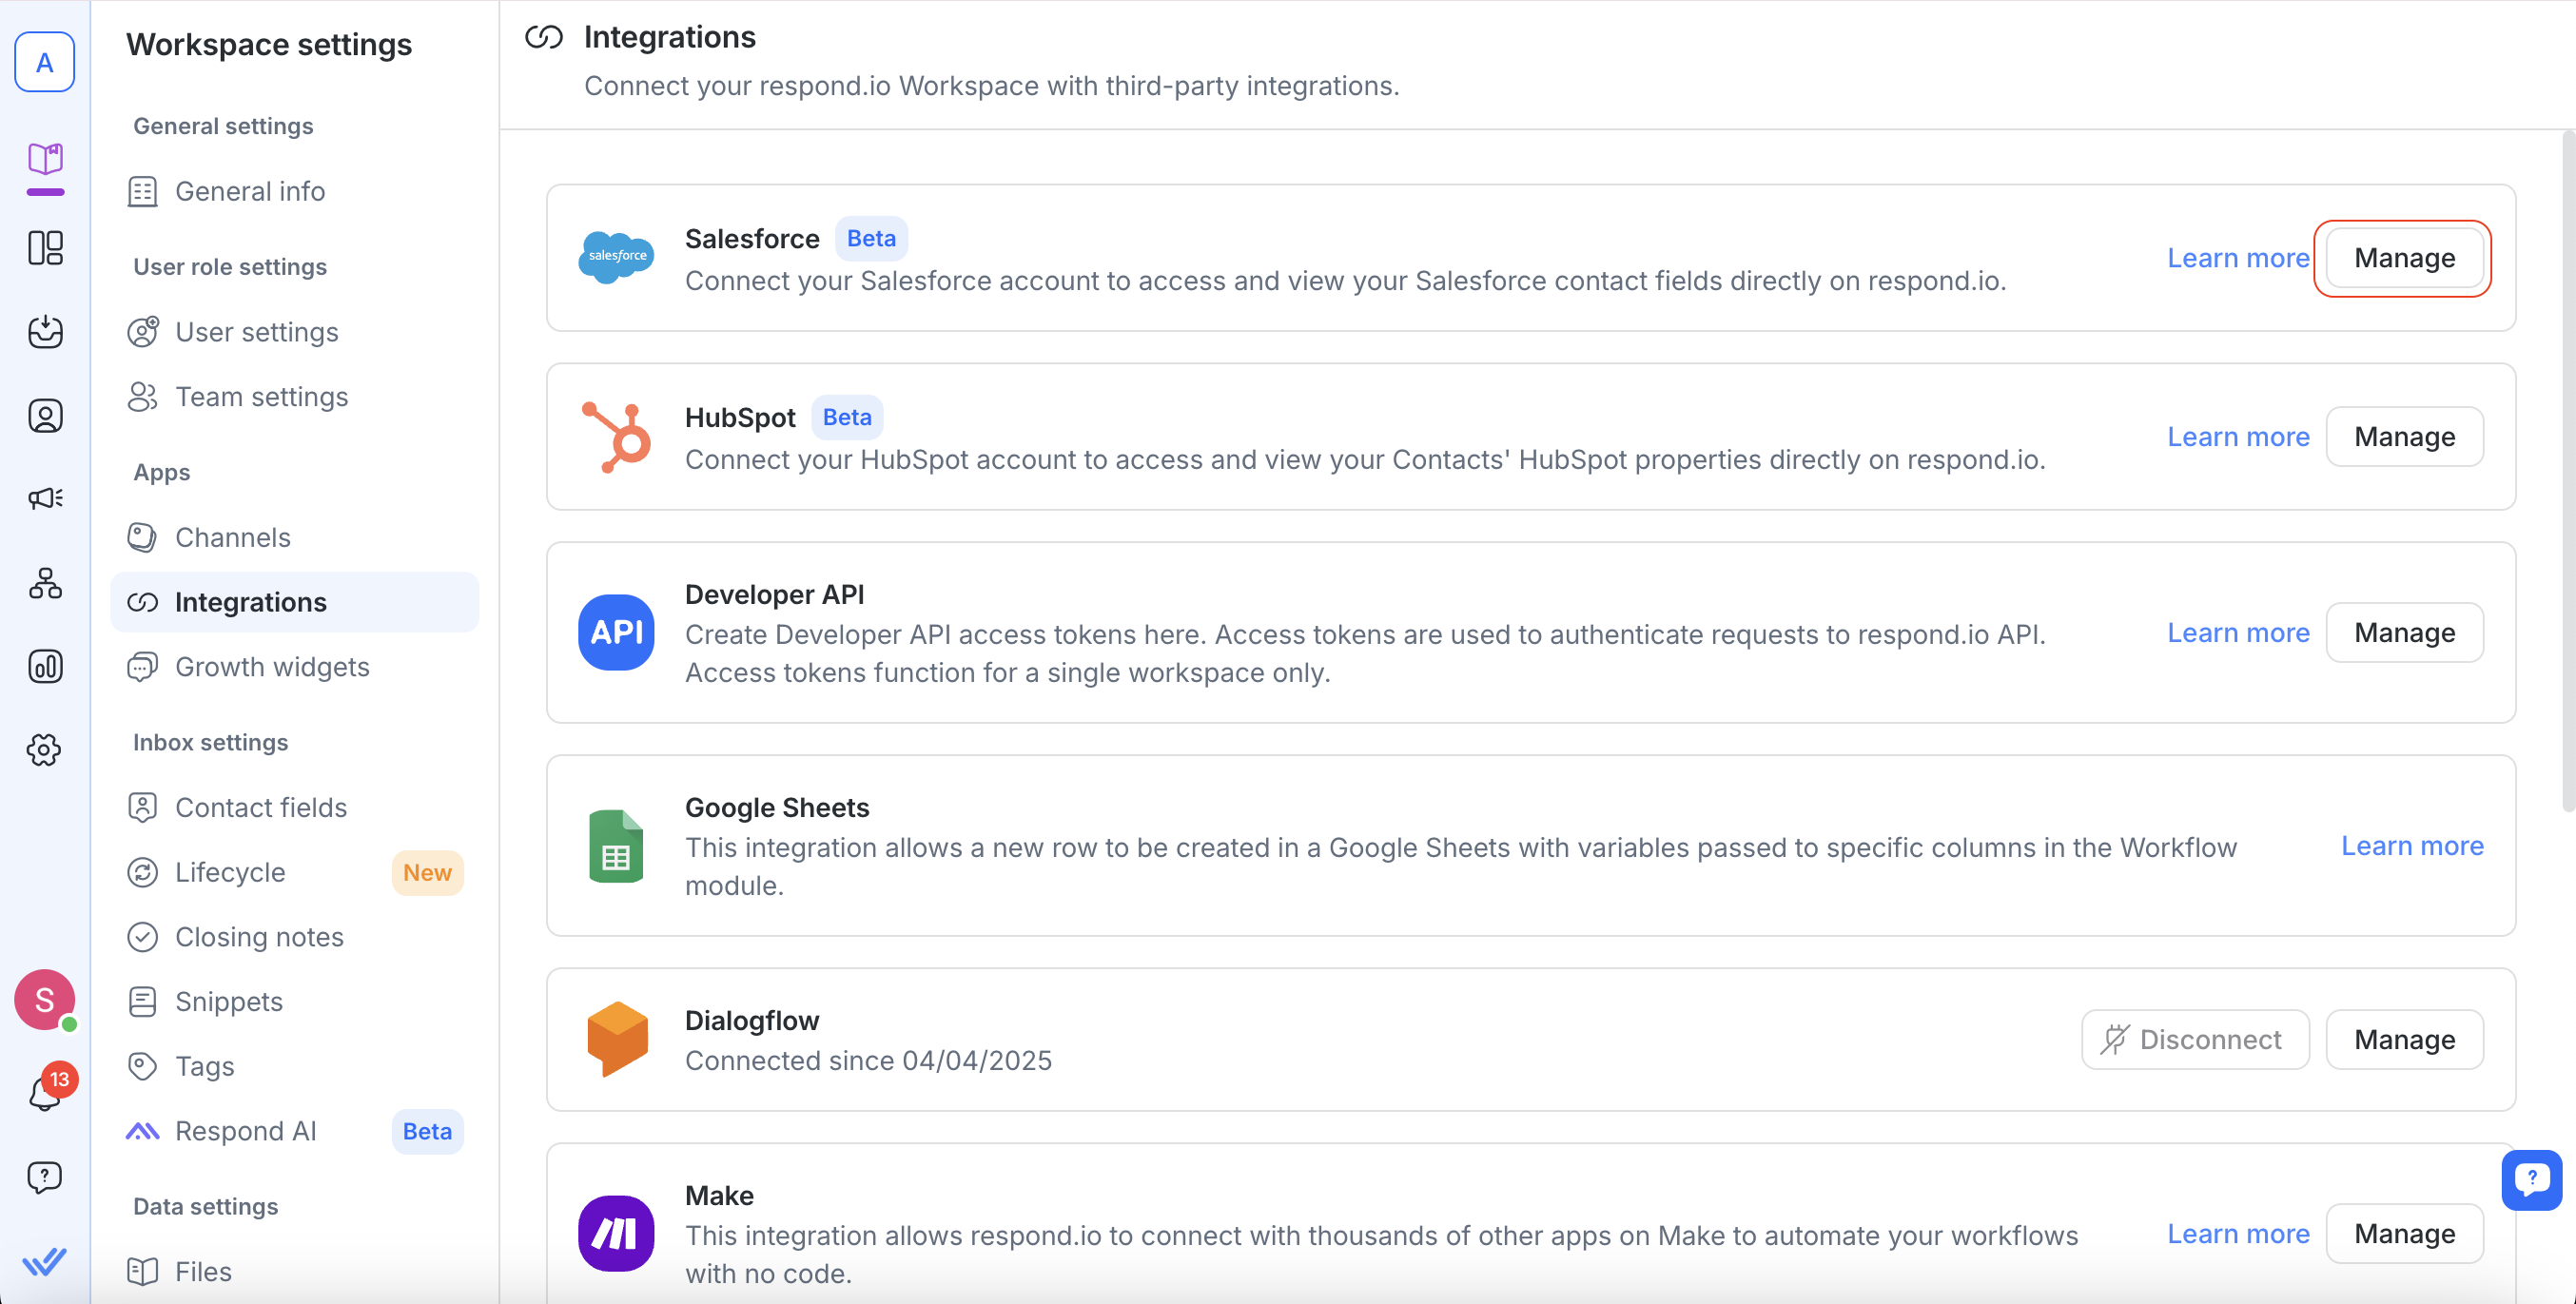
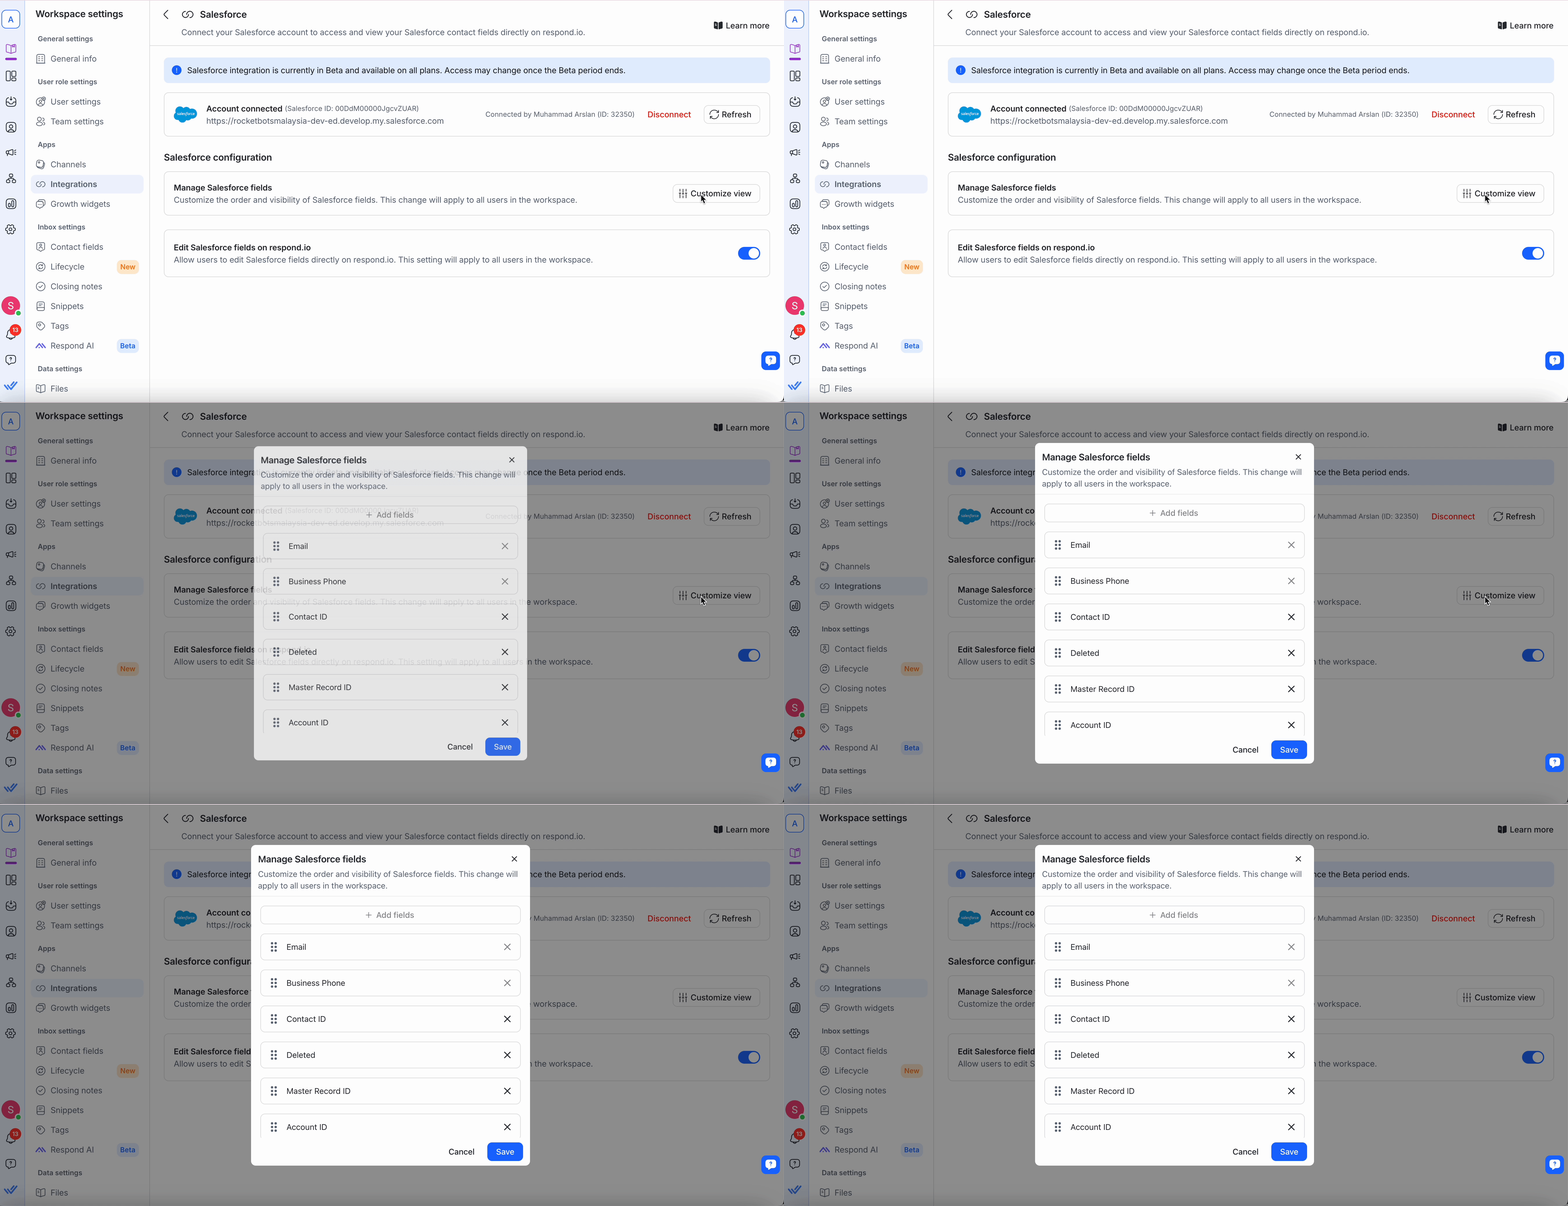
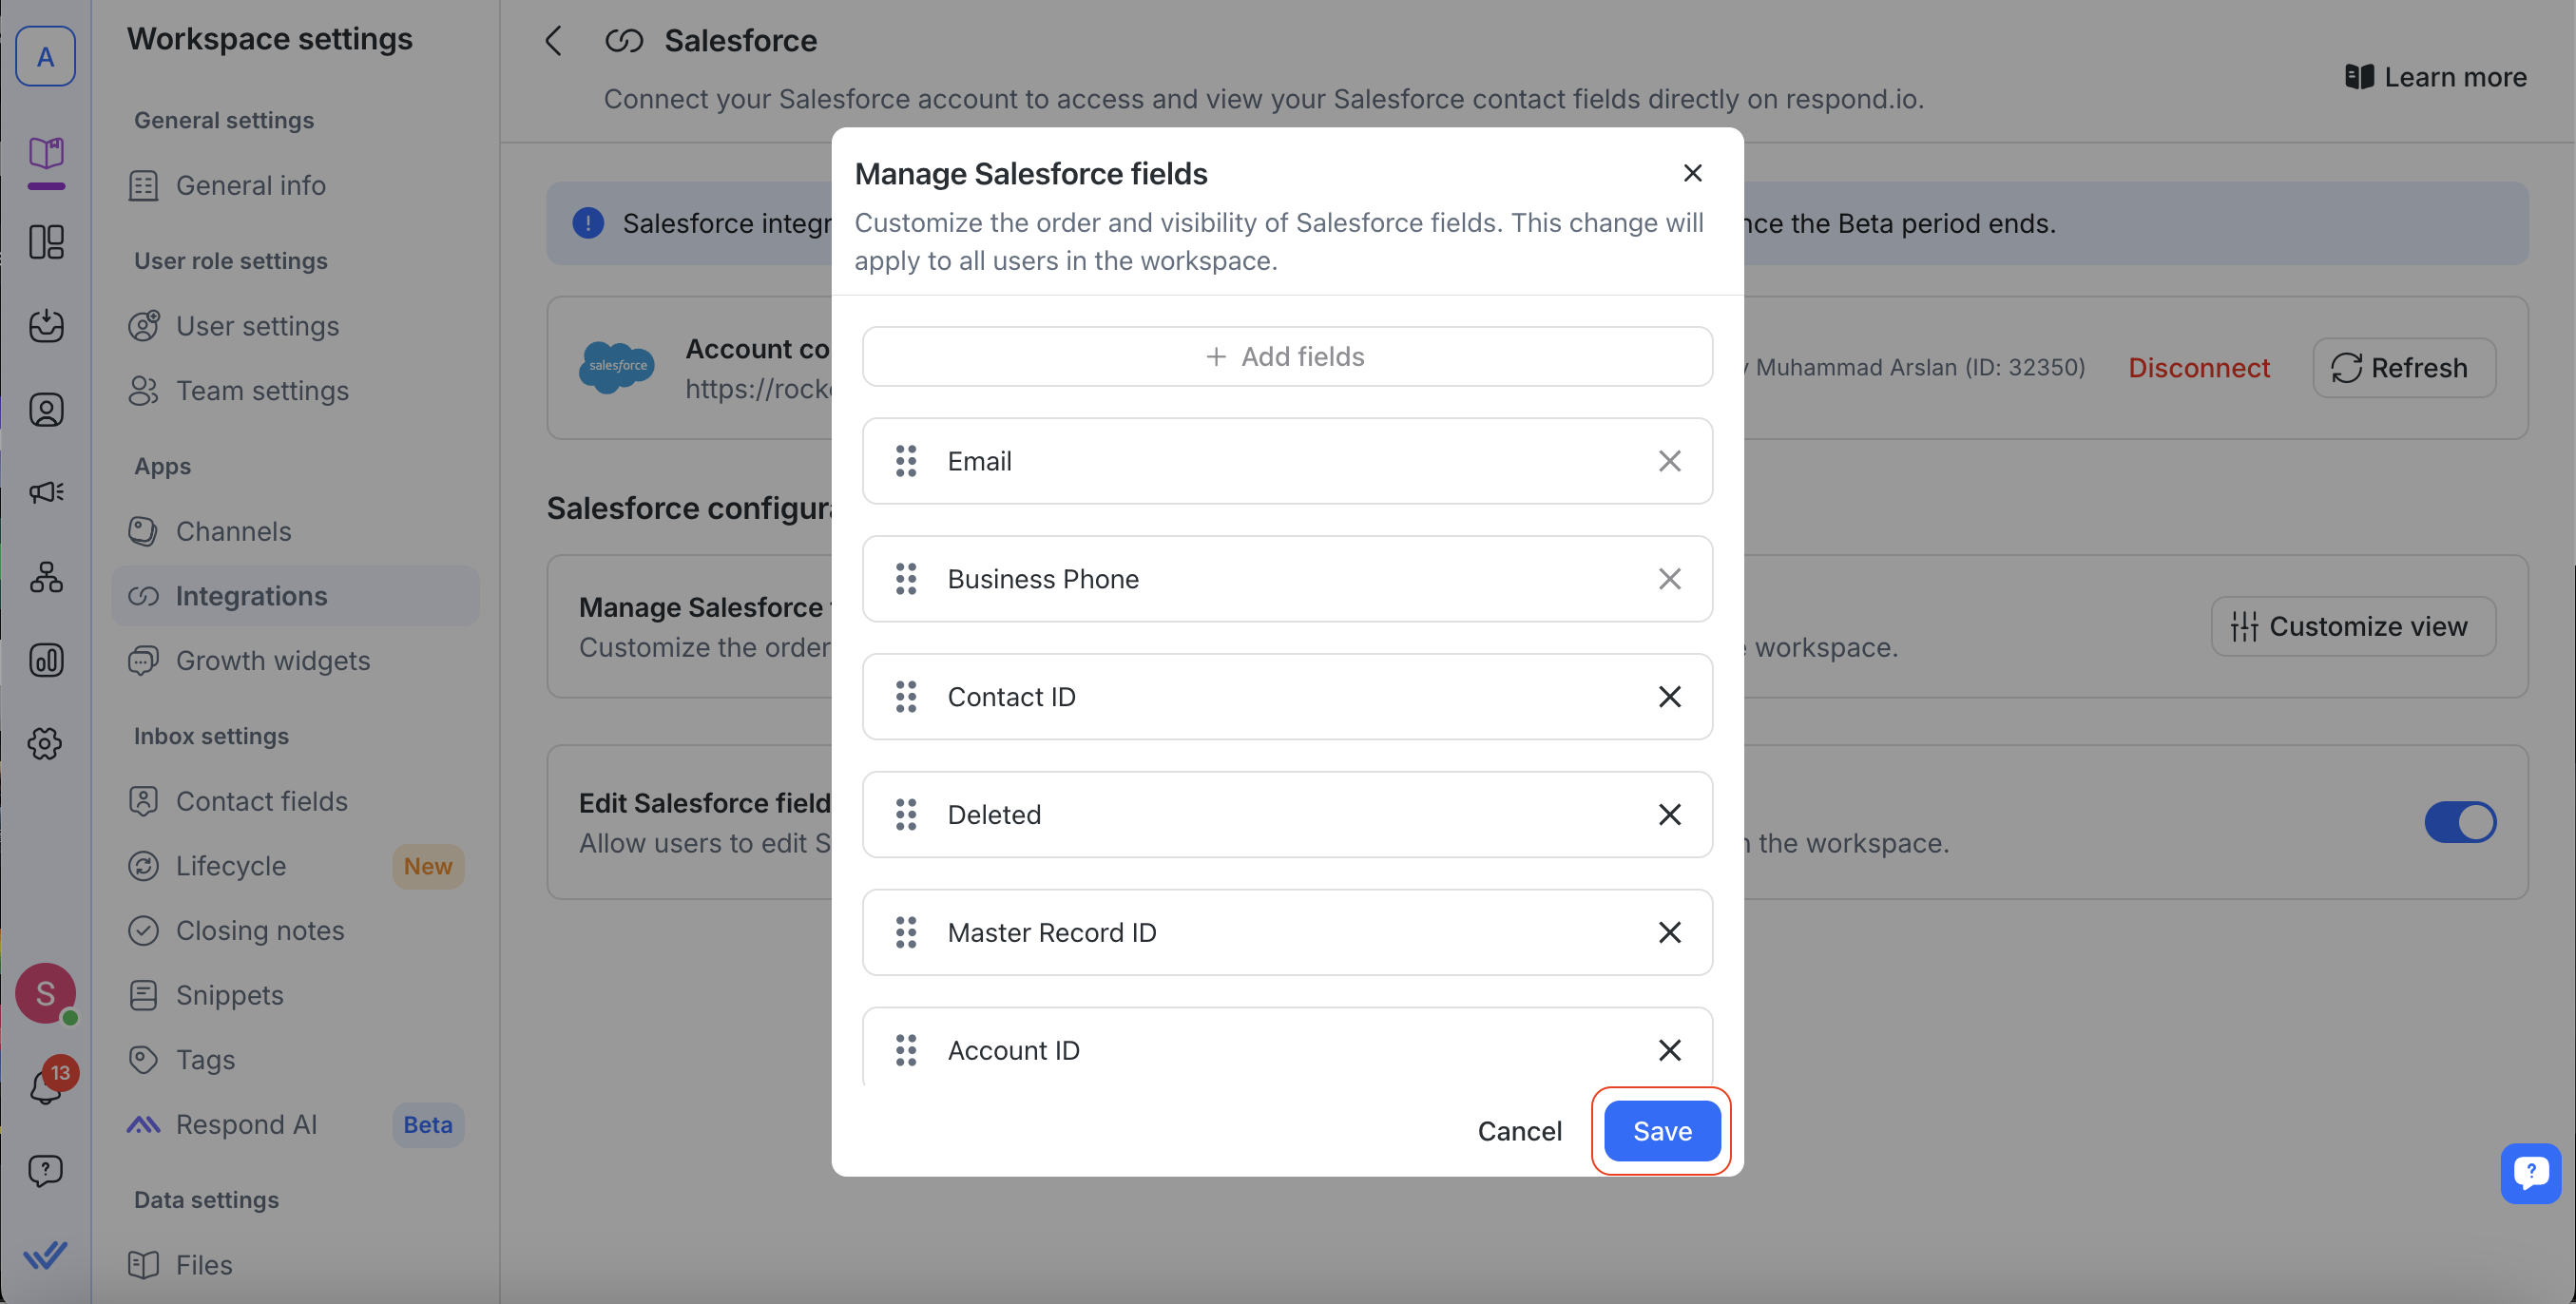
Note: This applies to the whole Workspace, not just your own view. Once saved, the Inbox and Contacts modules show the same fields in the same order for every user.
Editing Salesforce Contact Fields
You can now edit certain Salesforce contact fields directly within respond.io.
To enable this feature, go to View Salesforce fields on respond.io and turn on Allow users to edit Salesforce fields. Once enabled, all users in your Workspace can edit the selected Salesforce fields from respond.io.

Non-editable fields remain read-only and must be updated directly in Salesforce.
Important Notes:
Email and Phone Number fields are non-editable.
Ensure appropriate permissions in respond.io and Salesforce to edit fields.
If changes do not appear immediately, refresh your page after 1 minute due to API caching.
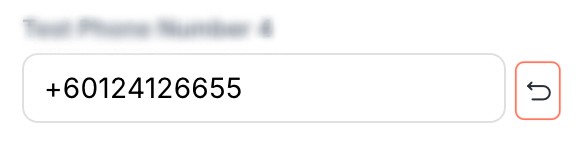
To discard changes, select the Restore icon next to each editable field. This can be accessed in both the Inbox and Contacts module.
Inbox module
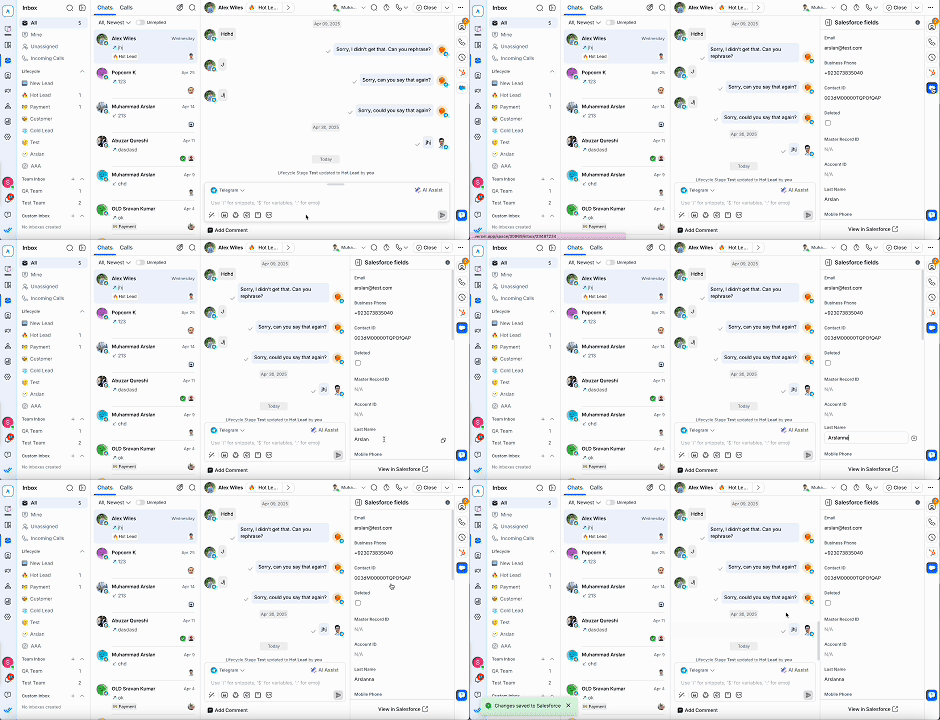
Open the Inbox and select a contact.
Select the Salesforce icon.
Click on the Salesforce property you want to edit and update the information. Your changes sync immediately to Salesforce.
Contacts module
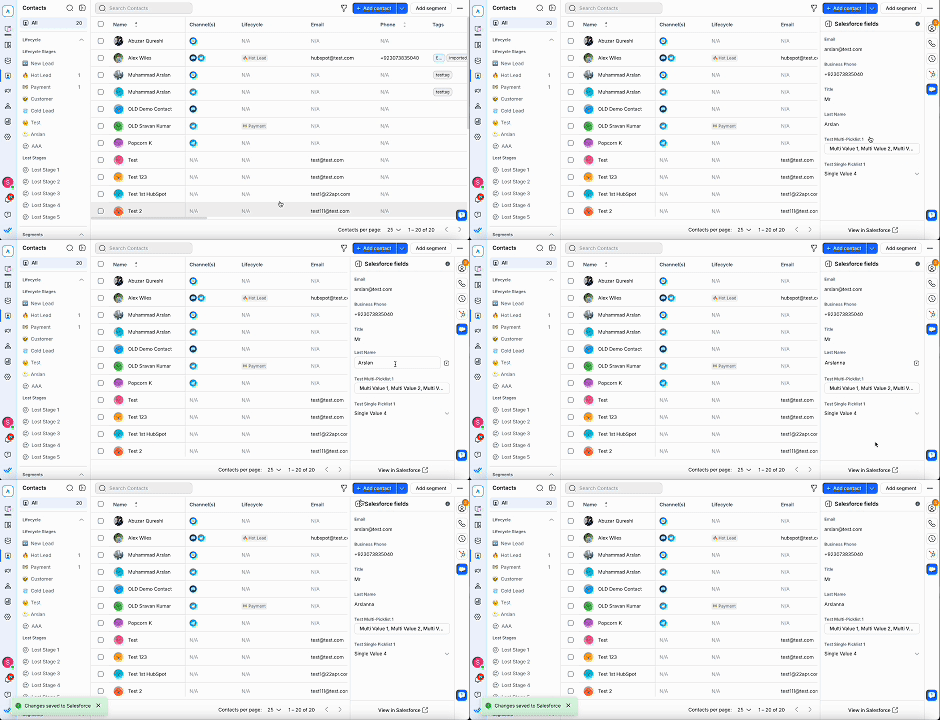
Access the Contacts module and select a contact.
Select the Salesforce icon.
Click on the Salesforce property you want to edit and update the information. Your changes sync immediately to Salesforce.
Sync Contacts from Salesforce
Contact sync automatically creates and updates respond.io Contacts using data from your connected Salesforce account. Synced fields work like any other Contact field, so you can use them in Inbox filters, Broadcast segments, Workflows, and AI Agents.
Turn on Contact sync

Go to Workspace settings > Integrations > Salesforce.
Under Sync Contacts from Salesforce, turn on Turn on Contact sync.
Once enabled, respond.io automatically creates or updates Contacts when they're created or updated in Salesforce. Contact sync is off by default.
If you turn this toggle off later, your field mapping and sync settings are kept. Turning it back on restores them.
How Contacts are synced
Choose whether Contacts from Salesforce are created, updated, or both in respond.io. Field mapping decides which fields sync.
Click the dropdown to choose your sync mode:
Create and update Contacts: Creates new Contacts and updates existing ones.
Create Contacts only: Creates new Contacts. Existing Contacts aren't updated.
Update Contacts only: Updates existing Contacts. New Contacts aren't created.
Note: If you previously had Create Contacts automatically turned on, Contact sync is now on and set to Create Contacts only, with Create Contacts from new Salesforce contacts only selected. If it was off, Contact sync is off.
How Contact matching works
When a Salesforce contact is created or updated, respond.io first looks for a Contact already linked to it. If there isn't one, it looks for a matching Contact by email, then by phone number.
If more than 1 Contact matches, respond.io uses the oldest Contact.
Once matched, the Contact is linked to the Salesforce contact. Later updates go straight to the linked Contact instead of searching again.
If the matching Contact is already linked to a different Salesforce contact, the update is skipped.
Only fields included in your field mapping are updated. Unmapped fields are ignored, and only the fields that changed in Salesforce are written.
Whether an unmatched contact creates a Contact depends on your sync mode:
Create and update Contacts: it always creates one.
Create Contacts only: it creates one, unless Create Contacts from new Salesforce contacts only is selected and the contact was updated rather than created.
Update Contacts only: it never creates one.
Deleted and merged contacts
If a contact is deleted in Salesforce, its respond.io Contact is unlinked. A later update from Salesforce can link it again if it matches.
When you merge 2 Contacts in respond.io, the primary Contact keeps its Salesforce link. If the primary Contact isn't linked, it takes the Salesforce link from the secondary Contact.
Advanced settings
Under How Contacts are synced, click Advanced settings to expand additional settings.
Note: Which settings appear depends on your sync mode. Update Contacts only hides all 3. Create and update Contacts hides Create Contacts from new Salesforce contacts only.

Add “Auto-Create: Salesforce” tag
Automatically adds the tag “Auto-Create: Salesforce” to Contacts created through Contact sync.
This helps identify how the Contact was sourced, but won't trigger Workflows on respond.io.
The tag is listed in the Tags module and can't be manually removed or edited.
Include bulk-imported Contacts from Salesforce
When selected, contacts added to Salesforce through bulk import are also created in respond.io.
These Contacts don't count towards MAC (Monthly Active Contacts) and don't trigger Workflows unless a conversation starts.
Create Contacts from new Salesforce contacts only
This checkbox only appears when How Contacts are synced is set to Create Contacts only.
Selected: only contacts newly created in Salesforce create a Contact. An update to a Salesforce contact won't create a Contact, even when no match is found.
Cleared: both new and updated Salesforce contacts create a Contact when no match is found.
It's cleared by default. For Workspaces that had Create Contacts automatically turned on, it's selected.
Field mapping
Choose which Salesforce fields sync to respond.io Contact fields. You can map any Salesforce contact field, including custom fields.
Click Configure field mapping to open the setup dialog.
Select a Salesforce field, then the respond.io Contact field it syncs to. Only Contact fields with a compatible data type are listed. Any Salesforce field can map to a text field.
Click Add field mapping to add more pairs.
Click Save.

Every Salesforce connection starts with these default mappings, which you can edit anytime:
Email → Email
Phone or Mobile Phone → Phone
First Name → First Name (uses Email, Phone or Mobile Phone when First Name is empty)
Last Name → Last Name
Mailing Country Code → Country
You can also map the Salesforce Contact Owner to Assignee. The Salesforce owner is matched to a user in your Workspace by email. If no user matches, the assignee doesn't change.
Note: When Contact Owner is mapped to Assignee, changing the owner in Salesforce reassigns the Contact in respond.io. Lifecycle and assignee changes made by Contact sync show Salesforce as the source in the Lifecycle and Assignments reports.
FAQ and Troubleshooting
Can I connect multiple Salesforce accounts?
No, each workspace can only connect to one Salesforce account.
Can I edit Salesforce data in respond.io?
Yes, once your Workspace admin turns on Allow users to edit Salesforce fields. See Editing Salesforce Contact Fields for more details.
Why am I not seeing recent edits from Salesforce in my respond.io workspace?
Contact information is cached for 1 minute to limit excessive API requests and reduce the chances of reaching Salesforce’s API rate limit.
During that minute, any direct edits to a Contact in Salesforce will not immediately appear in respond.io. After 1 minute, you can refresh the page to display the latest information.
Why didn't a Salesforce update sync to my respond.io Contact?
Check the following:
Contact sync is turned on, and the change was made after you turned it on.
The changed Salesforce field is included in your field mapping.
How Contacts are synced is set to Create and update Contacts or Update Contacts only.
The Contact isn't already linked to a different Salesforce contact.
The value fits the respond.io field. For example, a Salesforce value with no matching Lifecycle stage, or a value that can't be converted to the field's data type, is skipped.
Why can’t I view my Salesforce contact fields in respond.io?
If you can’t view your Salesforce contact fields in our Inbox or Contacts module, check that their email or phone number in respond.io exactly match those in Salesforce. Even minor differences, such as spaces or special characters, can prevent fields from being displayed.
For example, if a phone number is stored as “12 3” in Salesforce but as “123” in respond.io, that Contact’s information won’t be displayed in respond.io. To fix this, update the contact field in Salesforce to match the format used in respond.io.
What happens if I update a contact’s email or phone number in Salesforce?
If Contact sync is on and set to Create and update Contacts or Update Contacts only, the Contact stays linked to its Salesforce contact. If Email or Phone is in your field mapping, the new value syncs to the Contact.
If Contact sync is off, Salesforce fields only appear on a Contact whose email or phone number exactly matches Salesforce. Update the Contact in respond.io to match.
What happens if a contact is missing from respond.io?
Ensure the email or phone number exists in Salesforce.
To create Contacts from Salesforce, turn on Contact sync and set How Contacts are synced to Create and update Contacts or Create Contacts only.
Contact sync doesn't backfill. Contacts that existed in Salesforce before you turned it on are only created once they're updated in Salesforce, unless Create Contacts from new Salesforce contacts only is selected.
Changes in Salesforce may take a few minutes to reflect in respond.io due to caching.
Why am I seeing a ‘Salesforce API access required’ error?
Your Salesforce account must have API access to use the integration.
Contact your Salesforce admin to enable API permissions.
Can I connect multiple workspaces to the same Salesforce account?
Yes, multiple respond.io workspaces can connect to the same Salesforce account.
What happens if I disconnect Salesforce?
Disconnecting removes access to Salesforce data and stops syncing in this Workspace. You can reconnect anytime to restore access.


