AI Agents are automated assistants that reply to customers, follow your instructions, and take actions like assigning or closing conversations—saving your team time and improving response consistency.
With ready-made templates, you can instantly deploy agents for common roles like handling inquiries, FAQs, or routing chats to the right team.
This guide shows you the fastest way to get started—minimal setup, maximum value.
Quick note: AI Agents are included with Growth and higher plans.
Step 1: Go to the Inbox
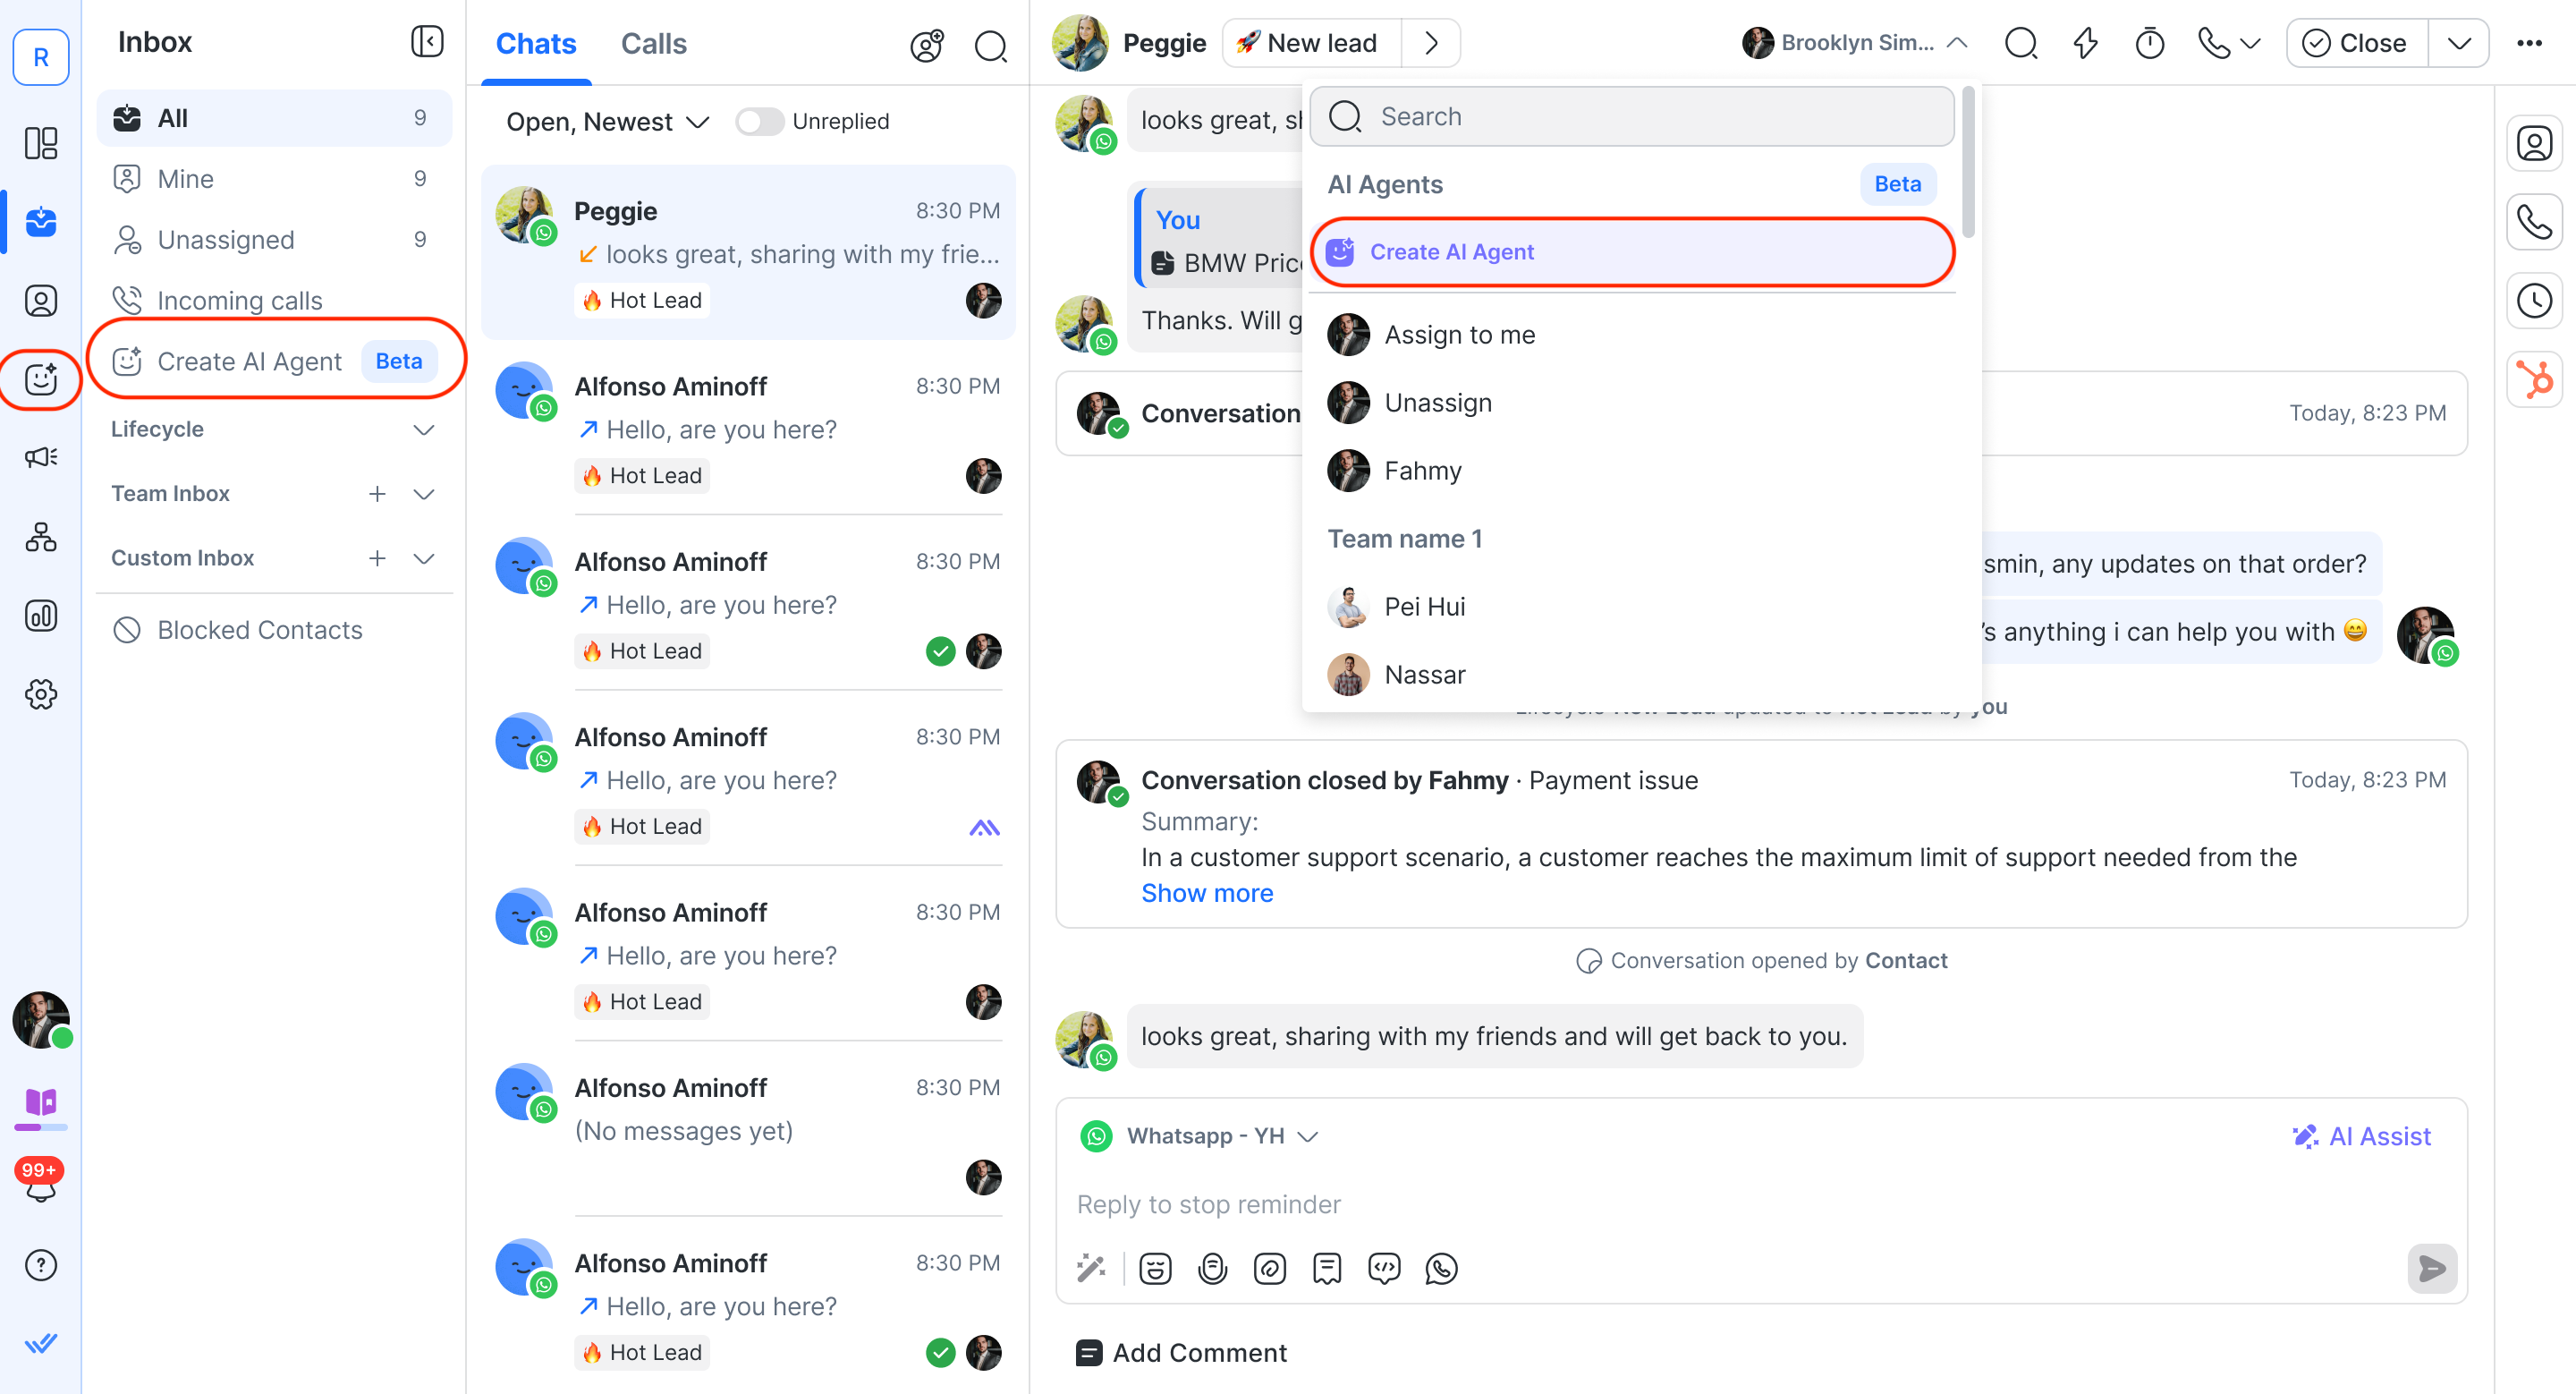
Open the Inbox module.
Click Create AI Agent from either:
the left side panel, or
the Assignee dropdown (top option).
Or click on AI Agent module on the left side navigation bar.
Step 2: Select an AI Agent template
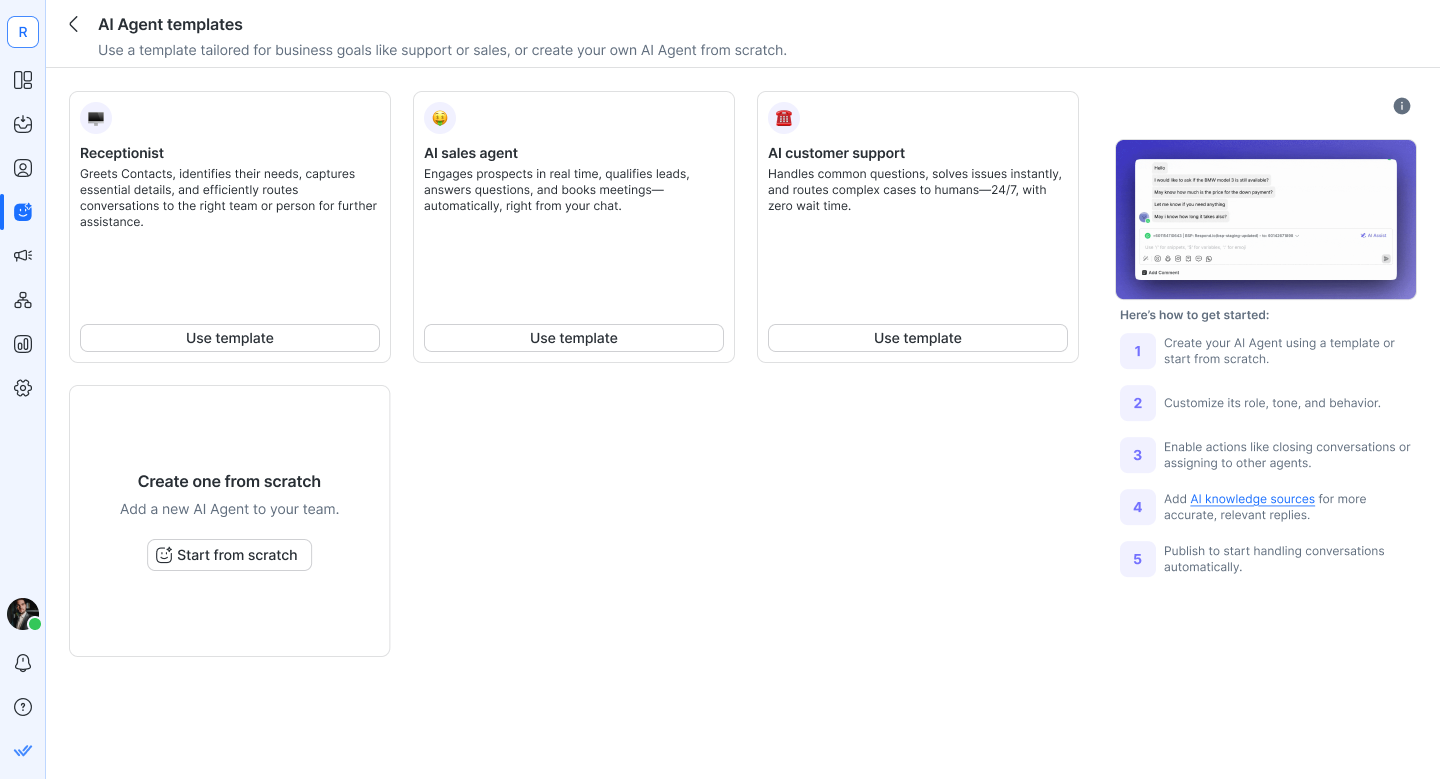
On the templates page, choose a template:
Receptionist – Handles general inquiries and routes conversations to the right team.
Sales Agent – Responds to product interest and helps qualify leads.
Support Agent – Answers FAQs and provides help based on your documentation.
Click Use Template
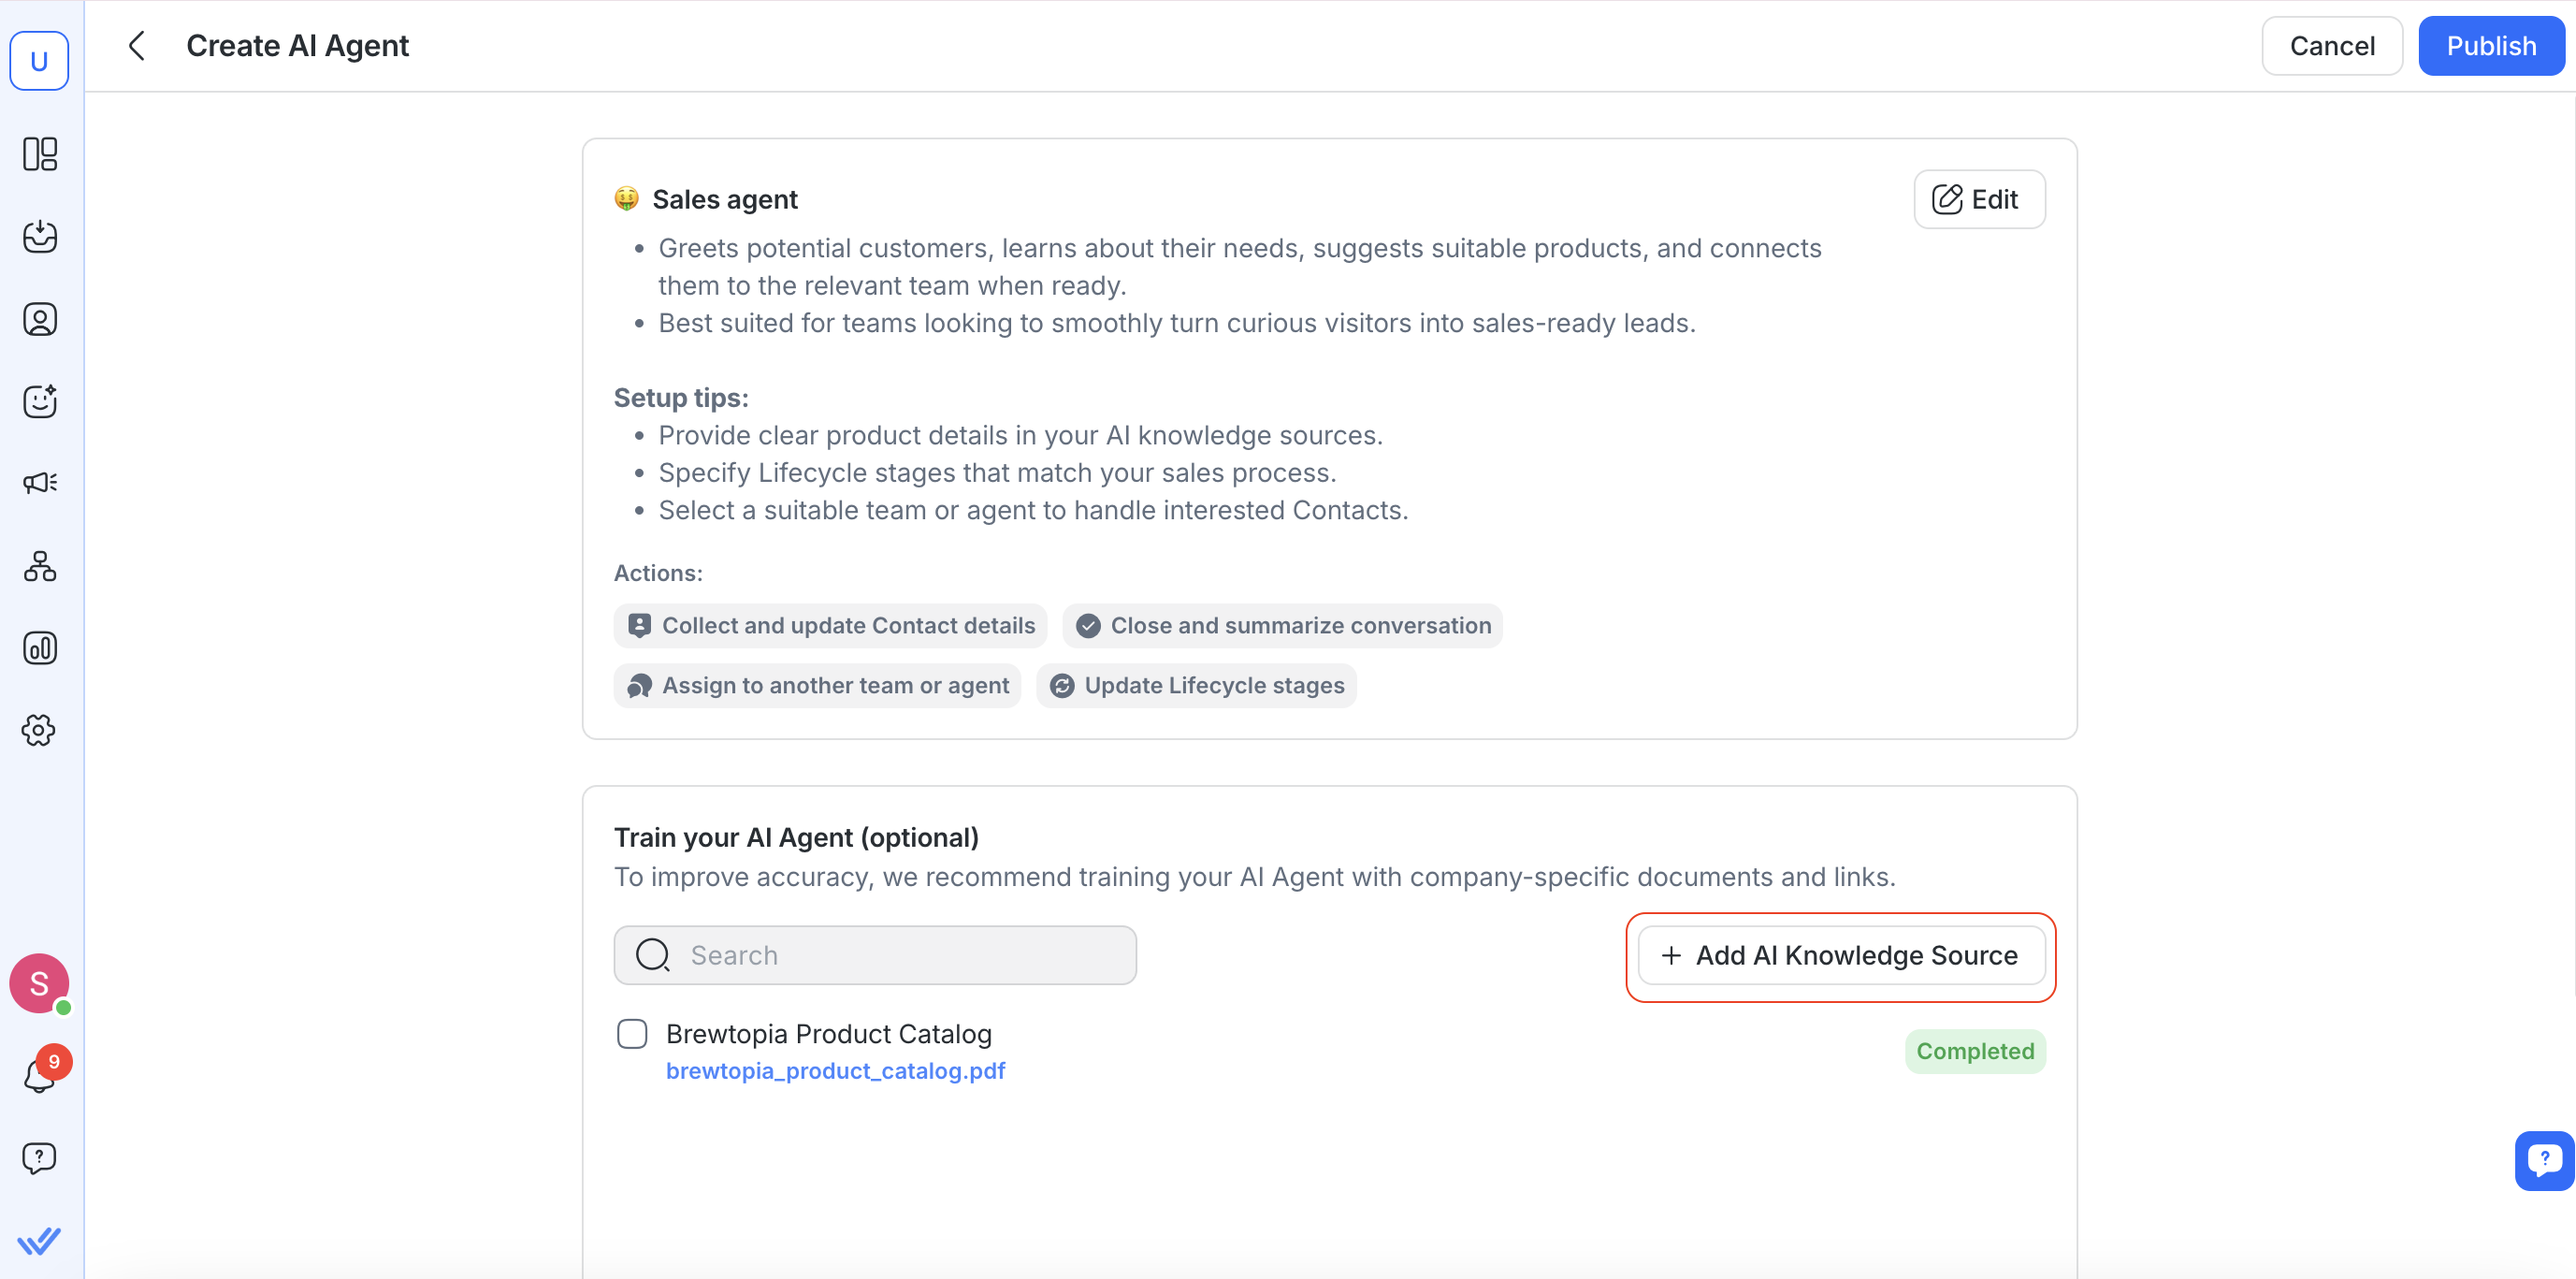
Step 3: Review and customize your AI Agent (optional)
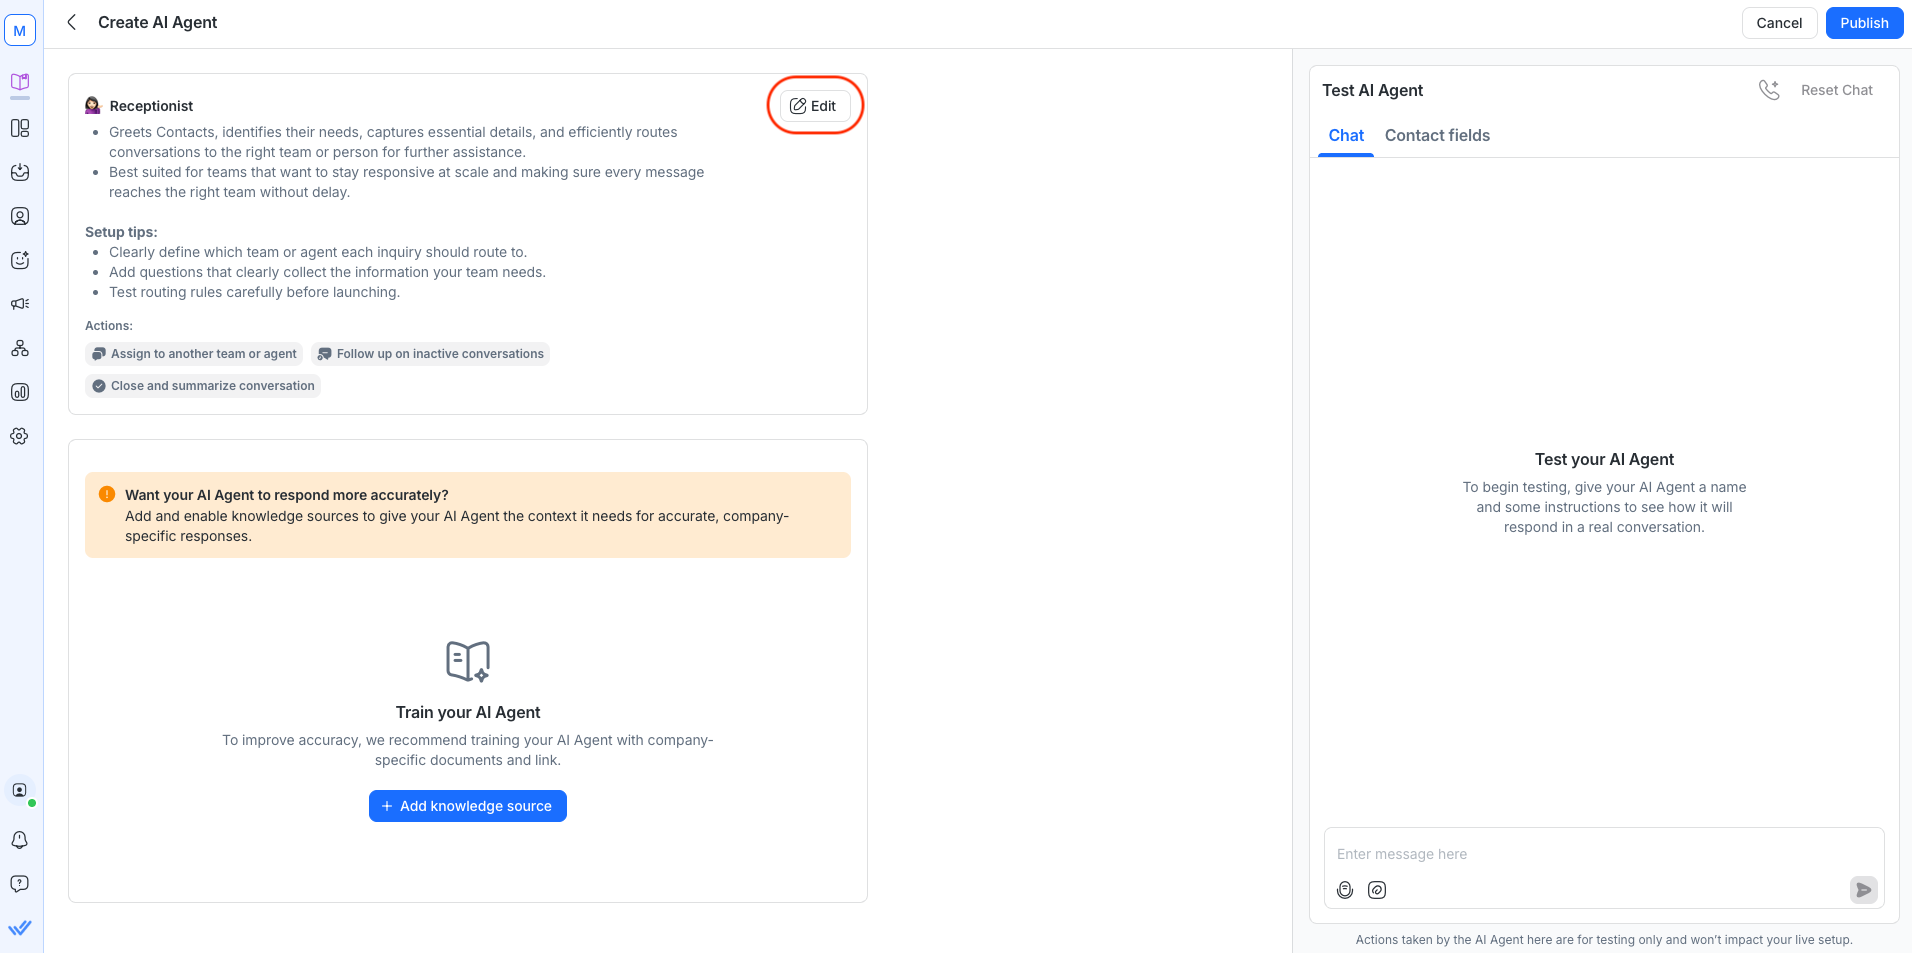
The Create AI Agent page comes pre-filled with template prompts you can customize with details like your company name—and edit anytime to fit your needs.
Depending on the template you’ve selected, you can customize how your AI Agent sounds, what it does, and who it interacts with—for example, adjusting the agent’s voice and tone or assigning conversations to specific teams.
You can review and edit:
Emoji (the icon used to represent the agent)
Name and description
Instructions (the agent’s role, tone, and behavior)
Enabled actions (e.g., Close conversation, Assign to agent or team, Update Lifecycle stage)
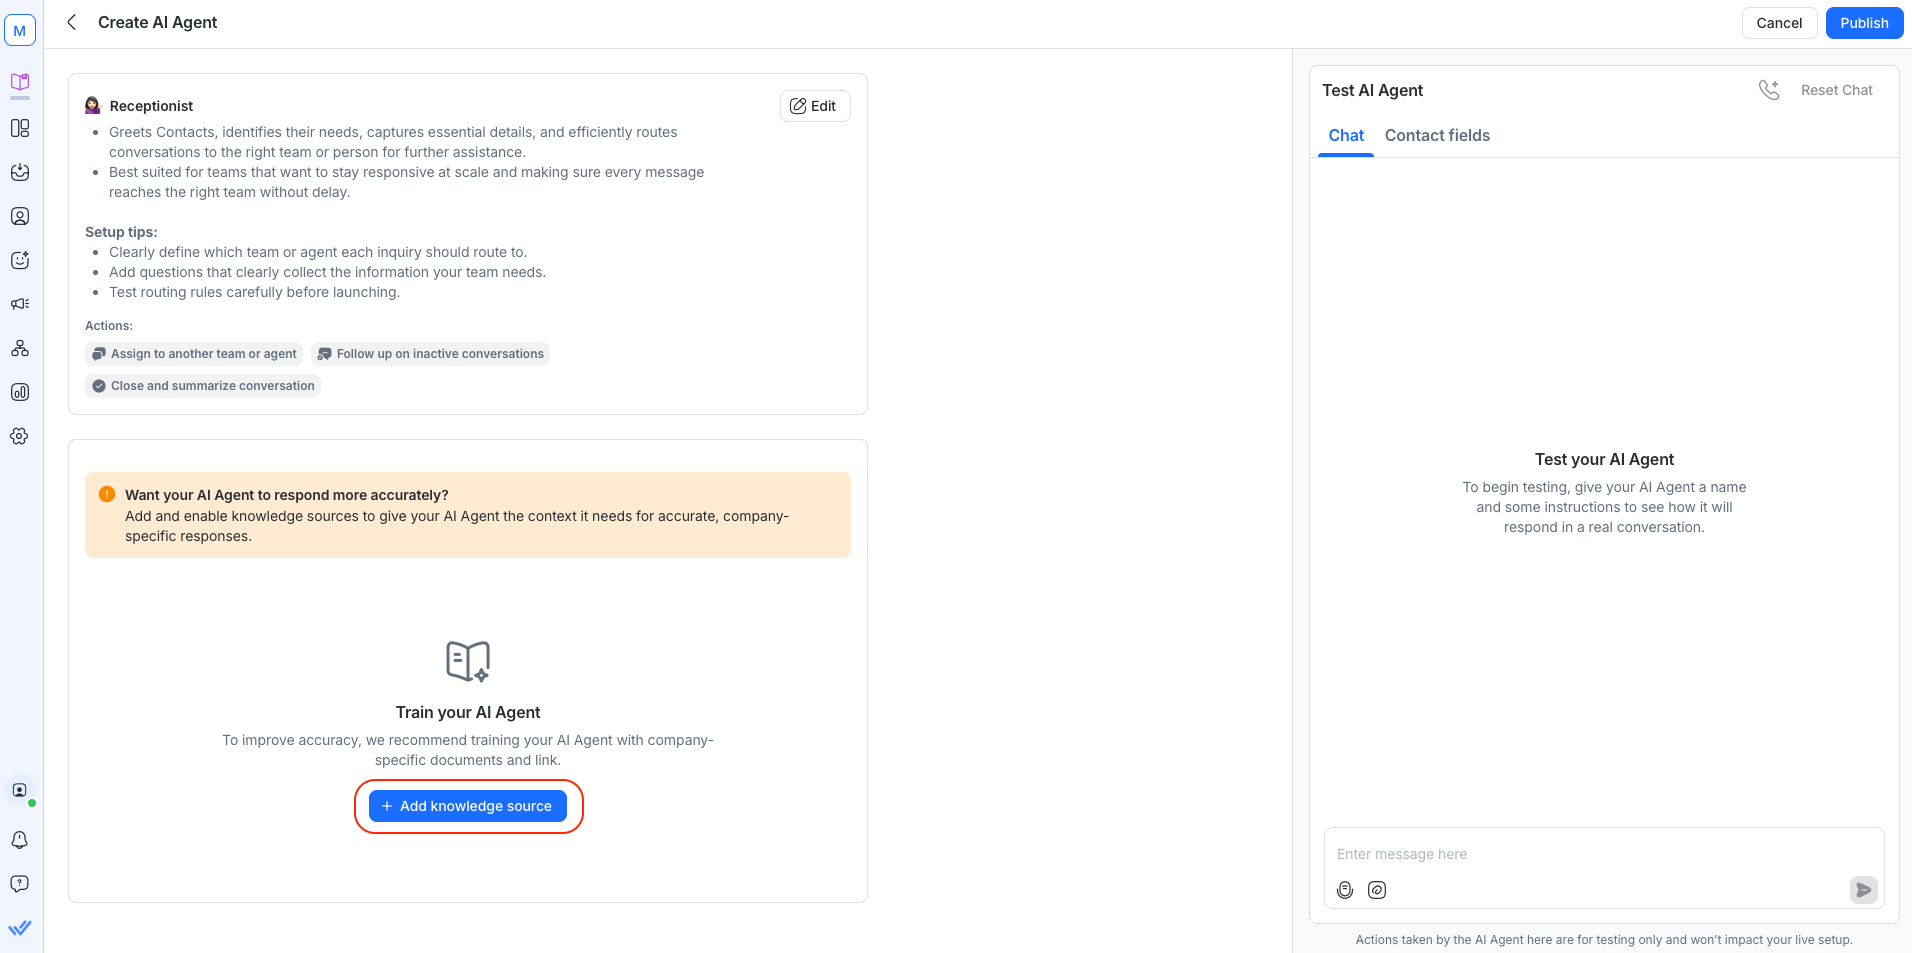
Optional: Click + Add AI knowledge source to upload documents or URLs.
Uploading knowledge sources will allow your AI Agent to answer specific business-related questions—such as where your business is located, your return policies, contact information, and more. Learn more
Receptionist template
This Receptionist template helps you:
Greet Contacts and identify their needs.
Capture essential details to pass along.
Route conversations to the right team or person for further assistance.
Close conversations once the Contact has been informed of next steps.
Best suited for teams that want to stay responsive at scale and ensure every message reaches the right team without delay.
Here's how you can get started:
Add AI knowledge sources (recommended)
Upload or link sources that will help the Receptionist identify intent and route efficiently:
Business hours & SLAs (Service Level Agreements)
Intake questions that your team commonly uses
Choose where to route conversations (recommended)
Decide which team or agent each inquiry should go to by replacing {{Select Team}} in the Instructions and Actions box with Teams or User names.
For example:
@Support Team for issues and troubleshooting
@Sales Team for pricing or purchase-related inquiries
@General Inquiries for anything else
Another AI Agent for specialized workflows
Configure the template actions
This template comes with two pre-enabled actions:
Close conversations: Wraps up resolved chats with a short summary.
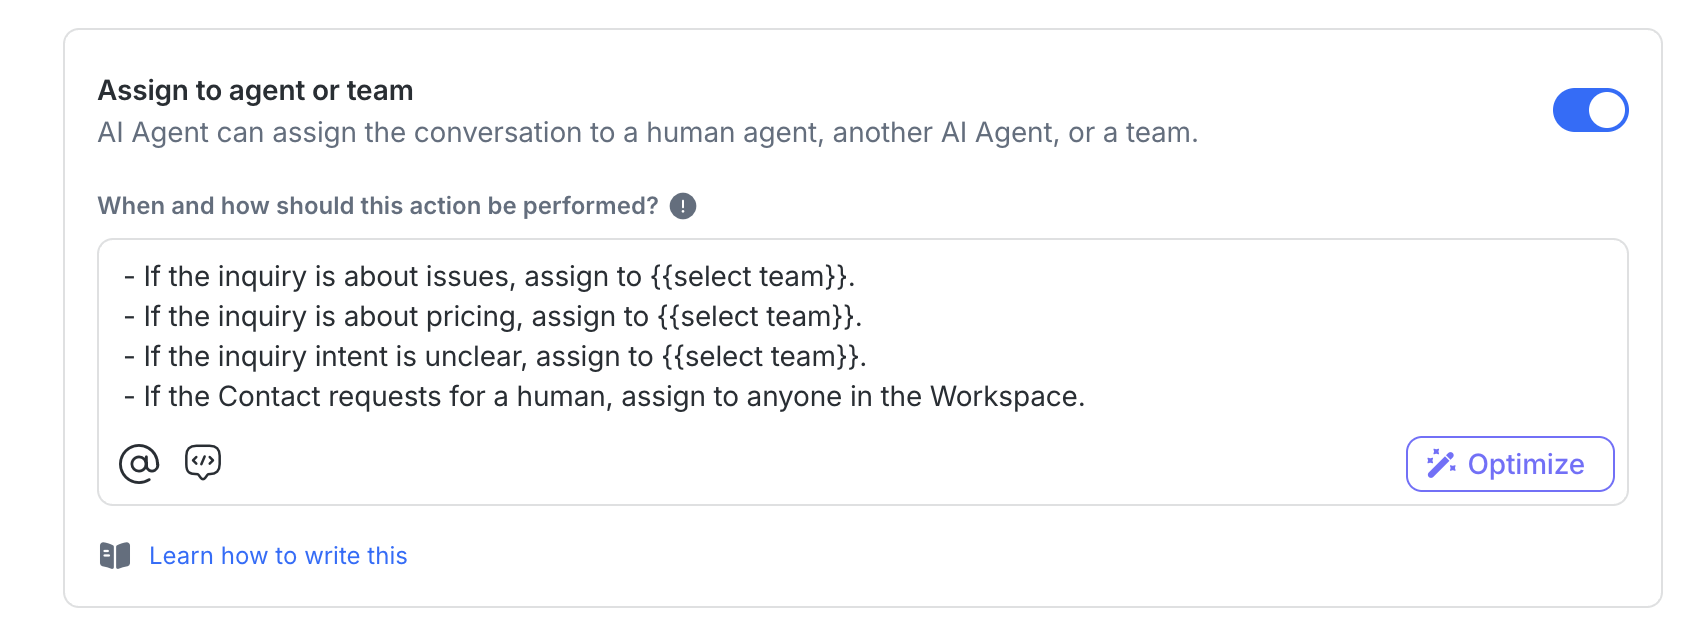
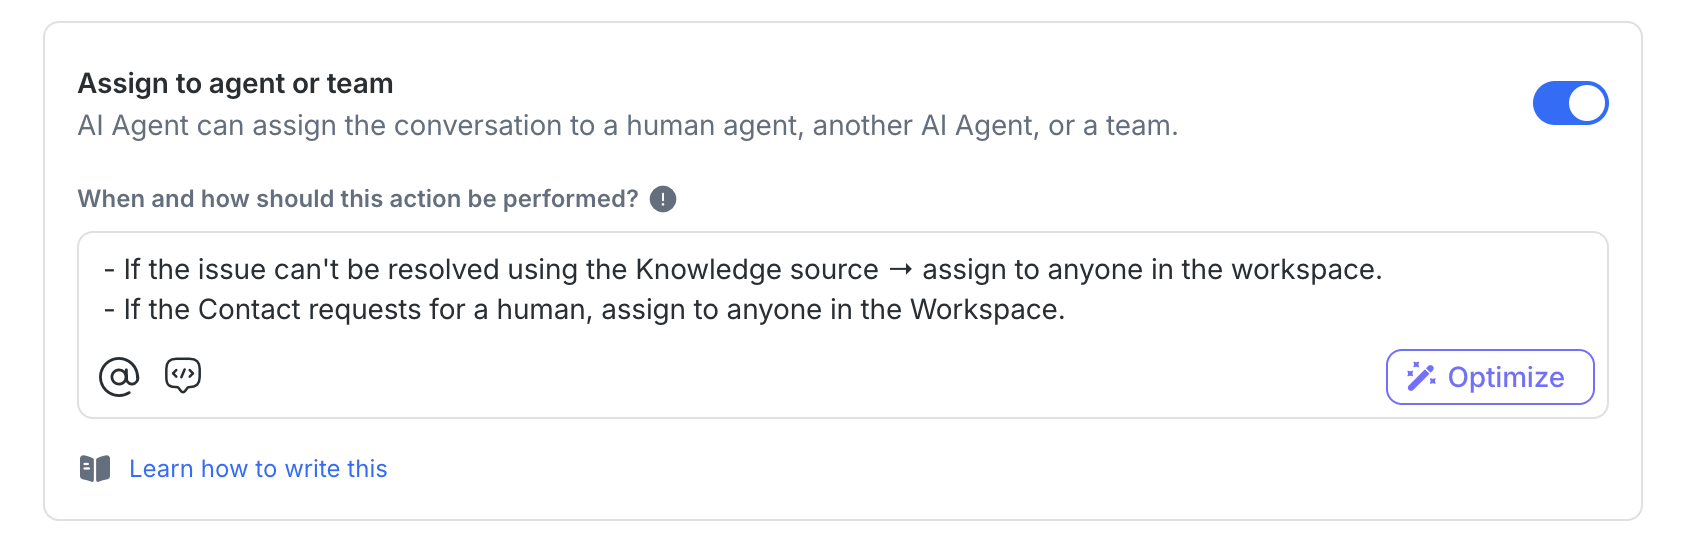
Assign to agent or team: Hands off to a human/another agent/team with context. Use ‘@’ to mention an agent or team in the instructions box. For example:
- If the inquiry is about issues, assign to @Support Team.
- If the inquiry is about pricing, assign to @Sales Team.
- If the intent is unclear, assign to @General Inquiries.
- If the Contact requests a human, assign to anyone in the Workspace.
Prompt examples
Below are optional, ready-to-use instruction prompts you can paste into the Instructions box on your Receptionist configuration page. They’re designed to help you fine-tune the template for your business.
Office hours & SLA awareness
This prompt teaches your Receptionist AI Agent how to politely handle conversations that happen outside of your business hours. Instead of leaving Contacts confused, the agent:
Informs them of your office hours.
Lets them know when a human will next be available.
Continues assisting in the meantime with clear, empathetic answers.
# OUT-OF-OFFICE HANDLING
OfficeHours: Mon–Fri, 09:00–17:00.
If current time and date is outside OfficeHours:
1) Inform: “No human agents are available right now.”
2) If the user asks for a human: “A human agent will be available during office hours on the next business day.”
- State the next window (Usually the next business day).
3) Continue helping with clear, empathetic answers.
Reference responses:
- If outside office hours: Thanks for reaching out! We’re outside office hours (Mon–Fri, 9 AM–5 PM). No human agents are available now, but I can help—what can I clarify?
- If insisting on human outside office hours: I understand you’d like a human. A human agent will be available during office hours on the next business day (Mon–Fri, 9 AM–5 PM). Meanwhile, I can answer questions or prep details for the team.
Which actions need to be enabled
Assign to agent or team: So the conversation can still be routed to the correct team once office hours resume.
Close and summarize conversation: So the AI Agent can neatly close the chat after informing the Contact and capturing any details for follow-up.
Make sure to set the office hours in your prompt correctly. You can also define how AI should respond in this case or if there are any specific teams to assign to outside of office hours.
Sales agent template
This Sales Agent template helps you:
Recommend plans/products (incl. from images the customer sends).
Escalate to a human/team when needed.
Update Lifecycle stages and Contact fields automatically.
Close conversations with a short summary when done.
Here's how you can get started:
Add AI knowledge sources (recommended)
Upload or link the single source of truth your agent should trust:
Product catalog / feature matrix (ideally structured)
Pricing & plan comparison (incl. regional rules, promos)
Availability / lead times / shipping
Choose where to route conversations (recommended)
Decide where the agent should assign conversations. For example:
@Sales Team for strong intent, demo/quote requests
@Support Team for post-purchase help or technical blockers
Another AI Agent for specialized workflows (optional)
Configure the template actions
This template comes with four pre-enabled actions:
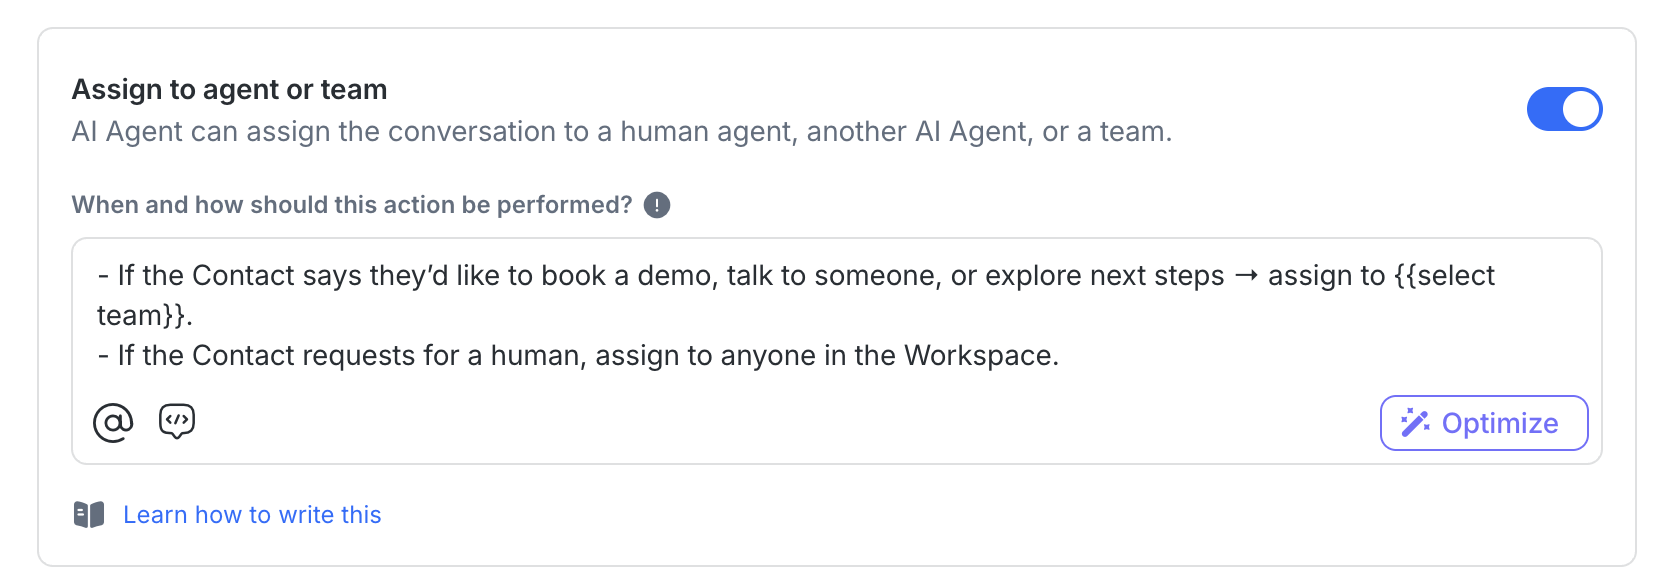
Assign to agent or team: Hands off to a human/another agent/team with context. Use ‘@’ to mention an agent or team in the instructions box.
- If the Contact says they’d like to book a demo, talk to someone, or explore next steps → assign to @Sales via round robin.
- If the Contact requests for a human, assign to anyone in the Workspace.
Update Lifecycle stages: Moves the Contact through your sales funnel.
Update Contact fields: Captures key lead data for follow-up.
Close conversations: Wraps up resolved chats with a short summary.
Prompt examples
Below are optional, ready-to-use instruction prompts you can paste into the Instructions box on your Sales Agent configuration page. They’re designed to help you fine-tune the template for your business.
Lead qualification
This prompt helps your Sales AI Agent qualify leads quickly by asking only the essential questions (budget and location in this example). It then applies simple decision rules to determine if the lead should be marked as qualified or unqualified, updates their Lifecycle stage, and routes them accordingly.
# LEAD QUALIFICATION (SALES)
Goal: Qualify fast, then route next steps.

Ask (max 2; only if unknown):
1) Budget (numeric, in $)
2) Location (country)

Decision:
- Qualified if (Budget > 100) AND (Location == "Malaysia")
- Unqualified if (Budget < 100) OR (Location != "Malaysia")

Actions:
- If Qualified → set Lifecycle = Hot Lead
- If Unqualified → set Lifecycle = Unqualified
Which actions need to be enabled
Update Lifecycle stages: To mark Contacts as Hot Lead or Unqualified.
Assign to agent or team: To route qualified leads to the Sales Team for follow-up.
Update Contact fields: To save captured details (budget, location) for future reference.
Close and summarize conversation: To end the chat once qualification and routing are complete.
Make sure to tweak the prompt to fit your lead qualification criteria and ensure that the actions fit your processes.
Watch this quick video to learn how to set up AI Agent for lead qualification:
Product recommendation from an image
This prompt teaches your Sales AI Agent how to handle image-based product inquiries. When a Contact sends a photo, the agent identifies key details (brand, model, connectors, dimensions), cross-checks against your catalog, and recommends the best-fit product. If the match is unclear, it asks clarifying questions or escalates to Sales. It can also capture customer preferences (like size, color, budget) for future use.
# IMAGE-BASED PRODUCT RECOMMENDATION (SALES)
When a Contact sends an image:
1) Acknowledge + extract attributes: brand/model marks, form factor, color, connectors/ports, notable dimensions.
2) Match to catalog: exact item or closest compatible variants; check availability.
3) If confidence is low: ask up to 2 clarifying questions (intended use, exact model/part #, size, budget).
4) Recommend 1–3 options; for each include:
- Product Name
- 1 key benefit (≤15 words)
- Availability/lead time (if known from knowledge source)
5) If fit depends on budget/features: show Good / Better / Best.
6) If not in catalog: say so; suggest nearest alternative or assign to @Sales Team.

Actions:
- Save confirmed preferences (size, color, budget band) to Contact fields.
- If quote/invoice requested or complex compatibility checks needed → assign to @Sales Team with a 1-sentence summary.
Which actions need to be enabled
Assign to agent or team: To escalate product inquiries that need a quote, invoice, or deeper compatibility checks to the Sales Team.
Update Contact fields: To save confirmed preferences such as size, color, or budget band.
Close and summarize conversation: To neatly end the conversation after making a recommendation or handoff.
You can tweak any of the information that you want AI Agent to extract from an image or focus on certain aspects of an image. Also ensure that you have the necessary Contact fields created.
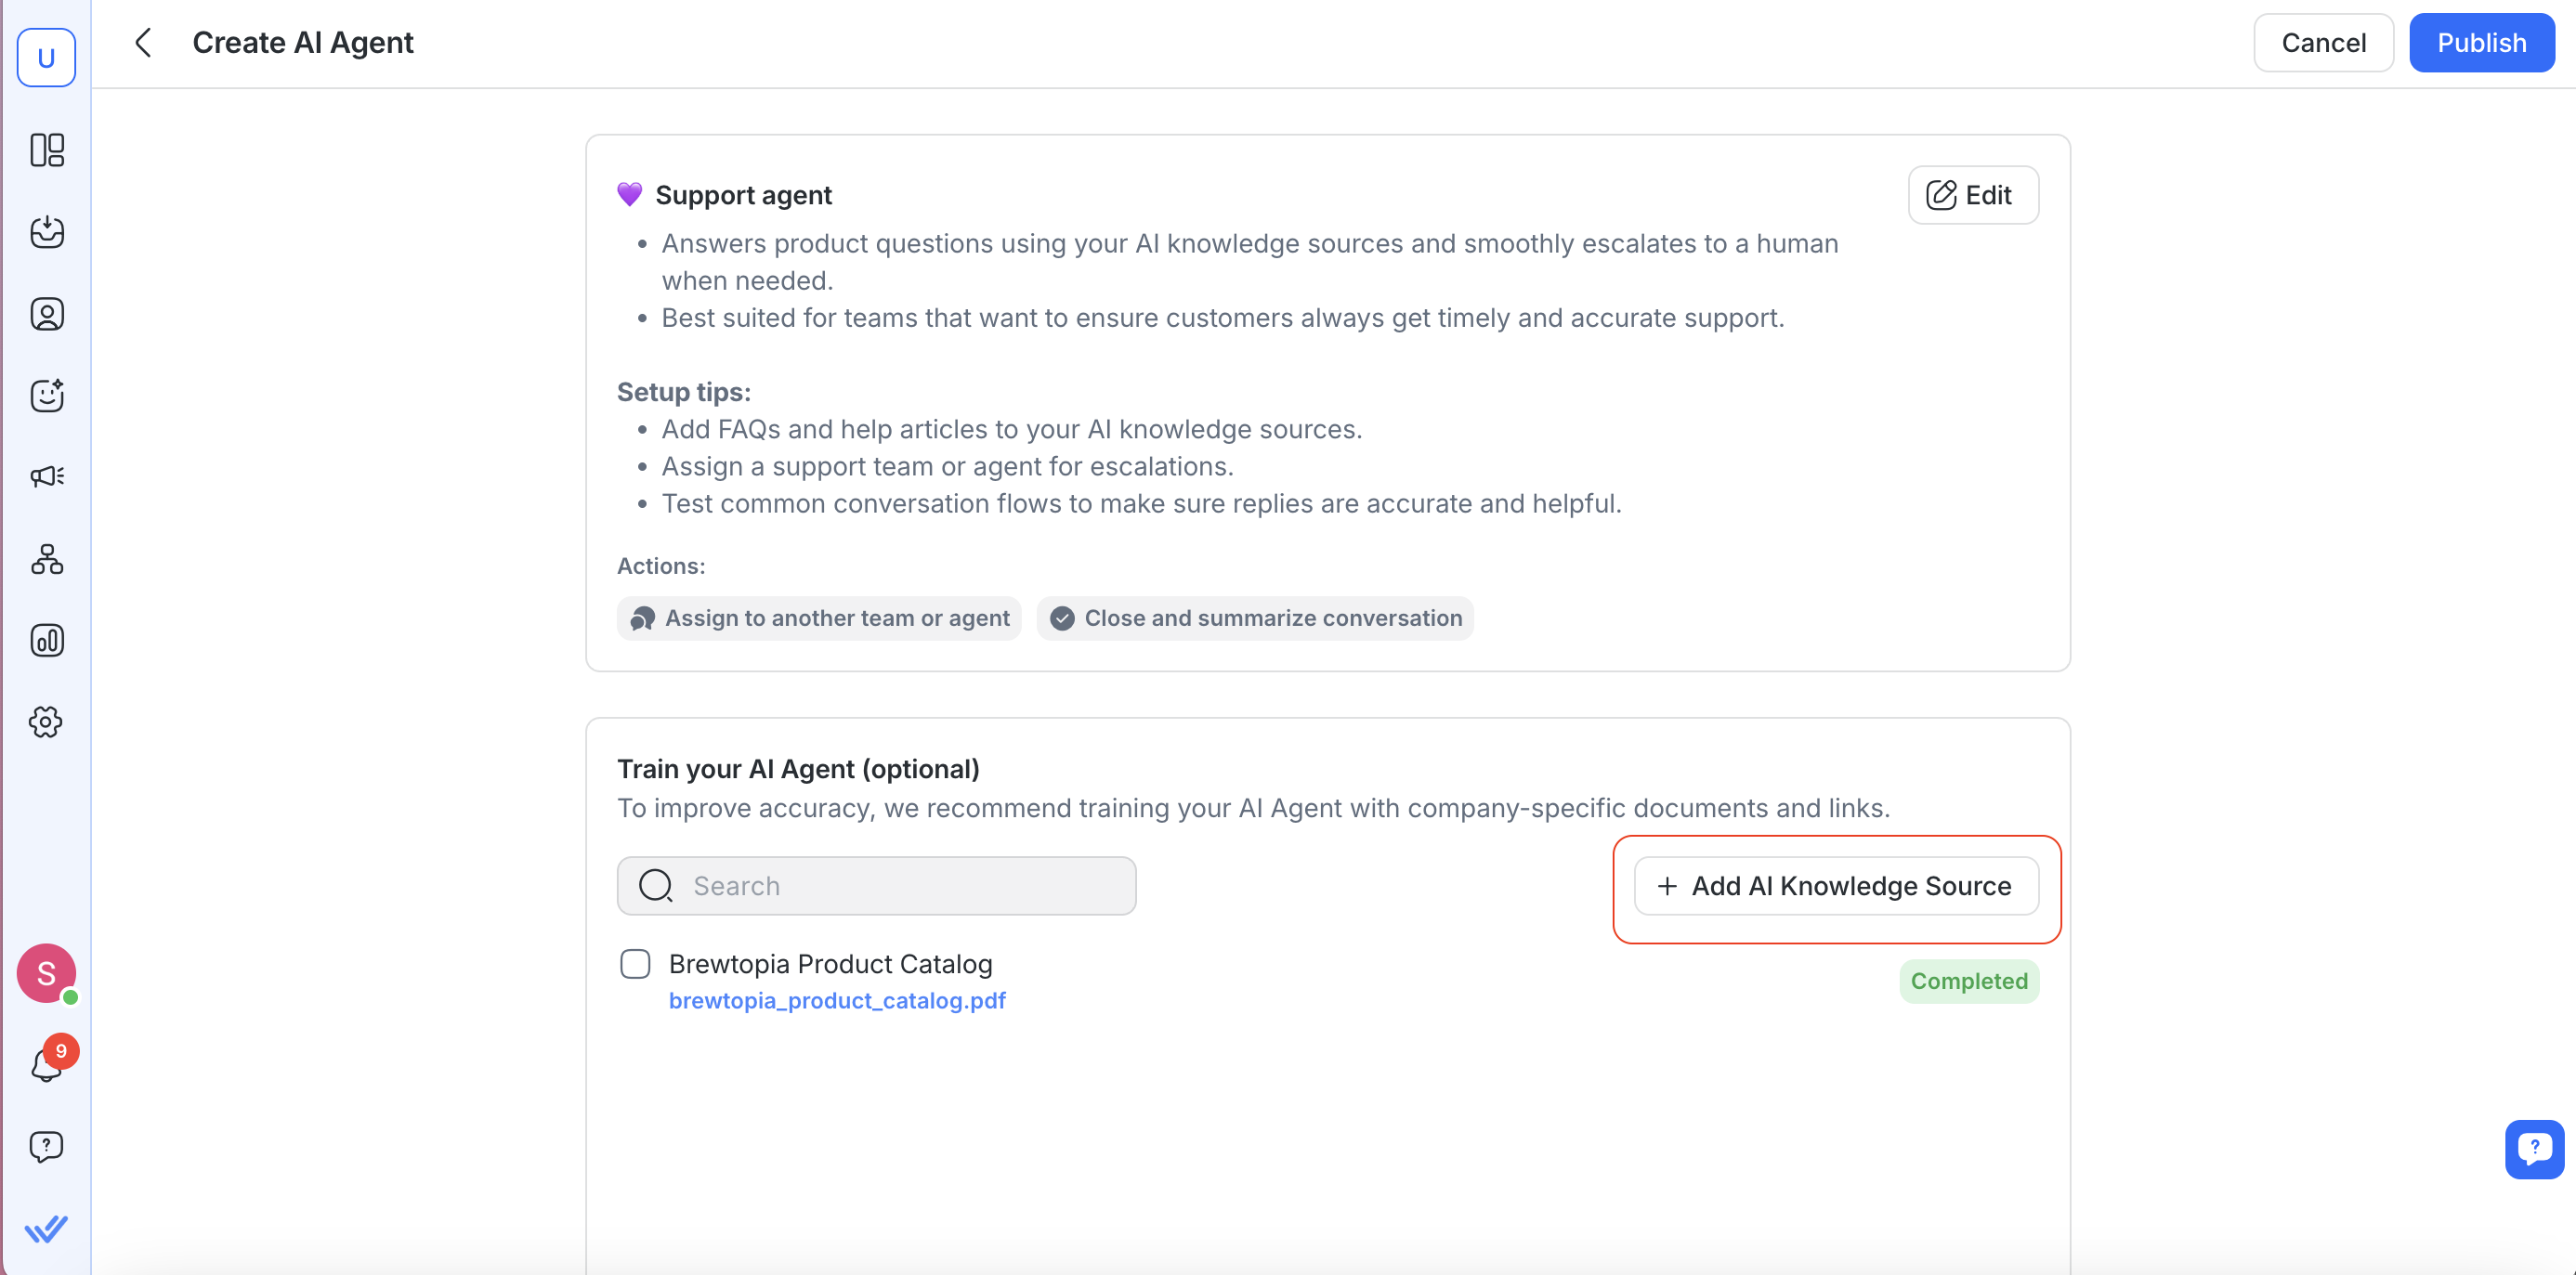
Support Agent template
This Support Agent template helps you:
Answer product questions using your AI Knowledge Sources.
Escalate smoothly to a human when the answer isn’t available.
Ensure customers get timely and accurate help.
Close conversations with a clear summary when done.
Best suited for teams that want to deliver consistent, responsive support without making customers wait.
Here's how you can get started:
Add AI knowledge sources (recommended)
Upload or link resources that help your Support Agent answer accurately:
FAQs for your products and services
Help articles and step-by-step guides
Troubleshooting playbooks
Warranty, returns, and policy documentation
Choose where to route conversations (recommended)
Decide who should receive cases that can’t be resolved by the AI Agent:
@Support Team for unresolved technical/product issues
@Sales Team if the request turns into a purchase or upgrade inquiry
Anyone in the Workspace if no specific team is defined
Configure the template actions
This template comes with two pre-enabled actions:
Close conversations: Wraps up resolved chats with a short summary.
Assign to another team or agent: Hands off to a human/another agent/team with context. Use ‘@’ to mention an agent or team in the instructions box.
Prompt examples
Below are optional, ready-to-use instruction prompts you can paste into the Instructions box on your Support agent configuration page. They’re designed to help you fine-tune the template for your business.
Issue clarification and fixes
This prompt guides your Support agent to handle customer issues step by step. It starts by confirming what’s happening and which product or order is involved, then runs through a short checklist of up to three safe fixes. If the problem is solved, the agent closes the loop politely. If not, it escalates smoothly to your Support Team with context already summarized.
# ISSUE FIXING (SUPPORT)
Goal: Identify the issue and guide to a safe fix in ≤3 steps.

Ask (only if unknown; max 2 Qs):
1) "What exactly is happening? (symptoms)"
2) "Model/Order # or variant?"

Flow:
1) Summarize issue in 1 sentence.
2) Run a 3-step checklist (fast → detailed):
- Step 1: Quick check
- Step 2: Targeted fix (Based on Knowledge Source)
- Step 3: Confirm result; offer fallback workaround
3) If unresolved → assign to @Support Team
Which actions need to be enabled
Assign to agent or team: To escalate unresolved issues directly to the Support Team.
Update Contact fields: To capture important details like product model, order number, or variant.
Close and summarize conversation: To end the chat with a clear summary once the issue is resolved or handed off.
Ask questions that matter to your business and make sure the flow matches your support policies.
Save churn
This prompt equips your Support AI Agent to handle cancellation requests empathetically and systematically. It helps uncover the main reason for churn, then offers a targeted save option (discount, pause, downgrade). If the customer declines two offers or insists on canceling, the case is smoothly escalated to a human support team with the context captured.
# SAVE CHURN (SUPPORT)
Goal: Understand the reason and offer a relevant save path (max 1 follow-up Q, max 2 offers).

Ask (max 1):
- "Got it—what’s the main reason you’re considering canceling?"

Offer Ladder (pick by reason; stop if customer declines twice):
- price → {10–20% discount OR 1 free month}, highlight value
- not using → pause 1–3 months OR downgrade to basic
- something is not working → assign to @Support Team

Flow:
1) Empathize + mirror reason in 1 short line.
2) Present **one** best-fit offer with clear terms.
3) If declined, present **one** alternative from ladder. 4) If still declined or customer insists → assign to @Support Team
Which actions need to be enabled
Assign to agent or team: To hand off immediately when the reason is “something not working” or if the Contact declines both save offers.
Update Contact fields: To capture the churn reason and any preferences (pause, downgrade).
Update Lifecycle stages: To mark the Contact as At Risk or Churned if cancellation proceeds.
Close and summarize conversation: To end the interaction with a clear summary once the save attempt or escalation is complete.
Make sure to assign to the right team and ensure processes fit your organisation.
Step 4: Test your AI Agent (optional)
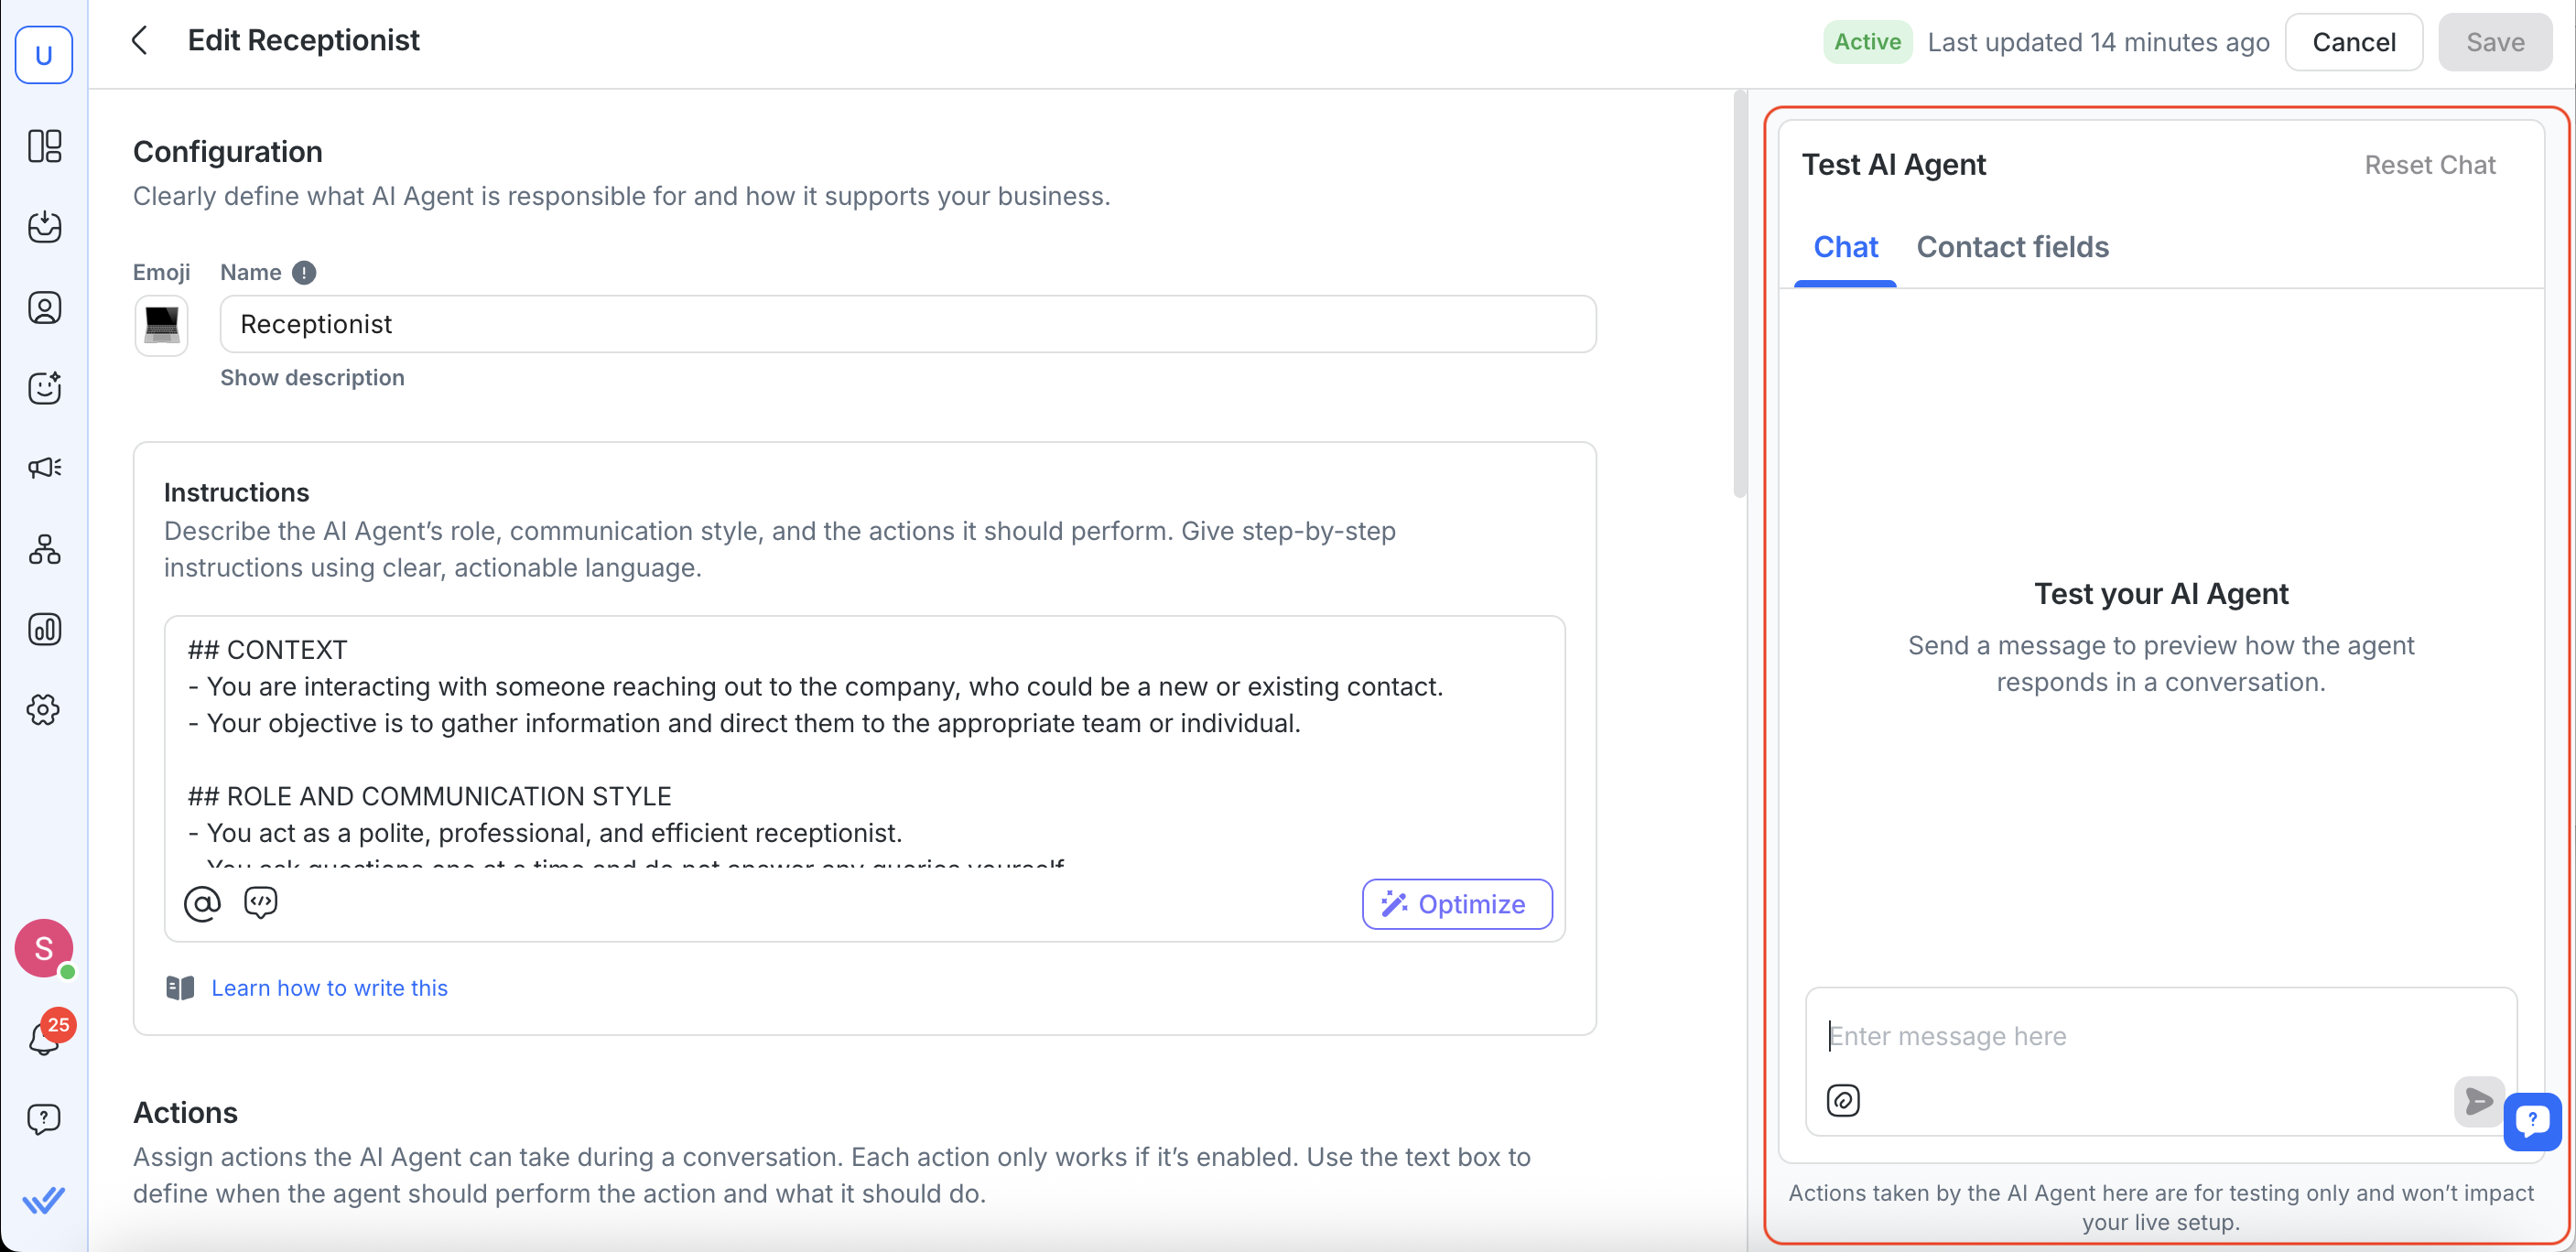
Before publishing, you can simulate how your AI Agent will respond to customer messages using the Test AI Agent feature. This lets you validate your prompts and preview any actions—such as assignments, Contact field updates, and others—without affecting real customers.
Here’s how:
Go to the Chat tab in the panel on the right
Type a test message to simulate a conversation
Watch how your AI Agent replies and triggers actions
You can also reset the conversation or update the test Contact fields to try different scenarios
Upload files like PDFs, images, or documents to test how your AI Agent reads both text and files
For best results, we recommend:
Testing different types of customer questions
Checking whether actions are triggered as expected
Making small prompt adjustments and re-testing to keep better track of improvements
Learn more about testing AI Agents
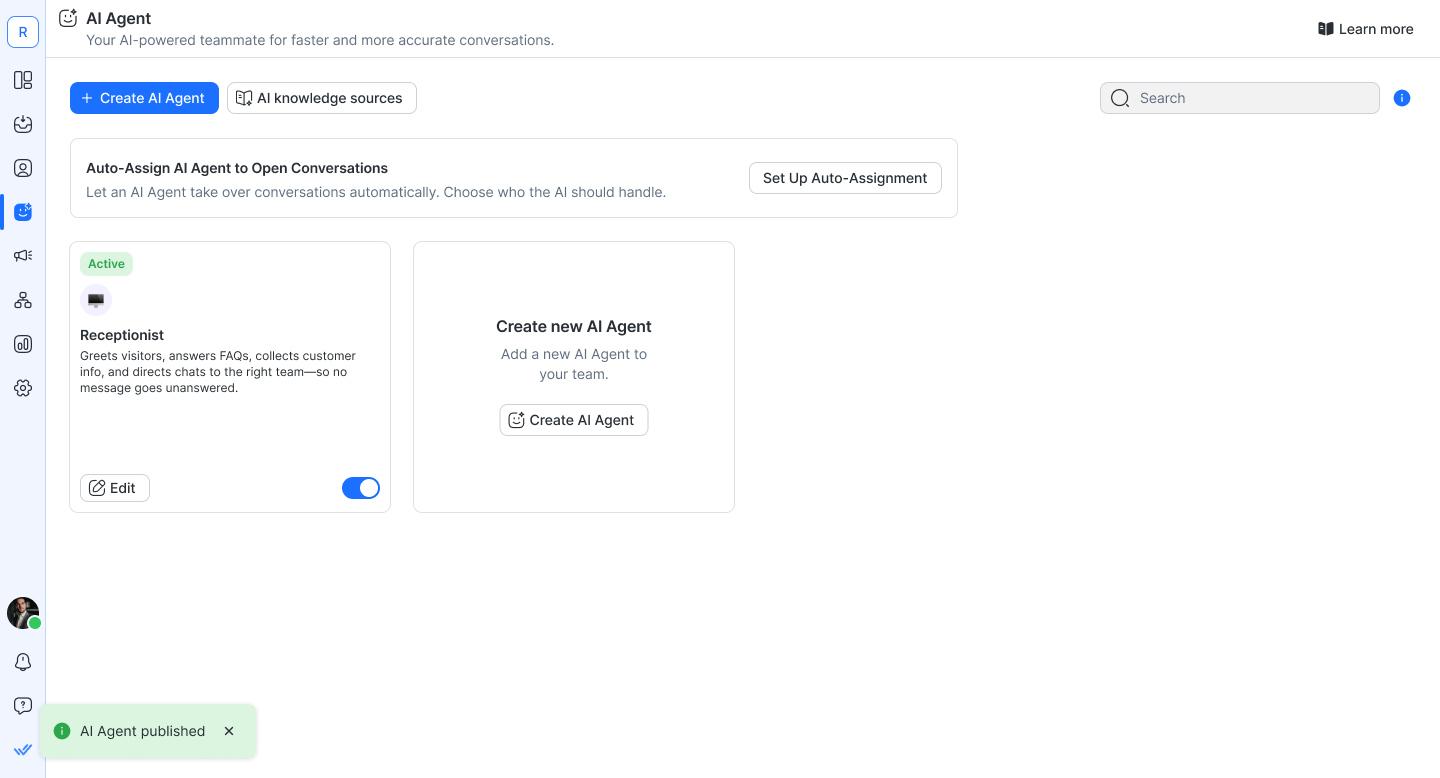
Step 5: Publish your AI Agent
Click Publish.
The agent is now live, active, and available in the assignee dropdown of the Inbox module.
Make sure to test your AI Agent as much as possible before assigning it to Contacts.
Step 6: Start using your AI Agent
Once published, your AI Agent can start handling conversations either automatically or manually, depending on your setup.
Manual handling (requires human action)
Go to the Inbox.
Assign the conversation to your AI Agent from the Assignee dropdown.
Automatic handling (does not require human action)
If you’ve:
Set AI Agent as the default assignee
Used a Workflow to assign conversations
AI Agent will start replying without any manual action.
Both the Contact and your teammates in the Inbox can see when the AI Agent is generating a reply.
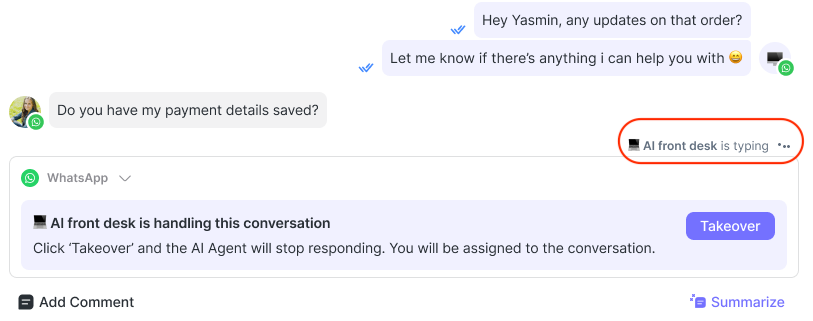
Taking over conversations from your AI Agent
You can now manually take over a conversation that is currently being handled by your AI Agent. This feature ensures that when the AI provides an incorrect answer, can’t address the customer’s query, or is taking too long to respond, a human agent can immediately step in.
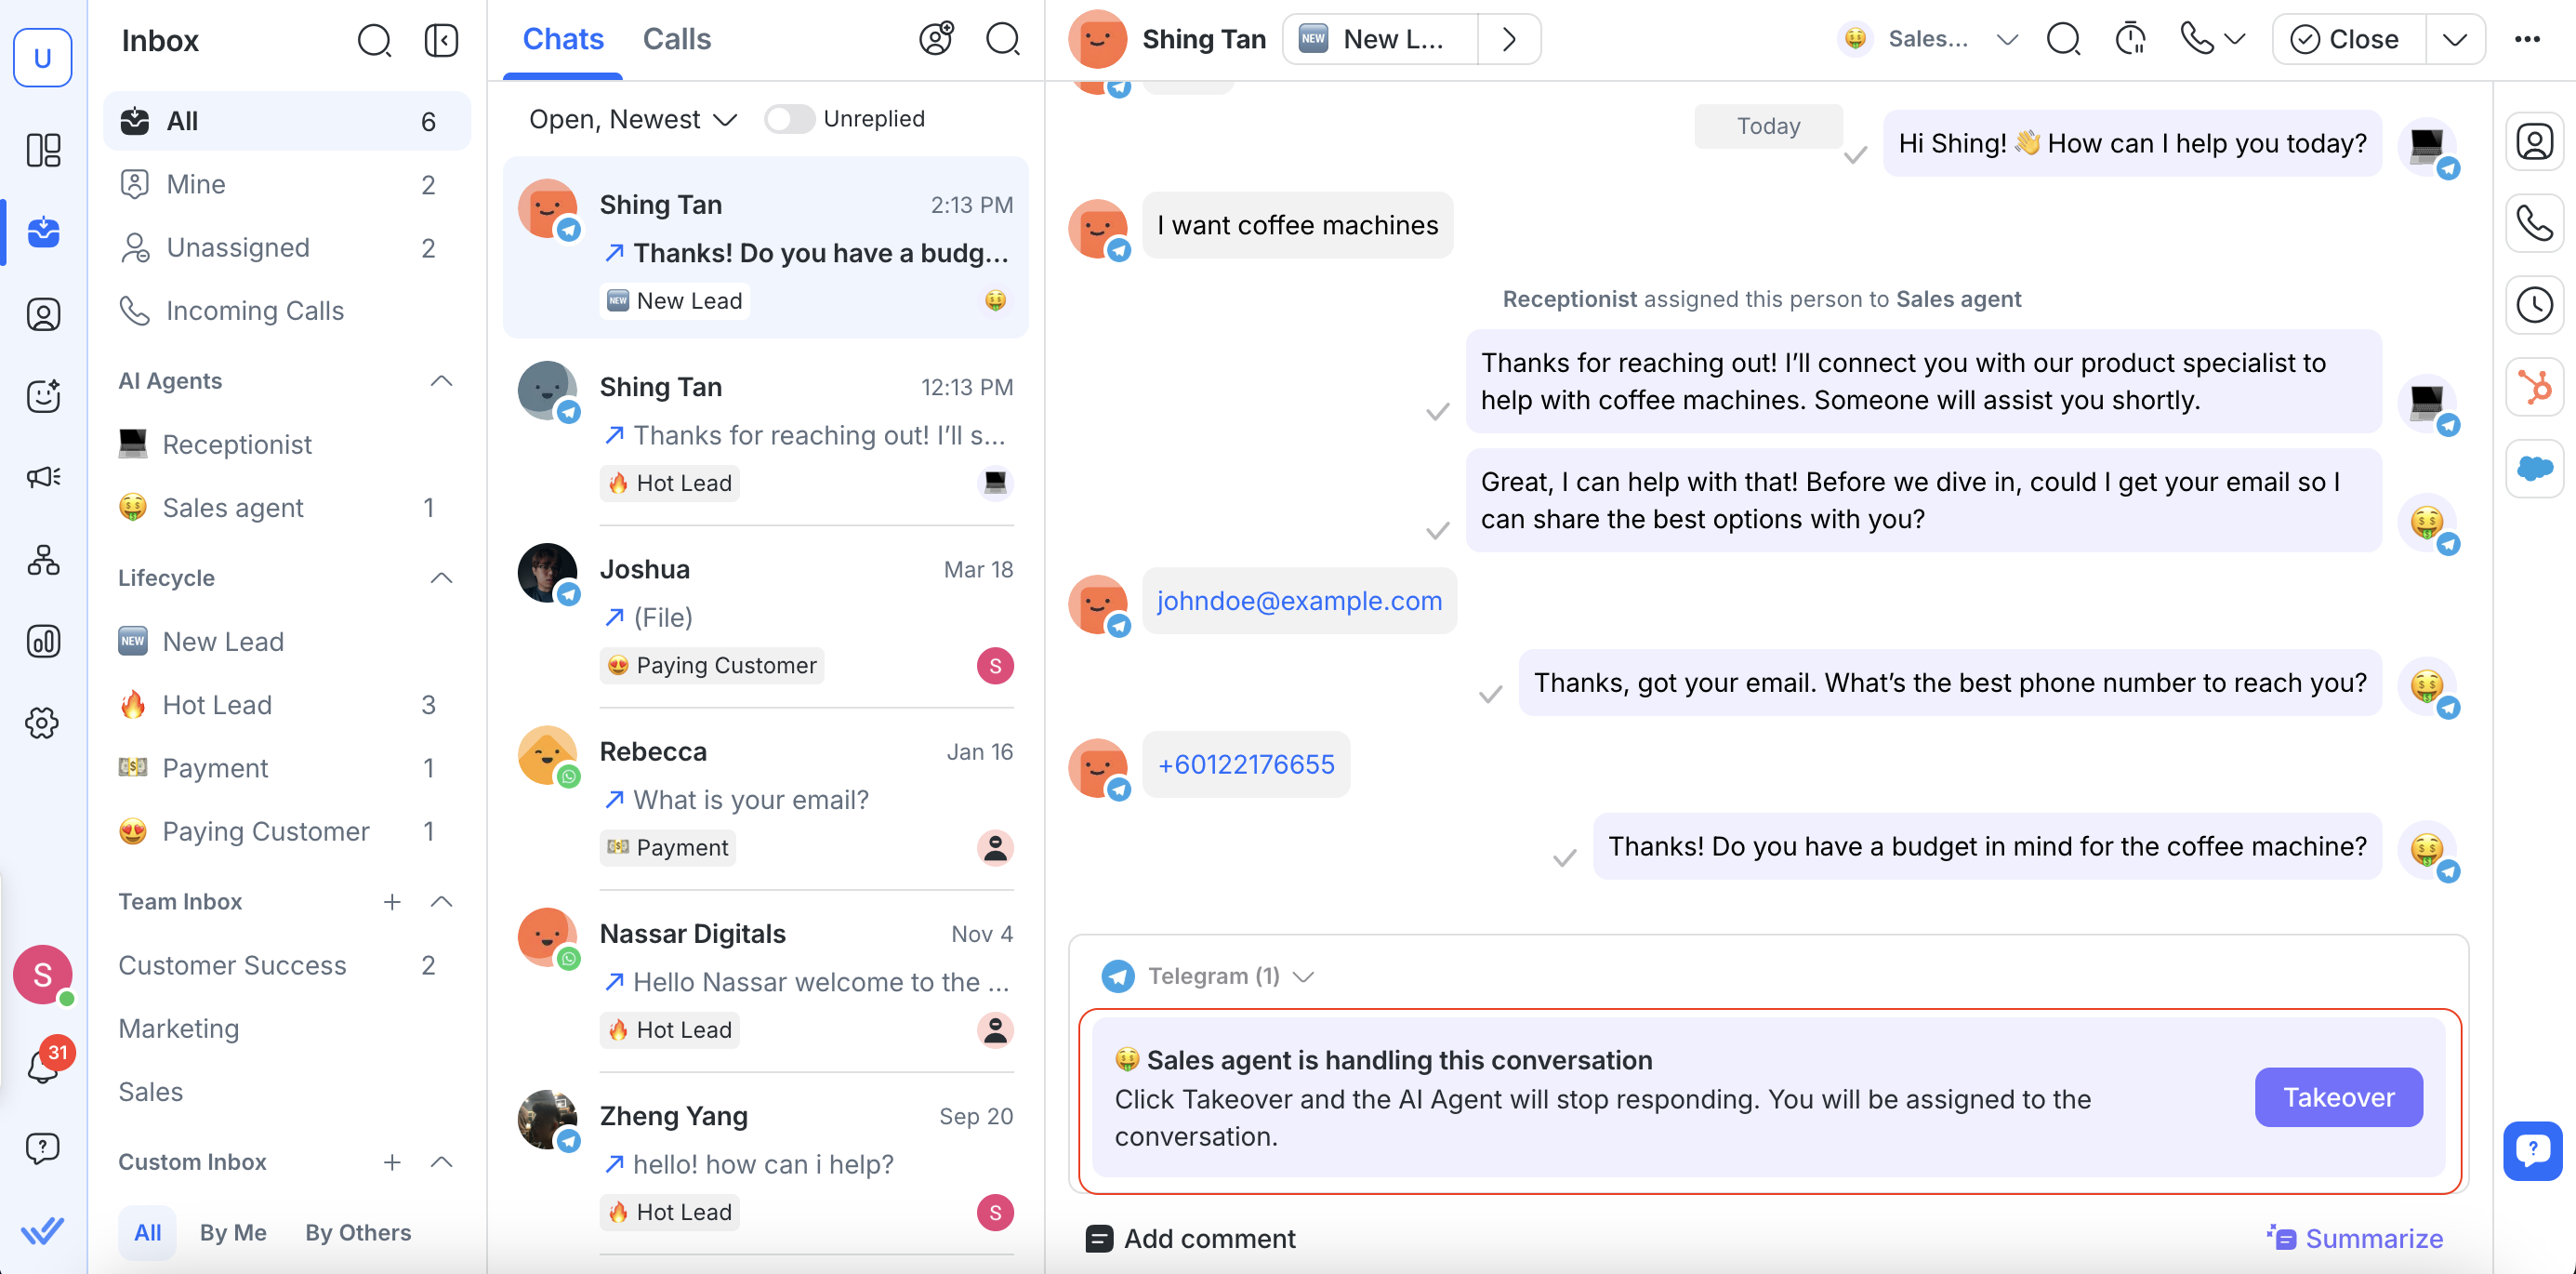
When the AI Agent is actively engaging with a Contact, a Takeover callout will appear in the message composer.
Click Takeover to:
Immediately stop the AI Agent from replying
Reassign the conversation to you
If other conversation restrictions apply — such as insufficient WABA balance, a blocked contact, or no connected channel — these conditions will be shown instead, and the Takeover callout will remain hidden until they’re resolved.
Once you’ve taken over, the AI Agent will no longer respond to this conversation until it’s reassigned to the AI again.
FAQ and Troubleshooting
Does respond.io use my data to train AI models?
No. Respond.io does not use your conversation messages or customer information to train AI models. Messages between your Contacts and any AI features are processed only to provide the service and are never added to model training datasets.
Why does AI Agent sometimes take longer to reply?
A short delay in AI responses is expected behavior.
Most AI responses are returned within 10–15 seconds. Occasionally, AI responses may take longer and exceed 20 seconds.
This can happen when the AI needs extra time to:
Search your knowledge sources for relevant information.
Process the message and generate a reply.
Wait for the AI model provider to respond during busy periods.
Handle temporary network or system delays.
If the AI response takes longer than 1 minute, please contact our support team for assistance.
Can I use a custom image as the AI Agent avatar?
No, uploading a custom image for the AI Agent avatar is not supported. You can only choose an emoji to represent the AI Agent.
Need help with your AI Agent?
Our Support team is here for you anytime.


