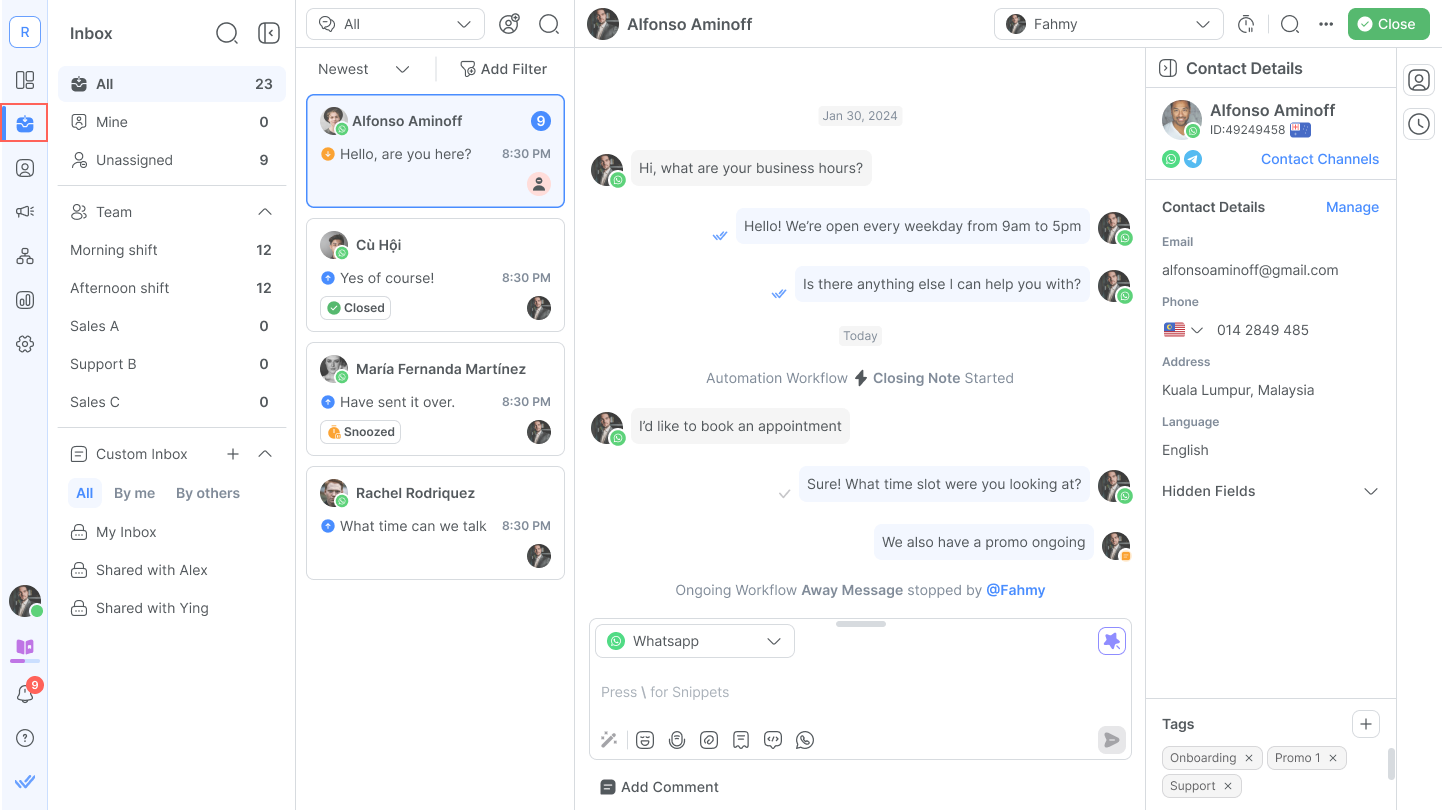
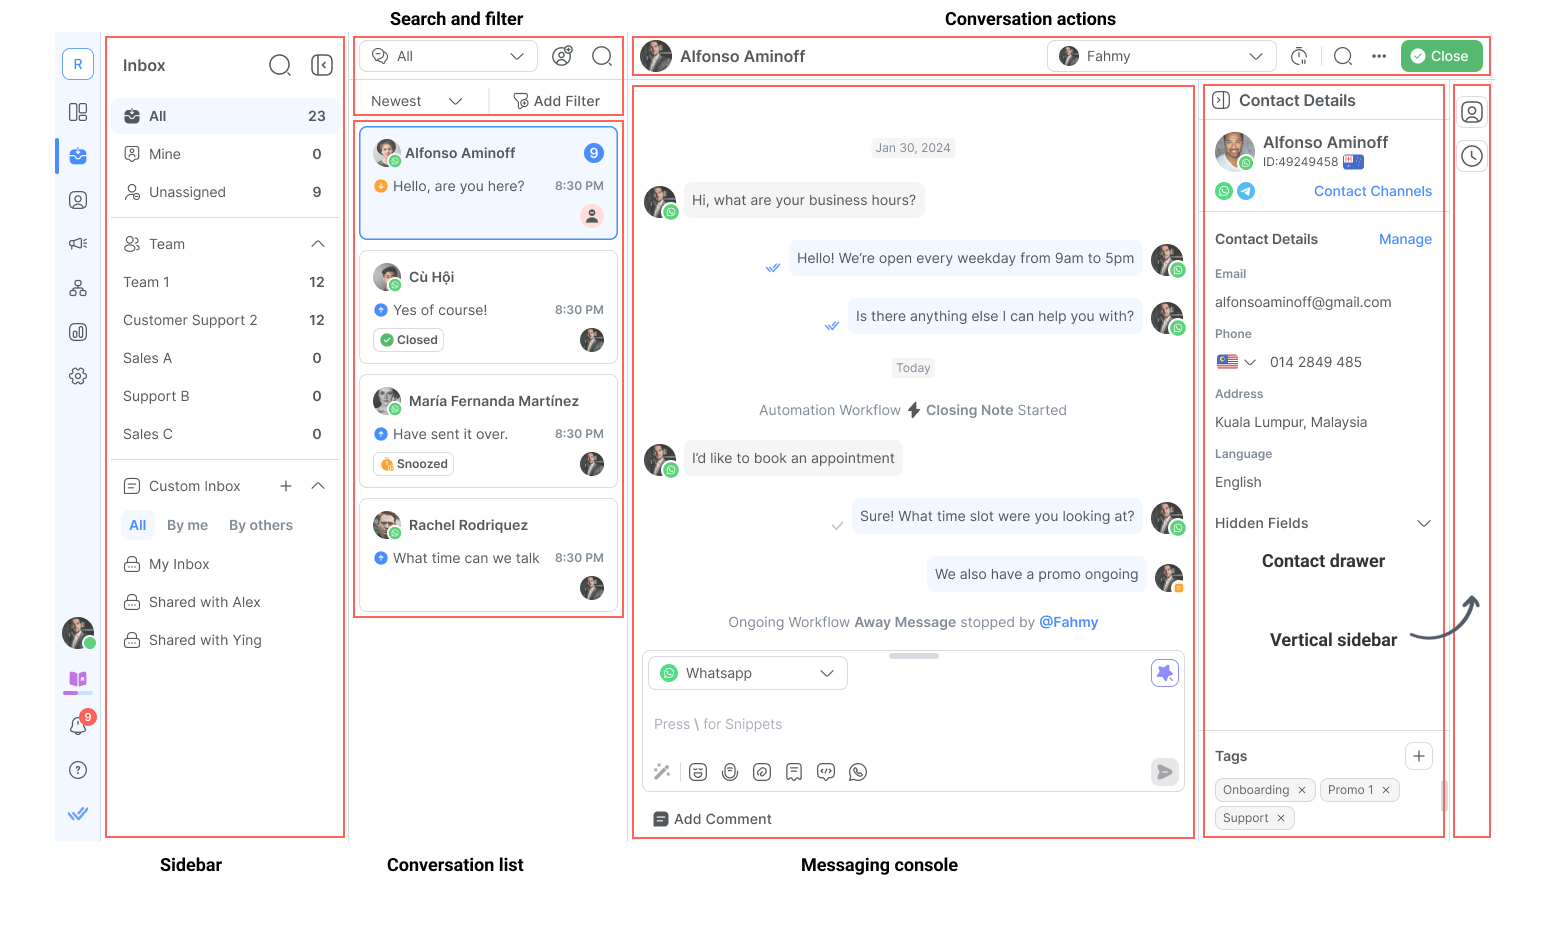
The Inbox module is where teams view and manage all conversations with Contacts. Access it from the left navigation menu to reply to messages, assign conversations, and track conversation history.
Conversations
A conversation is the interaction between a Contact and the platform. Conversations organize communication in context. A Contact can have multiple conversations with a Workspace but only one open conversation at a time.
For example, a Contact may reach out at different times for different reasons. Each conversation has a different context and is handled by different users.
How to open a conversation
Conversations open through:
New incoming message: When a Contact without an open conversation sends a message, a new conversation opens automatically. The same applies for messages from new Contacts.
Manual opening: A user opens a conversation from the Inbox module.
Automation: A Workflow with the Open Conversation step opens a new conversation for the triggering Contact.
How to close a conversation
Once a Contact's issue is resolved, close the conversation to remove it from the open conversation queue and reduce Inbox noise.
When a conversation is closed, the Contact and their future conversations remain assigned to the same user. Search for the Contact in the Contacts module to reference past conversations.
Other ways to close conversations:
AI Agent: An AI Agent with the Close Conversation action enabled can close a conversation once the Contact's issue is resolved. The AI Agent also auto-generates a conversation summary and selects a closing note.
Automation: A Workflow with the Close Conversation step closes the open conversation.
Dialogflow: The
RB_MARKDONEparameter closes a conversation for the triggering Contact.Contact merge: If the secondary Contact has an open conversation, it closes automatically.
Closing Notes
Closing Notes provide a summary of a conversation with a Contact. They support reporting and analytics.
To save time, use the Summarize feature to generate an AI-written summary before closing. Click the arrow next to the Close button to access the Closing Note dialog, then click the Summarize icon to generate a summary based on the latest conversation.
Conversation metrics
Find metrics and analytical insights such as Resolution Time and Closed Count on conversations in both Reports and Dashboard to track team performance.
Find out more on conversation metrics in the following modules:
How to reply to a Contact
New messages appear in the conversation list of the Inbox module. New Contacts are unassigned by default.
Responding using text
Click the messaging console area below the conversation history.
Type the message.
Press Enter or click the Send button.
When responding to an unassigned Contact, the Contact is automatically assigned to the responding user.
Using AI Assist
AI Assist generates a suggested reply based on your knowledge sources. Click the AI Assist button in the messaging console to draft a response — review, edit, and send it, or discard it and compose your own.
Responding using voice messages
Click the microphone icon in the messaging console to start recording.
Record the message (up to 5 minutes).
Click the stop button to end the recording.
Review the playback, then send or delete and re-record.
For Channels that support voice messaging, the recording is sent as a voice note. For Channels without voice messaging support, the recording is sent as an attachment.
Available keyboard shortcuts
Action | Keyboard Shortcut |
|---|---|
Open emoji picker | : |
Add Snippets | / |
Use Dynamic Variables | $ |
Use AI prompts to improve your messages.
How to use Snippets for faster replies
Snippets are message templates or canned responses for replying to Contacts. Use the / shortcut in the messaging console to insert a Snippet.
Learn more about managing and using Snippets.
How to attach files
Attach files such as invoices or instruction guides when needed. Up to 50 files per message can be sent in both the Inbox and Snippets.
Learn more about uploading and managing Files.
How to assign a Contact
A Contact can be assigned to a user or AI Agent through the assignment dropdown at the top right of the Inbox. Assignments can be made manually or automated via Workflows.
Manual assignment
Open the conversation in the Inbox module.
Click the assignment dropdown.
Select the user to assign the Contact to.
Tip: Assigning a Contact to a user ensures teammates know who is handling the conversation.
Assigning to an AI Agent
Published AI Agents appear in the assignment dropdown alongside human users. Assign a conversation to an AI Agent the same way as a user — the AI Agent will begin handling the conversation immediately.
AI Agents can also assign conversations to human agents or teams on their own, using the Assign to agent or team action. This is useful for routing escalations or passing off to the right team without manual intervention.
Taking over from an AI Agent
When an AI Agent is actively handling a conversation, a Takeover callout appears in the messaging console. Click Takeover to immediately stop the AI Agent from replying and reassign the conversation to yourself.
Once taken over, the AI Agent will not respond again unless the conversation is reassigned to it.
Automatic assignment
Set up automatic assignments using the Workflows module. Workflows automate the assignment process and reduce manual work.
Learn more about Workflows
How to unassign a Contact
Unassign a Contact manually in the Inbox module or automatically via Workflows — particularly after a conversation is closed.
What's next?
That's the end of the Quick Start guides. Use the Glossary of Terms for definitions of key platform terms, or explore the help center to go deeper on any feature.


