
Looking for the ultimate chat widget? If your web visitors are avid Messenger users, add a Facebook Messenger widget to your website. In this blog post, we’ll show you how to add Facebook Messenger to a website, as well as where to add it on website builders like WordPress, Wix and Shopify.
What is a Facebook Messenger Widget?
The Facebook Messenger widget is a website plugin that allows site visitors to chat with your Facebook Page via Messenger. As one of the world’s top messaging channels, many customers are naturally inclined to chat over Messenger.

When website visitors send an inquiry via the widget, you can reply through the Meta Business Suite Inbox. This is sufficient for businesses that receive low to medium volumes of messages and rely on Facebook Messenger for customer communication.
Do not mistake the Facebook Messenger widget with the Facebook Chat Plugin. While similar in some aspects, the Facebook Chat Plugin is no longer available from May 9, 2024.
Businesses that handle high volumes of conversations or chat with customers across multiple channels should use an omnichannel messaging inbox like respond.io. In addition to streamlining all conversations in a single inbox, it offers additional benefits such as advanced automation and analytics.
Why Use Facebook Messenger Widget
If you’re leveraging Facebook Messenger to provide customer support or push sales, you know how effective the platform is. Among the key reasons to consider using Facebook web chat is its ability to create persistent conversations and build a contact list.
Create Persistent, Consistent Engagement
With traditional website chats, you'll lose users forever once they leave your website. Your only hope of continuing the conversation is for them to return to your site. This is no longer the case once you add Messenger to your website.
Firstly, the Messenger widget is the fastest tool for your clients to reach you and get their questions resolved. It ensures customers can address you instantly and effortlessly on a familiar and comfortable messenger.
It also enables personal communication directly on your website to offer technical support, product consultation, order or booking assistance and more. Customers can reach you while interest is high to drive sales conversions.
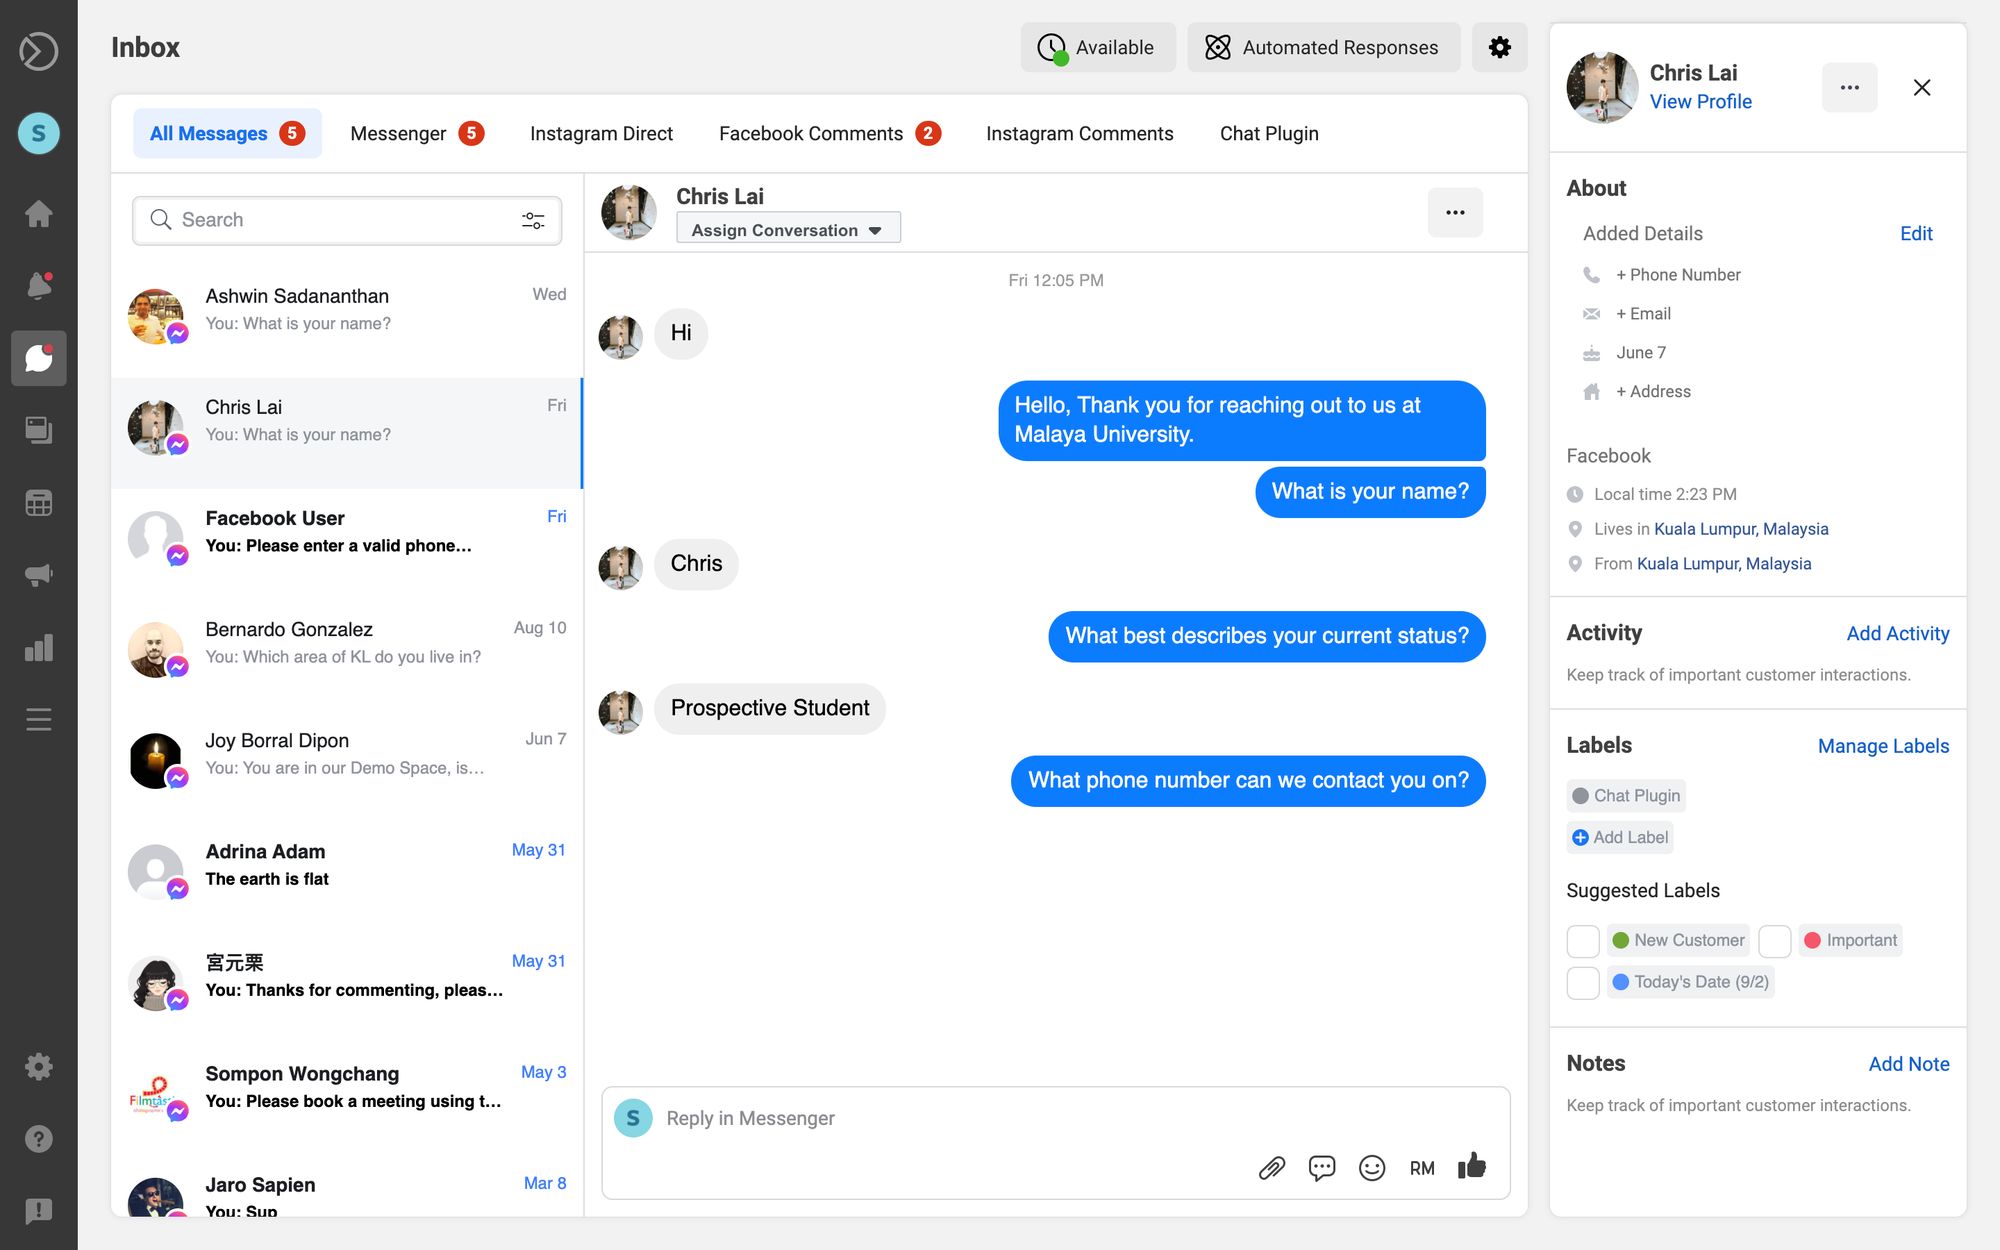
When you add Facebook chat to website, a contact’s chat history is saved in Meta Business Suite’s inbox. This means you can resume a conversation with a user who chatted with you on Messenger even after they’ve left your website.
Along with the conversation, you also get to see some of their basic profile information including their name, profile picture, birthday and location. This will help you serve the customer better than any live chat could and build a relationship with them over time.
Build a Facebook Messenger Contact List
Now that people can message you easily through Facebook using Facebook Customer Chat, they'll be added to your contact list forever.
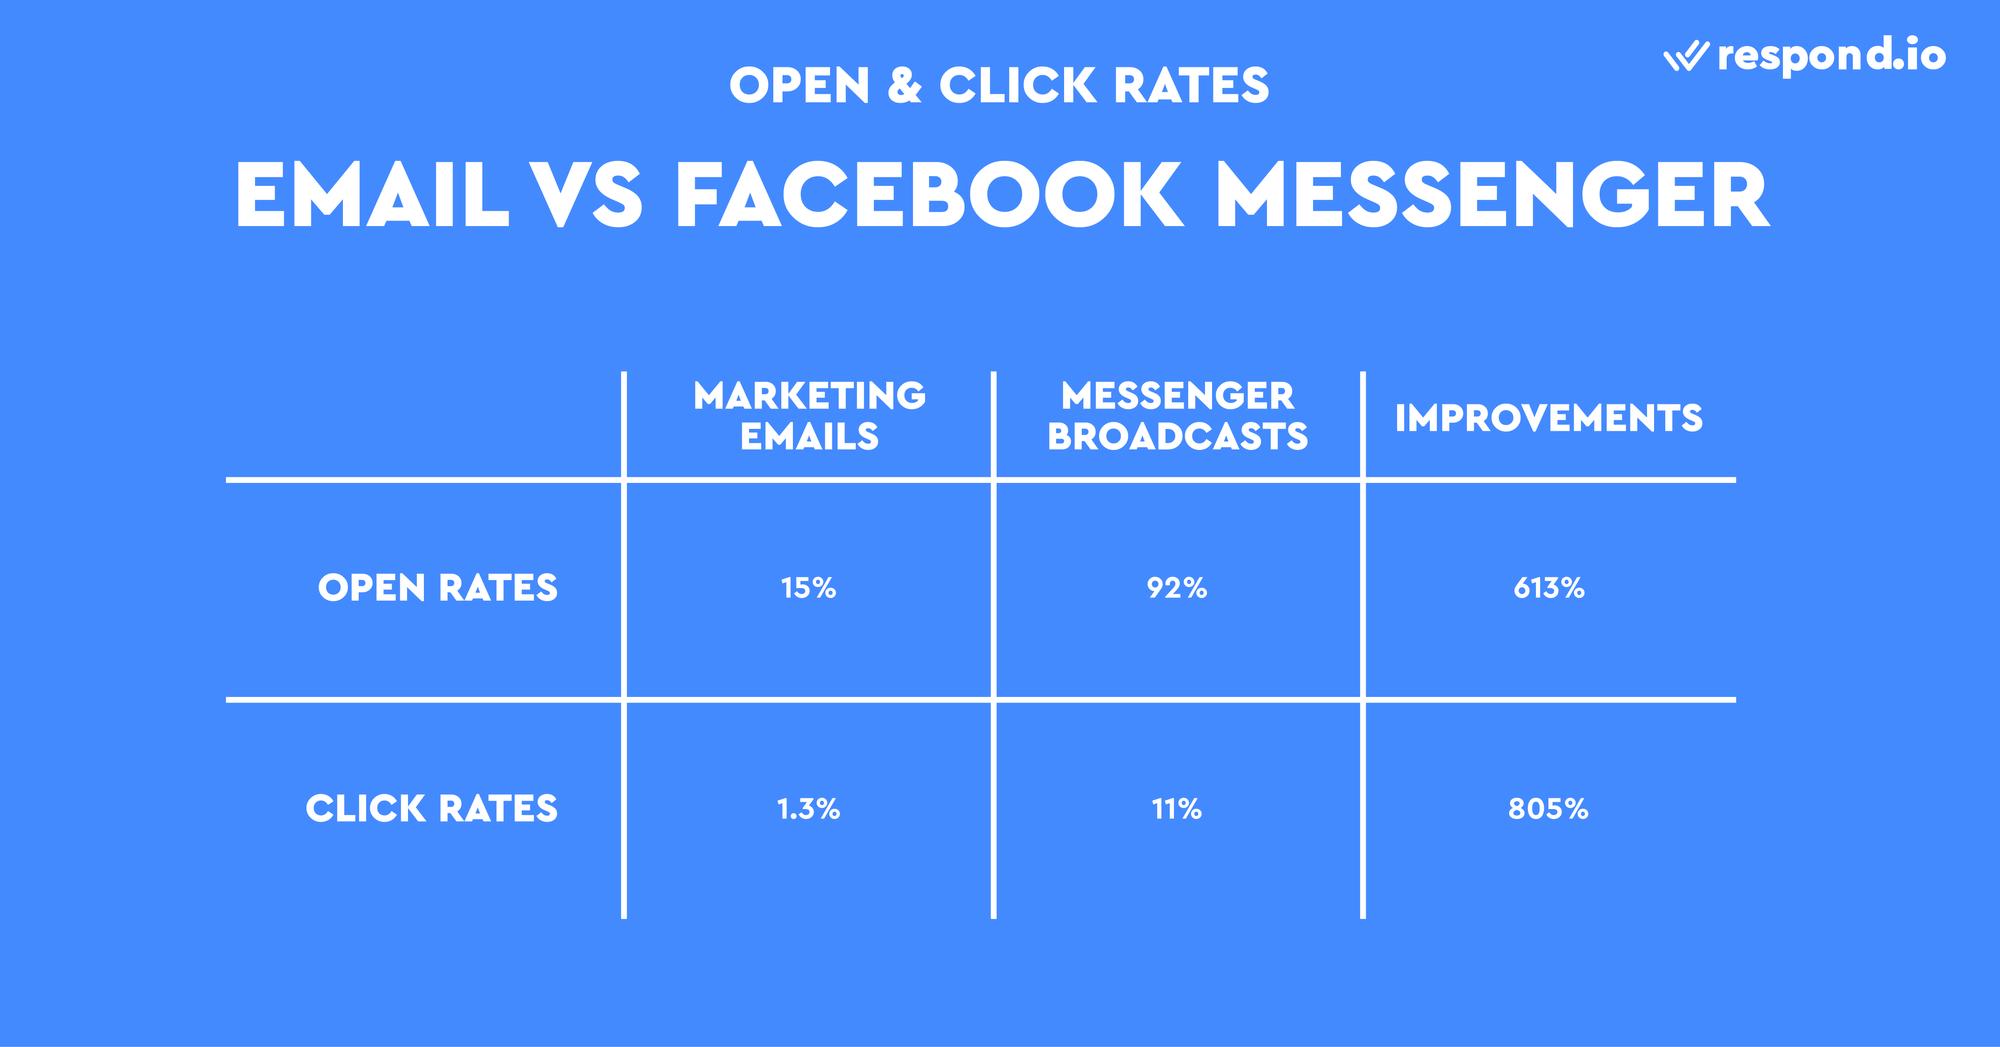
You can think of a Facebook Messenger subscriber list the same way you do an email subscriber list. Use this as a new communication channel with your audience or even use it to send Messenger broadcasts, which have a staggering 92 percent open rate.
The Messenger widget is just one way to build a Facebook Messenger subscriber list. There are several ways to grow your Messenger contacts, including Facebook Comment Auto Reply or private replies, Click to Messenger ads or links and Facebook QR codes.
Lastly, remember customers have to be signed in to their Facebook accounts to be added to your contact list. With this in mind, let’s move on to the next section, where you’ll learn how to add Messenger to website.
How to Create a Widget Code
First, let’s talk about the Messenger widget setup process. To add Facebook Messenger to a website, you need to do these two steps in sequence:
Create a Facebook Messenger widget code
Add the Messenger widget code to your website
If you are a B2B business that needs to have Guest Mode on, we recommend setting up your Facebook Messenger widget via respond.io.
Not only can you automate greetings or away messages and processes like chat routing or contact assignment, respond.io lets you add a reference code to a Facebook Messenger widget to identify where contacts come from. Large businesses should consider this option.
Generate a Widget Code on Respond.io
The process for setting up a Facebook Messenger widget is simple and can be done quickly by following these steps.
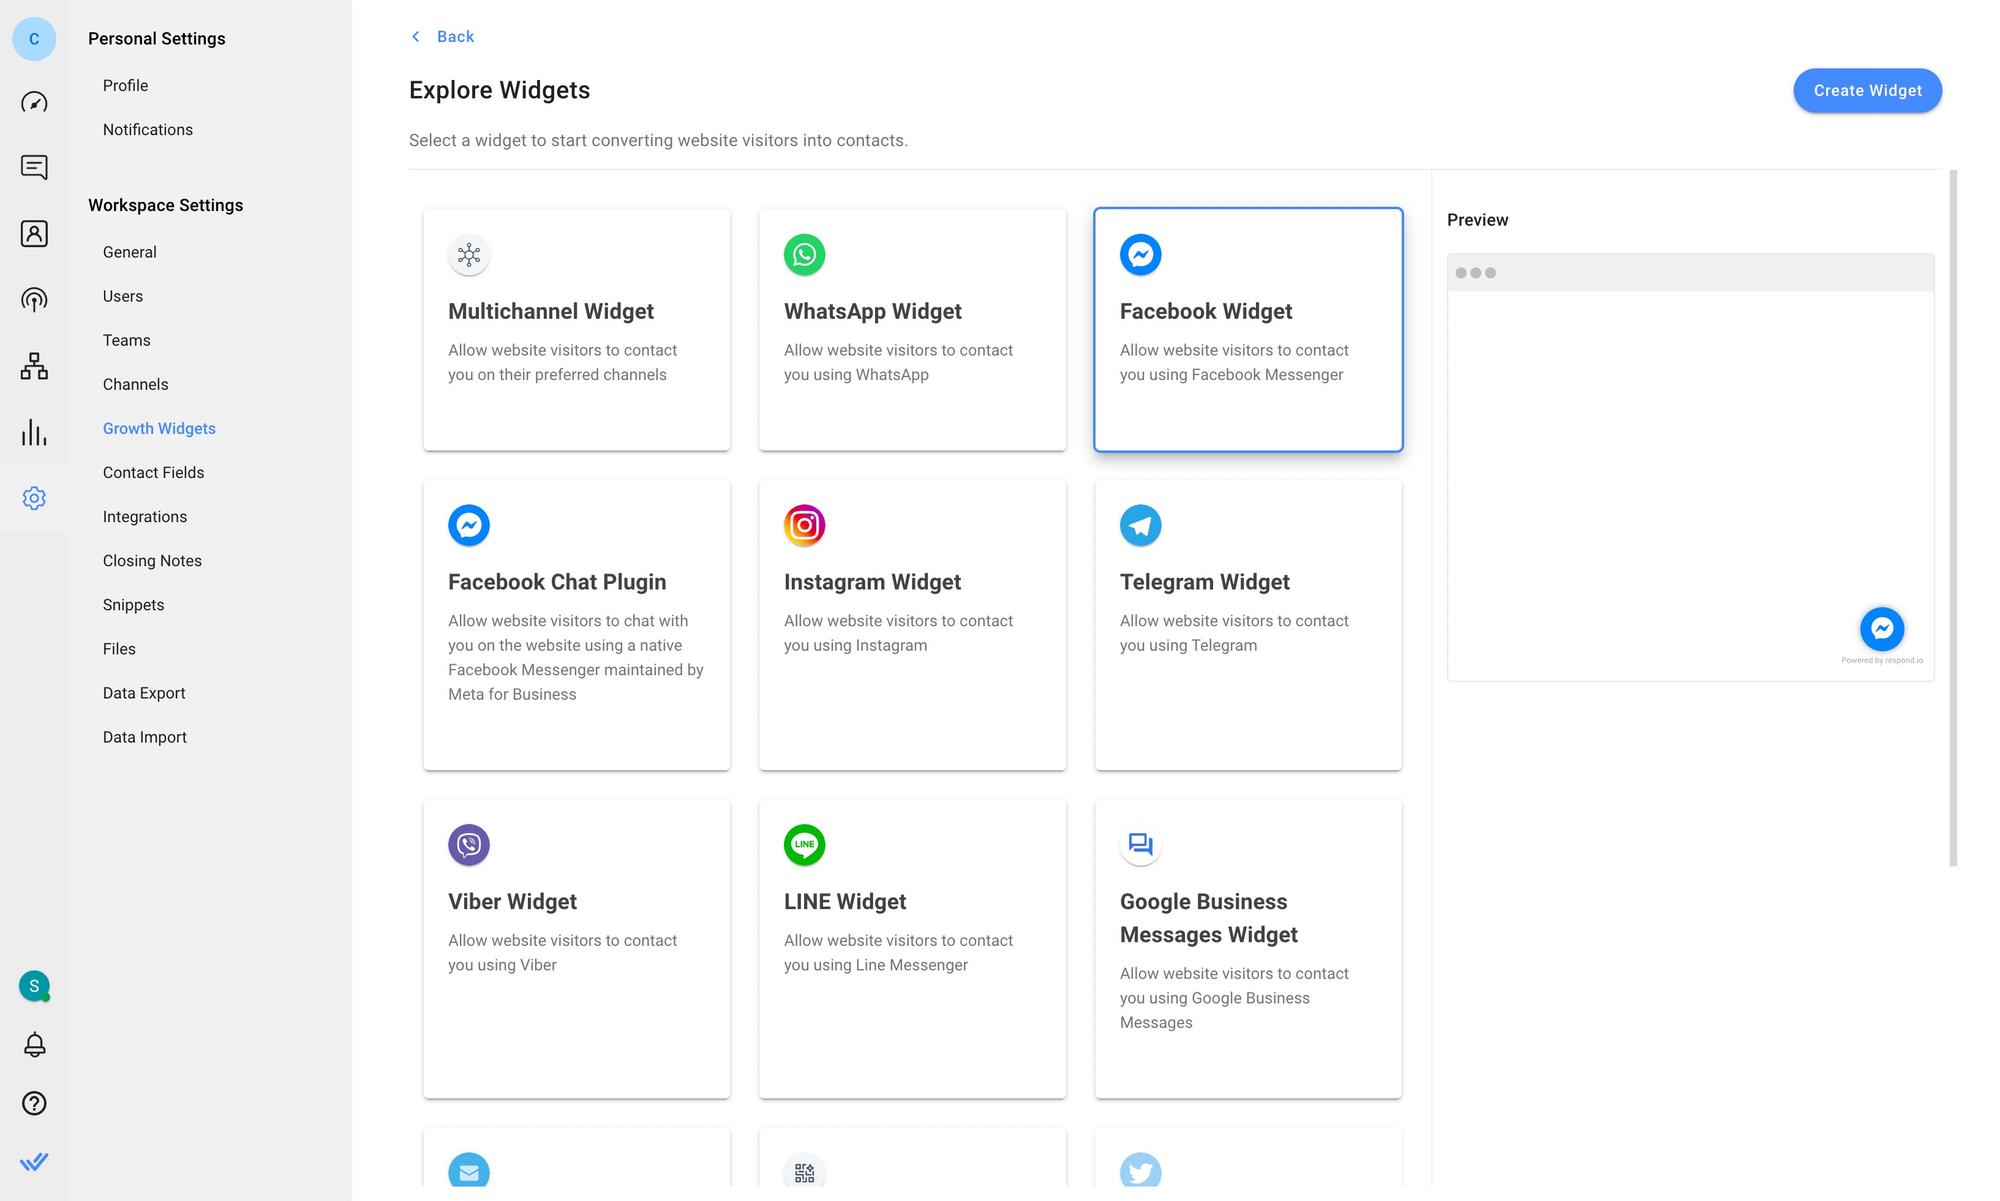
To get started, navigate to Settings > Growth Widgets. Then, click Add Widget and choose Facebook Widget before clicking Create Widget.
After that, enter the website(s) where you want to add the chat widget and select the account you want to create a widget for.
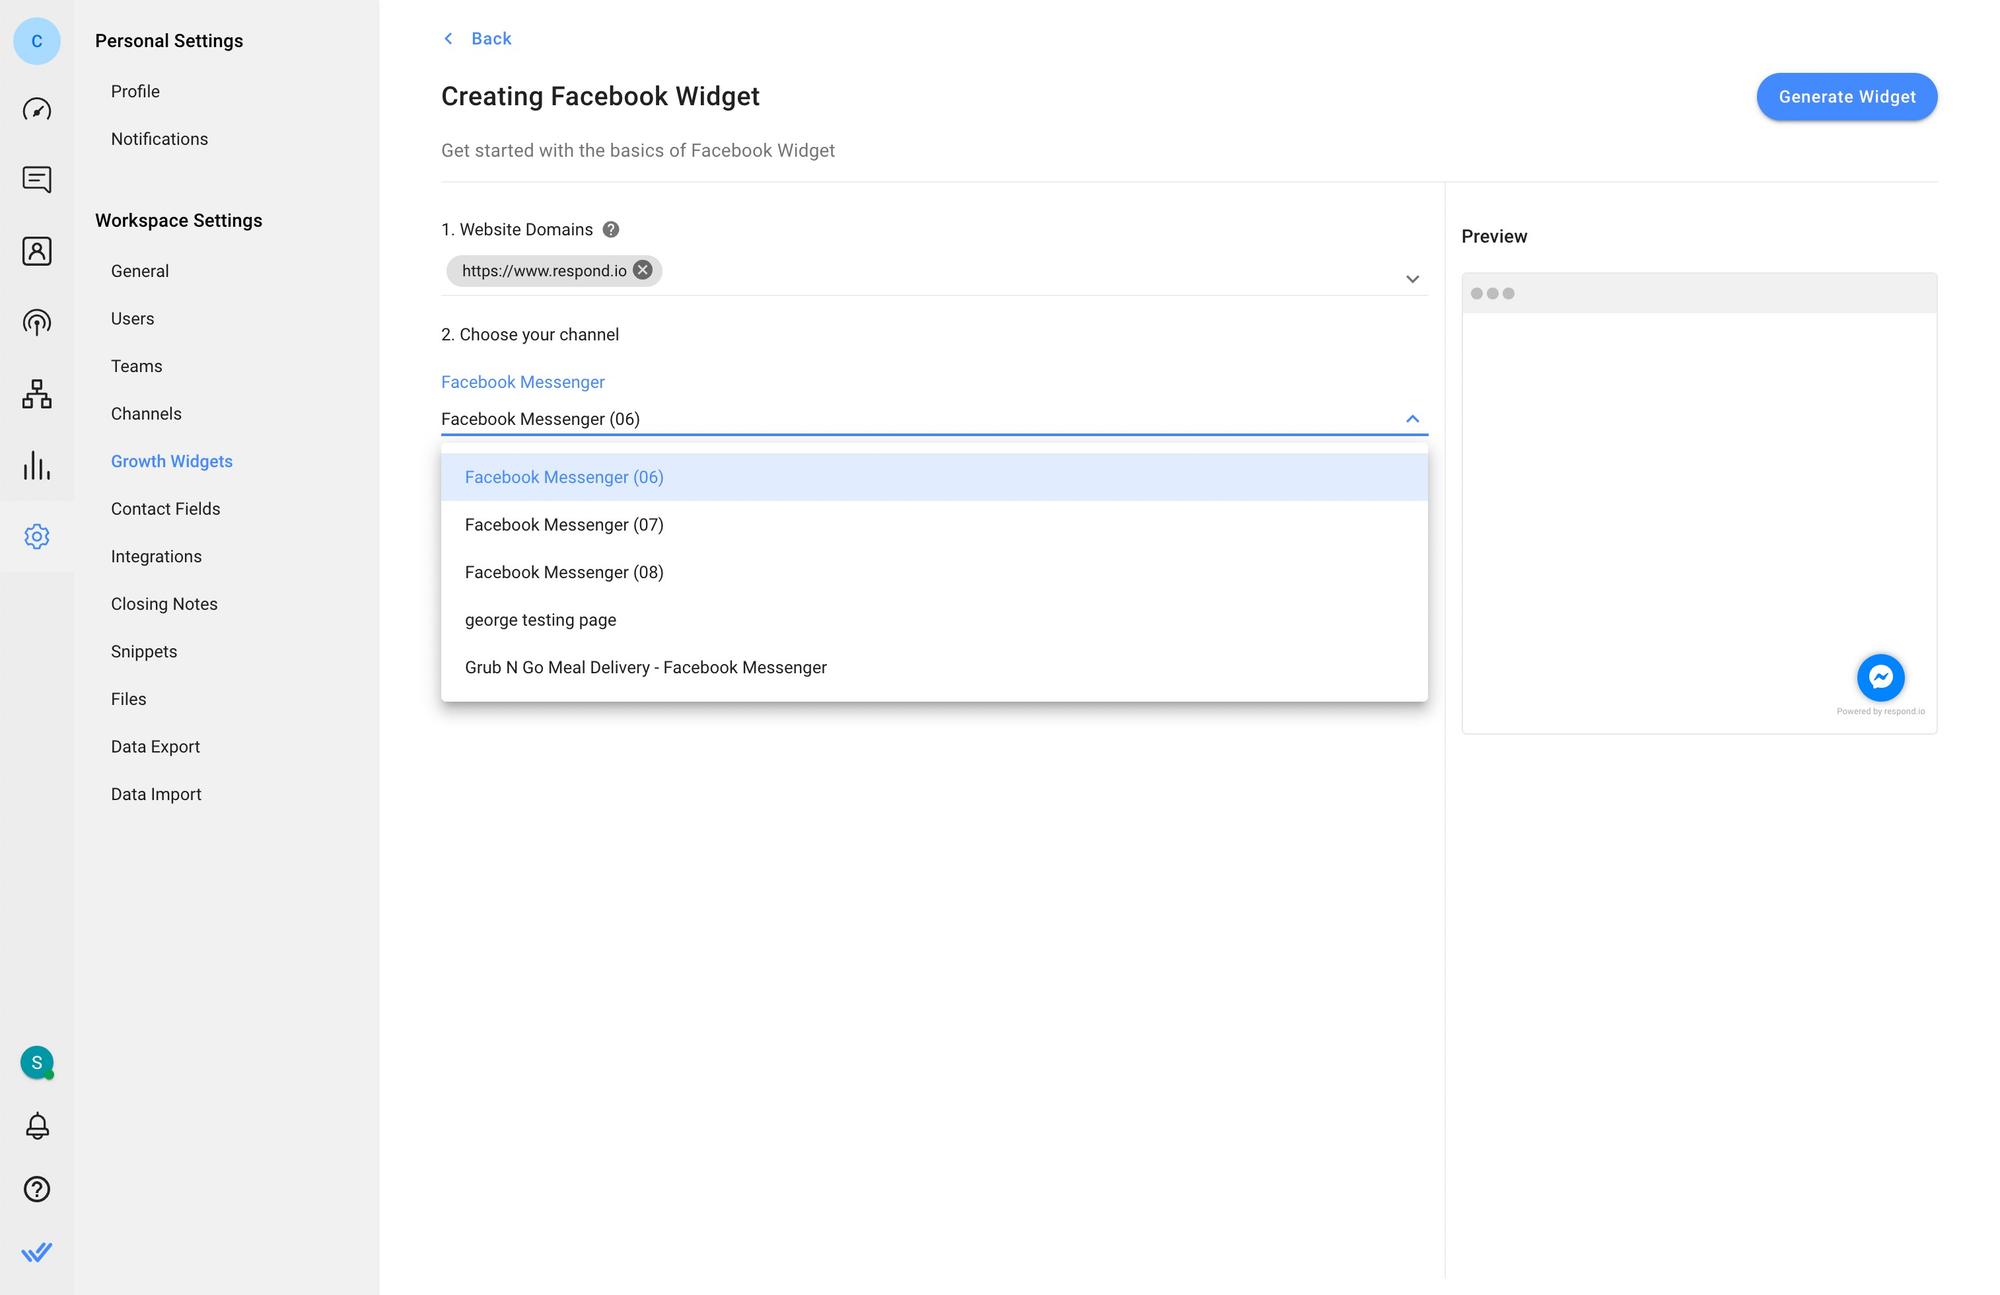
You can add a pre-filled text or customize the widget’s appearance by clicking on the Advanced Settings buttons. Finally, click Generate Widget, copy the generated script and install it on your website.
If you want to connect with customers across multiple channels, an omnichannel widget can help. You can also opt to add a website chat widget to your website.
Now that you've successfully set up your Messenger widget, the next step is to install the generated code onto your website. We’ll guide you through the installation process next.
Turn customer conversations into business growth with respond.io. ✨
Manage calls, chats and emails in one place!
How to Add Facebook Messenger to Website
Navigating your CMS to add a chat widget can be confusing. Below, you’ll find the instructions to install the Messenger widget code on popular site builders like WordPress, Wix, Shopify and Squarespace.
How to Add Messenger to Website: WordPress
You can now install a Messenger plugin by Meta directly from the Plugins tab in the sidebar. While the plugin itself is free, installation is only available to Business plan subscribers or Pro plan users, for those on legacy plans.
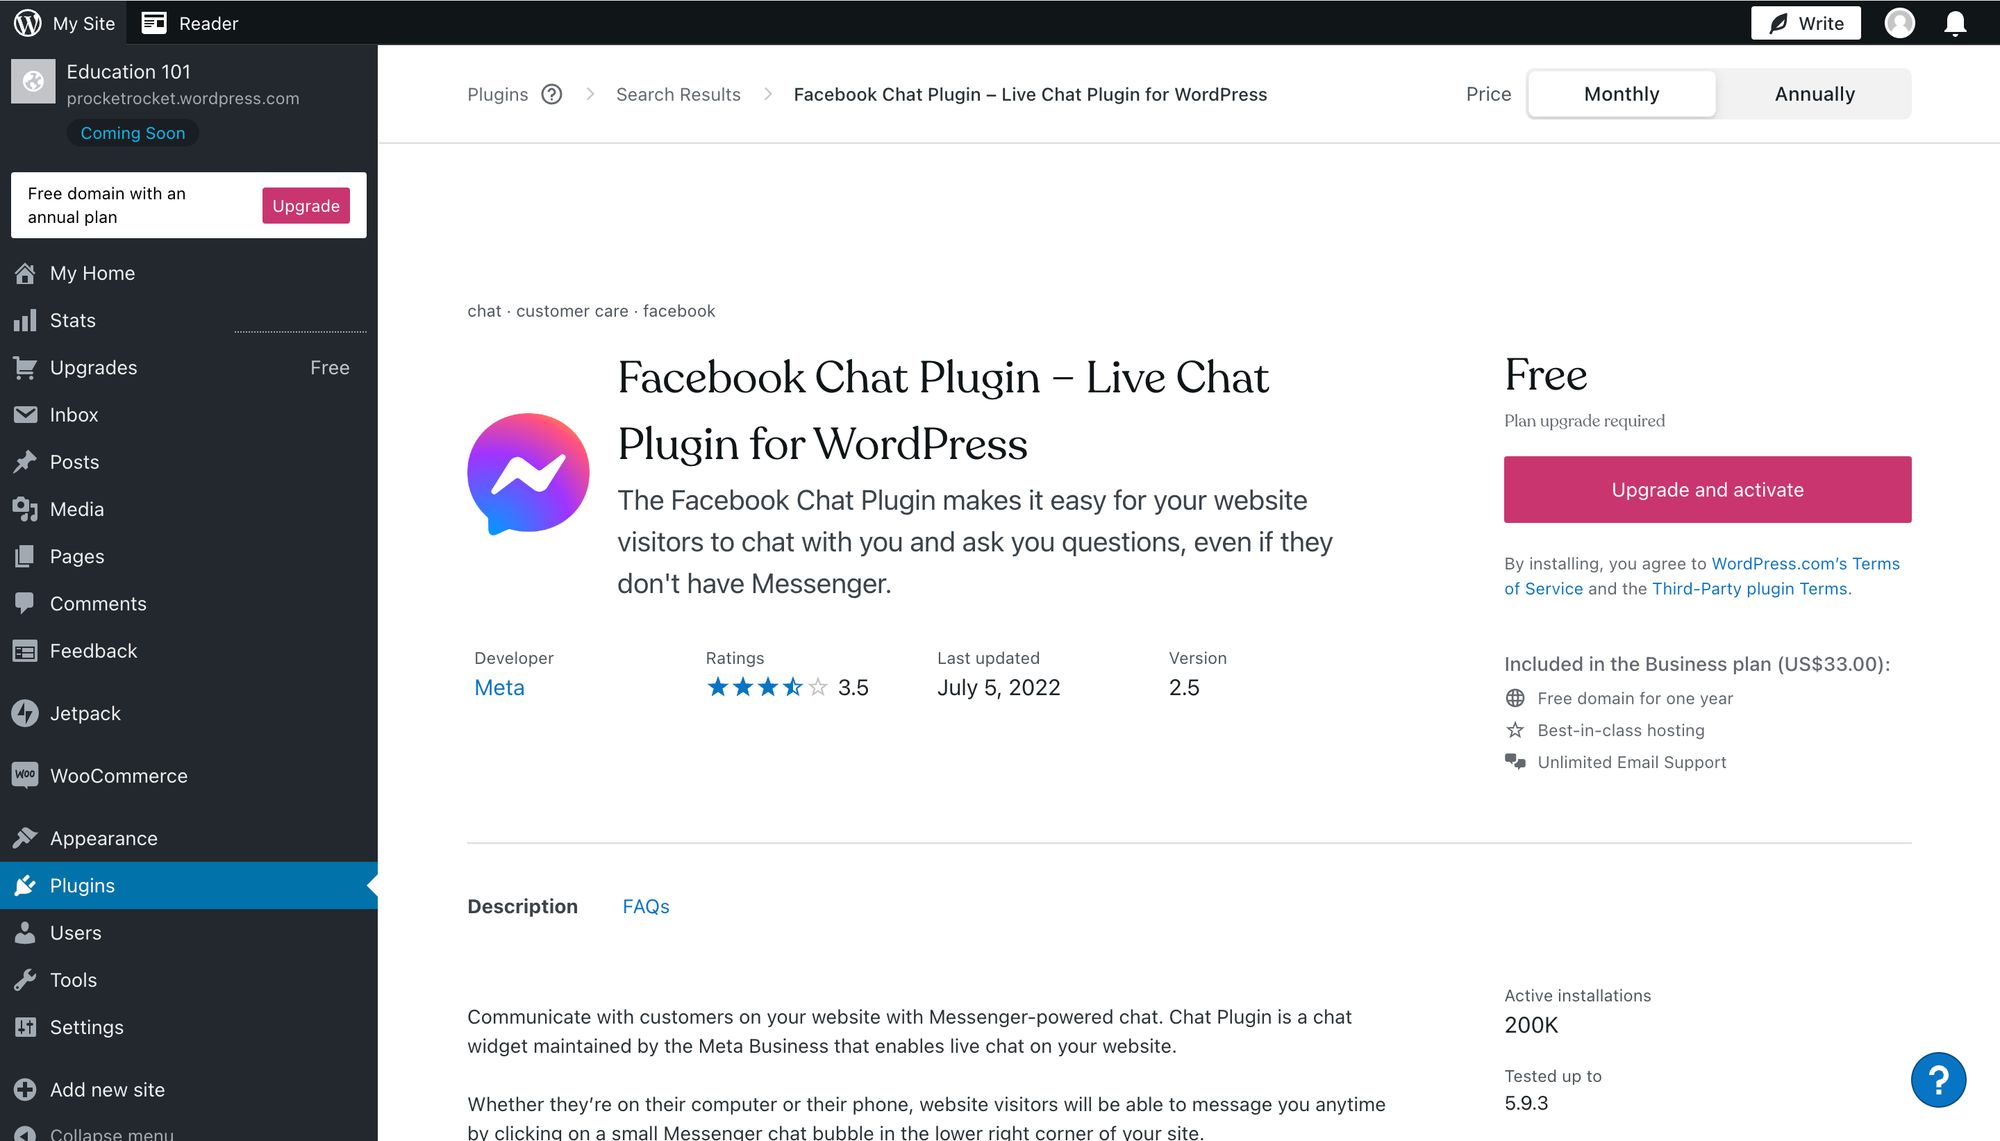
To add Facebook Messenger to website on WordPress, follow these instructions:
Search for the Facebook Messenger widget and select it.
Click Install now.
Click Activate.
Look for the tab that says Customer chat. Navigate to the Getting started section and click Edit chat plugin.
Customize your chat plugin and complete your setup.
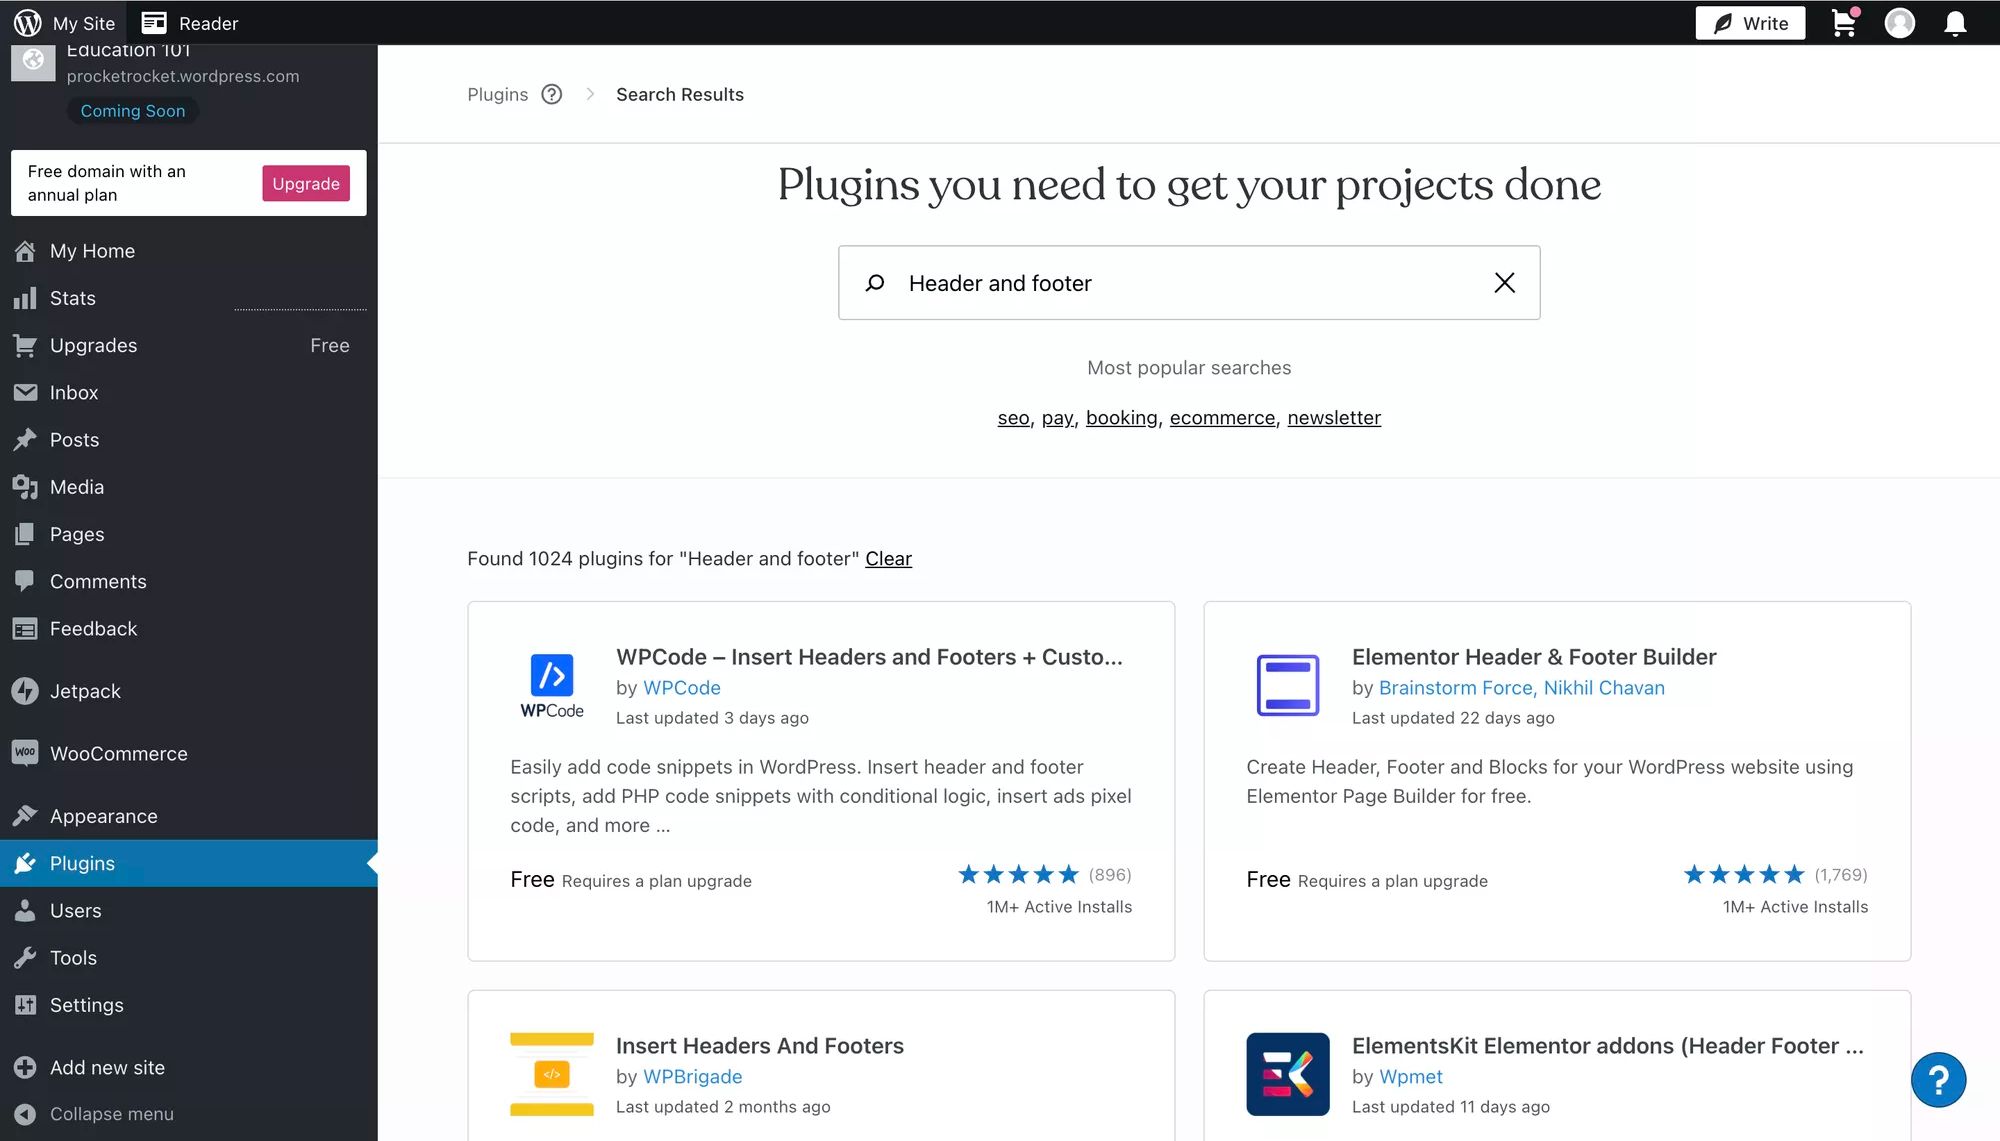
Alternatively, integrate Messenger into a WordPress site by using the Messenger widget code. This also requires going through the paywall. There are a few ways you could add a Messenger widget code to WordPress, including installing a header and footer plugin.
1. Add the header and footer plugin of your choice from the Plugins page.
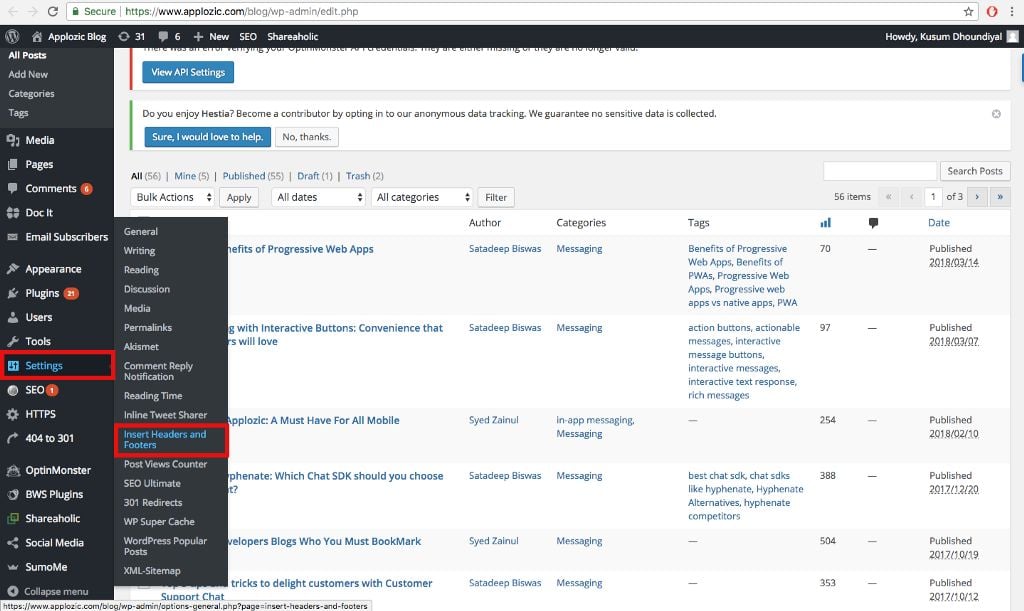
2. Navigate to Headers and Footers.
3. Add the Facebook Messenger widget script to the footer.
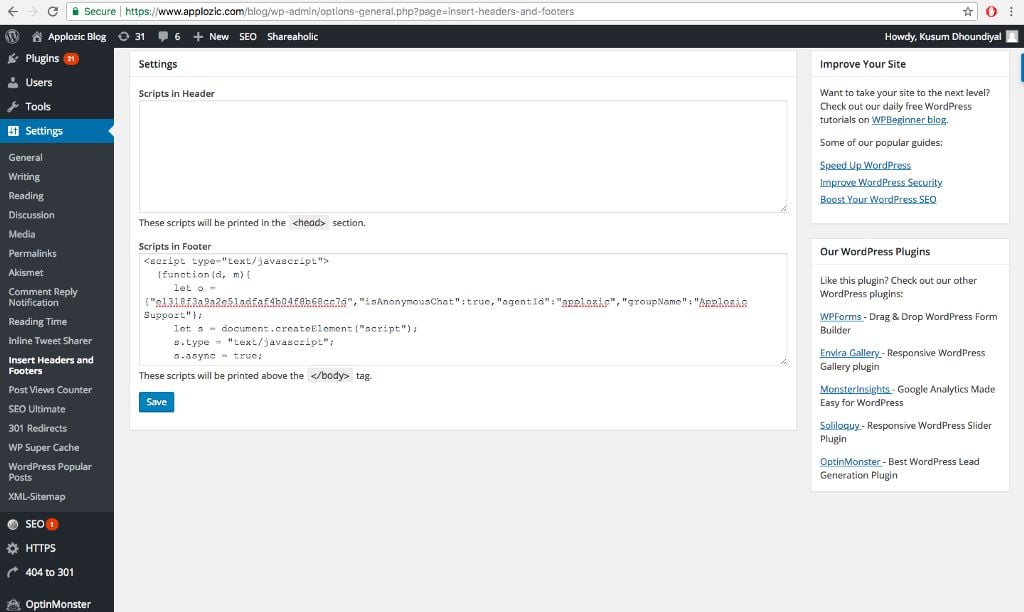
You have now added Facebook Messenger Live Chat to your WordPress website.
How to Add Messenger to Website: Wix
What if you would like to add live chat to a Wix website? Once you’ve generated a Facebook Messenger widget script, follow the steps below to add it to your Wix website. Do note that you’ll require a paid subscription to access this feature.
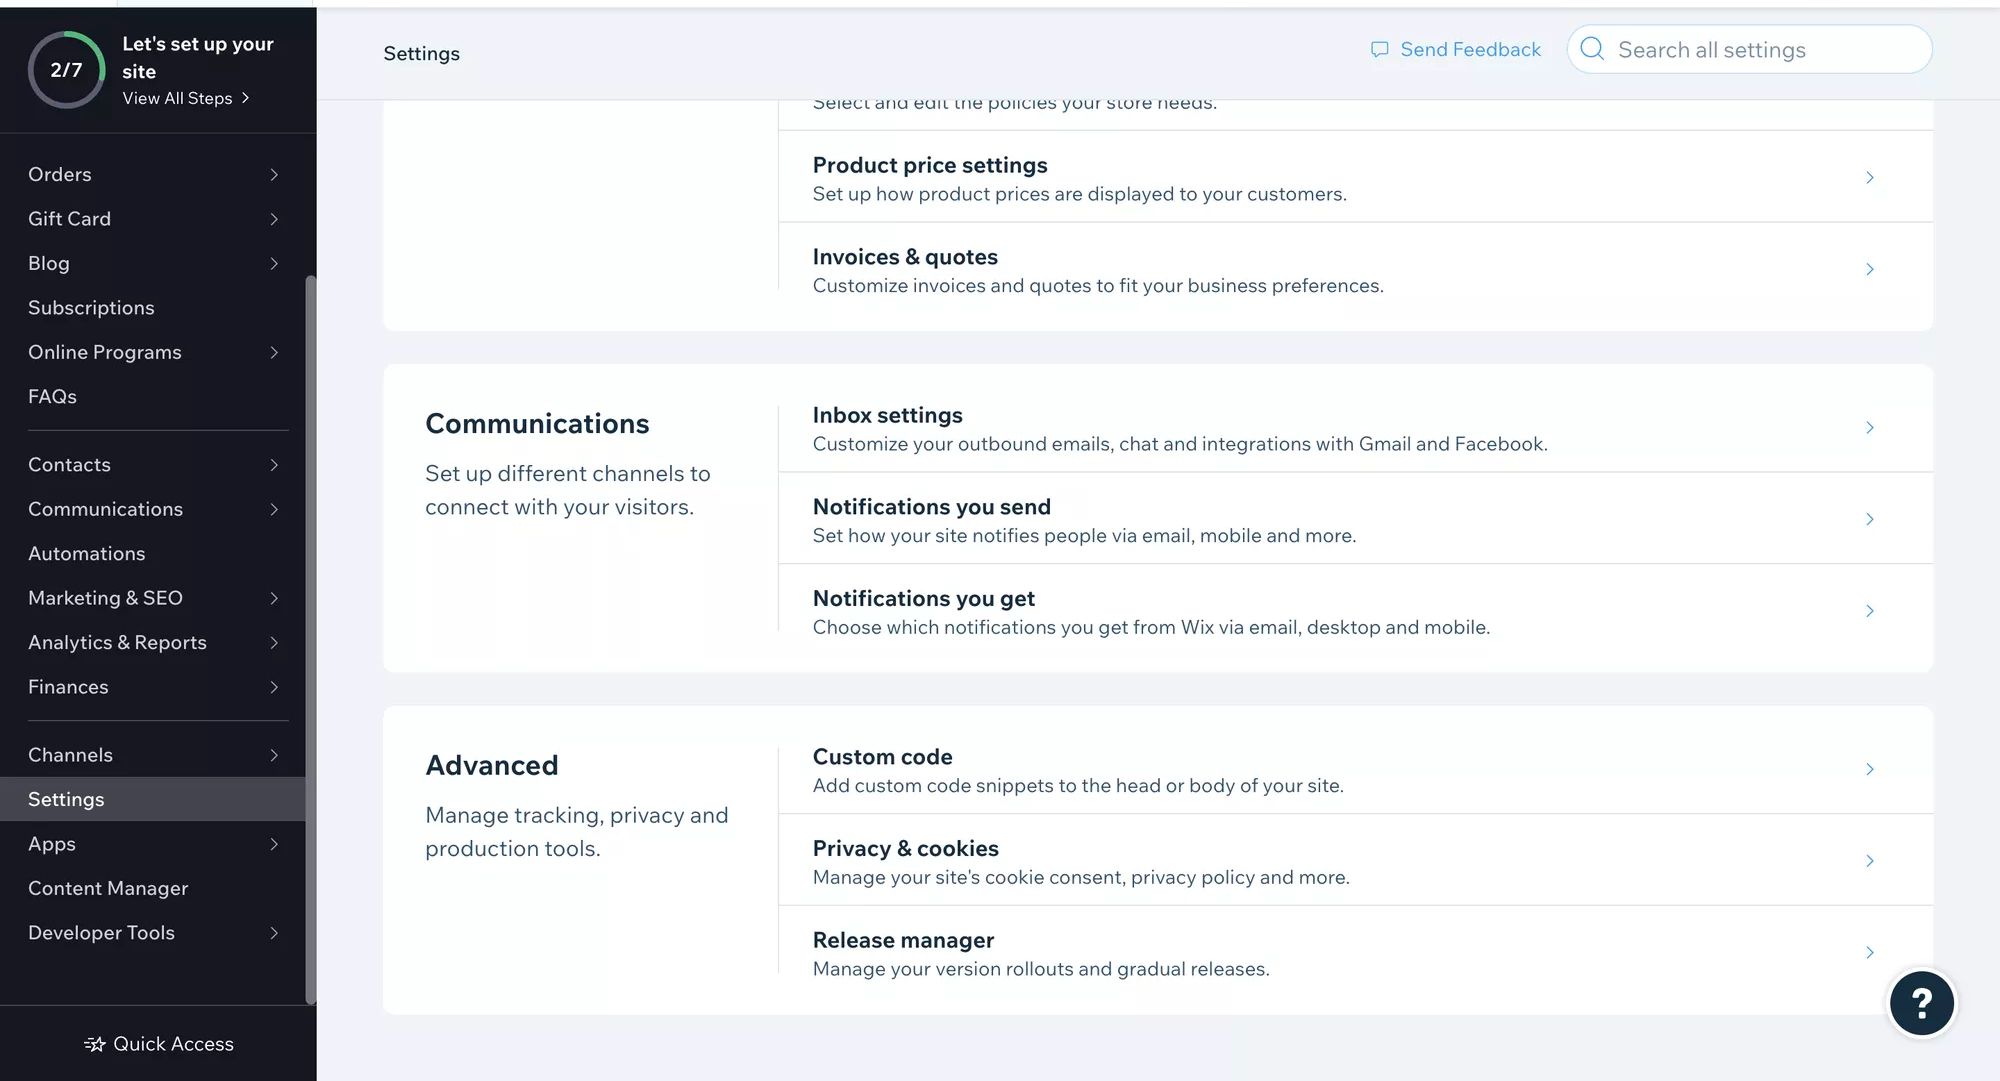
1. Navigate to Settings > Advanced Settings > Custom Code.
2. Paste the Facebook Messenger widget code and select the pages where you want the code to apply. Make sure you place the code in Body - end.
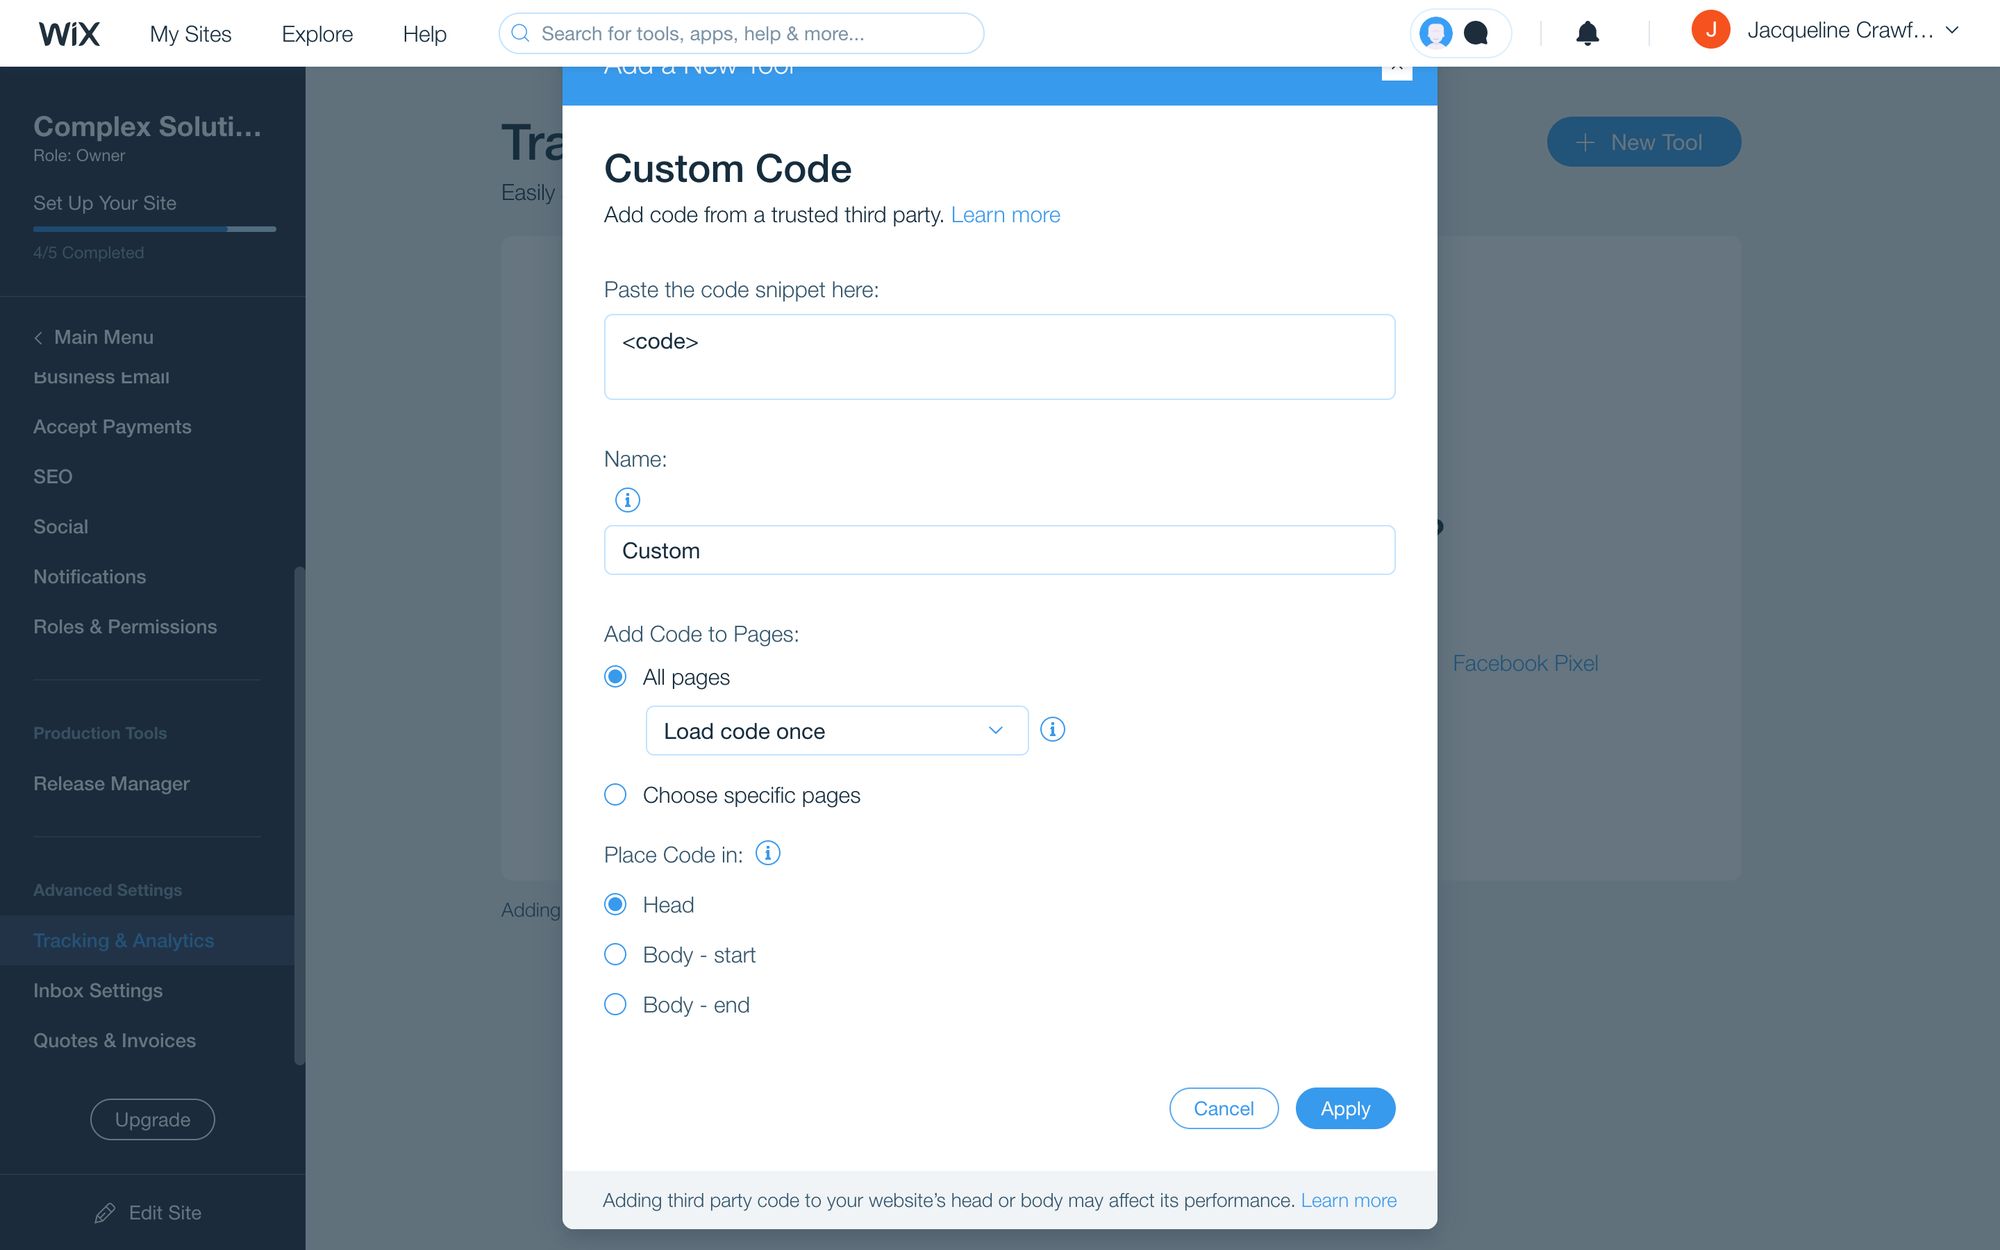
You have now added the Facebook Chat Widget to your Wix website.

How to Add Messenger to Website: Shopify
Once you have the Facebook Chat widget script, follow these steps to you need to integrate Facebook Messenger into a Shopify website.
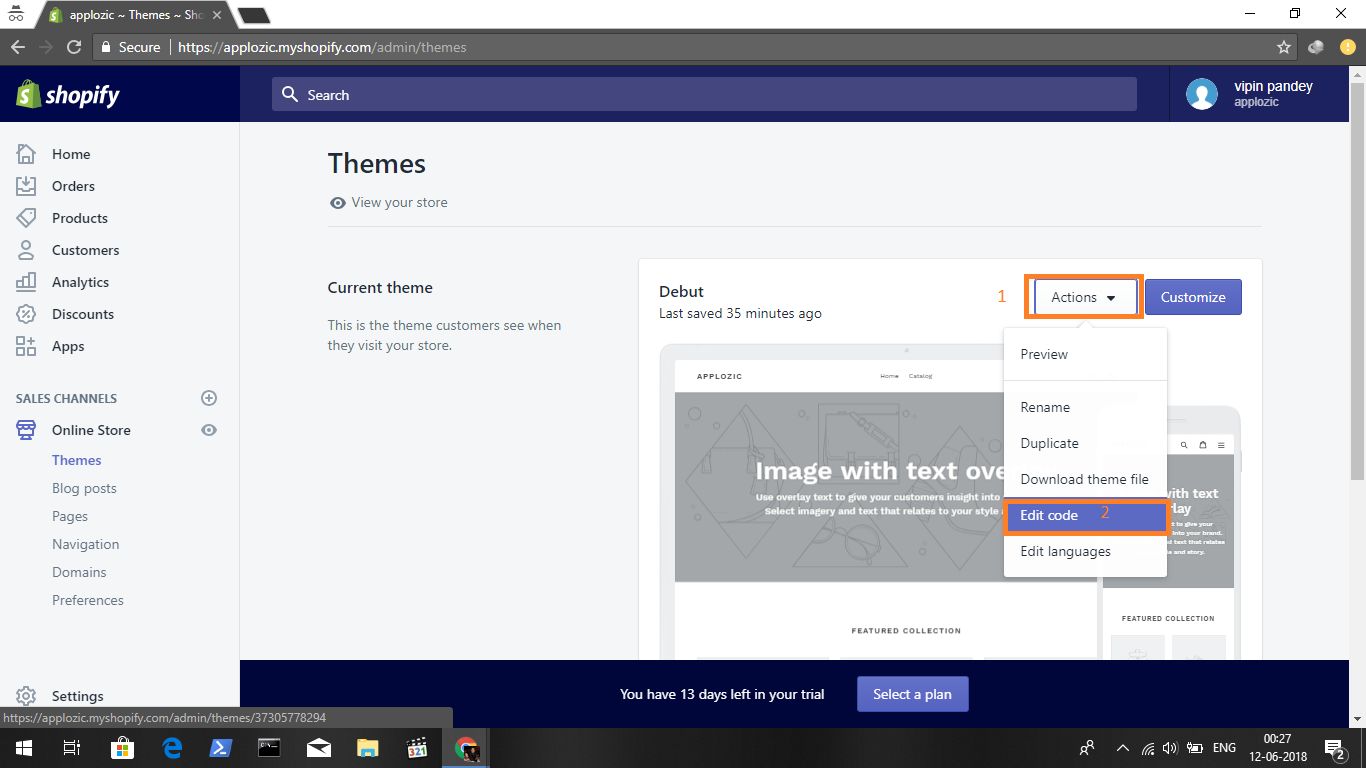
1. Navigate to Online Store and edit code.
2. Open the footer.liquid section and paste the Facebook Messenger Widget script.
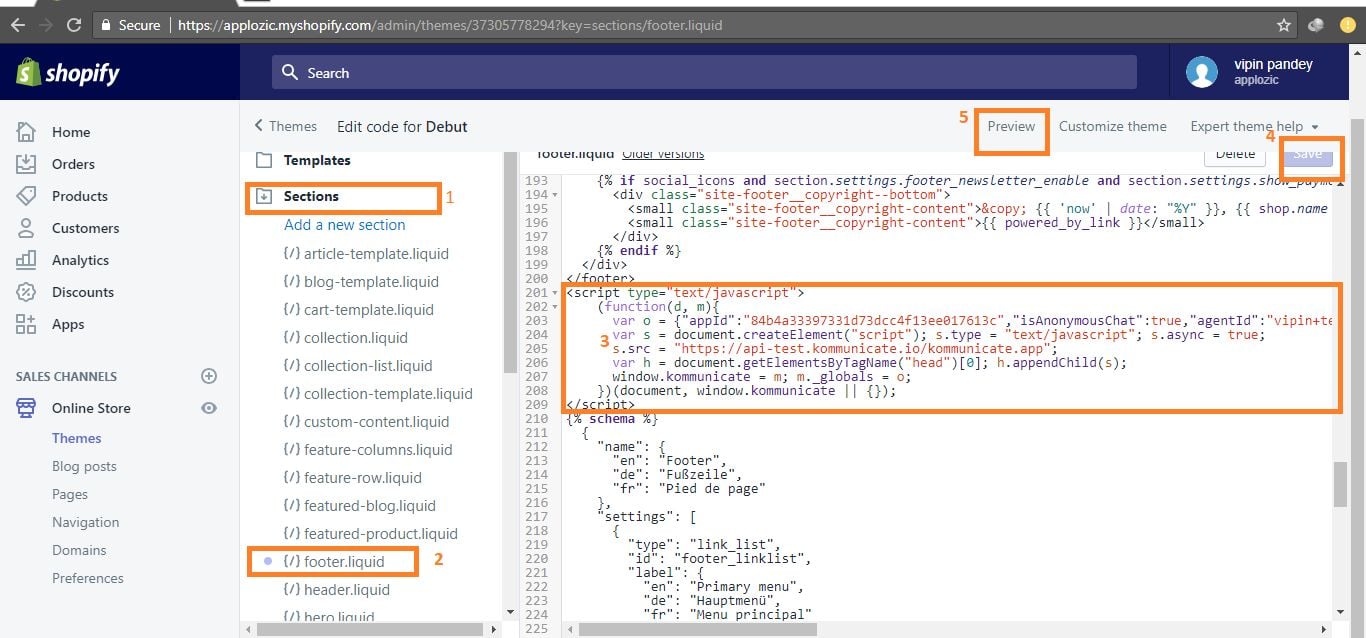
You have now added the Facebook Chat widget on your Shopify website.
How to Add Messenger to Website: Squarespace
Once you have the Facebook Chat widget script, it’s time to embed Messenger in a Squarespace website.
1. Log in to Squarespace, select your site and open Settings.
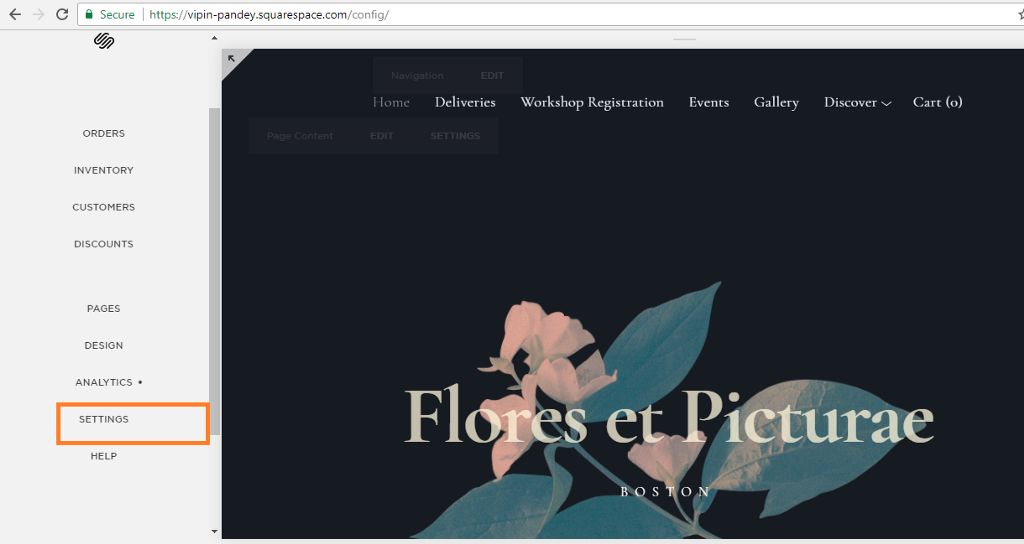
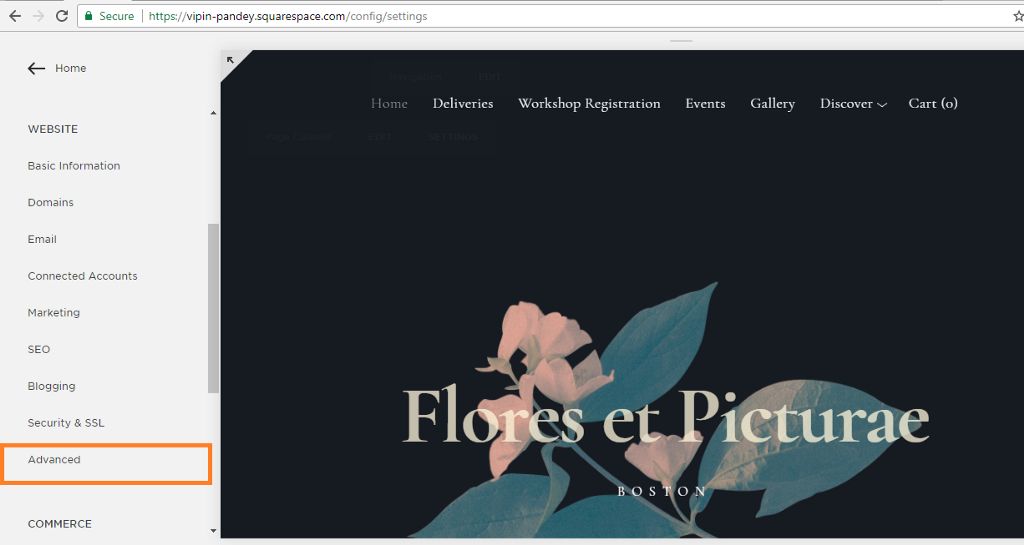
2. Navigate to Advanced Settings.
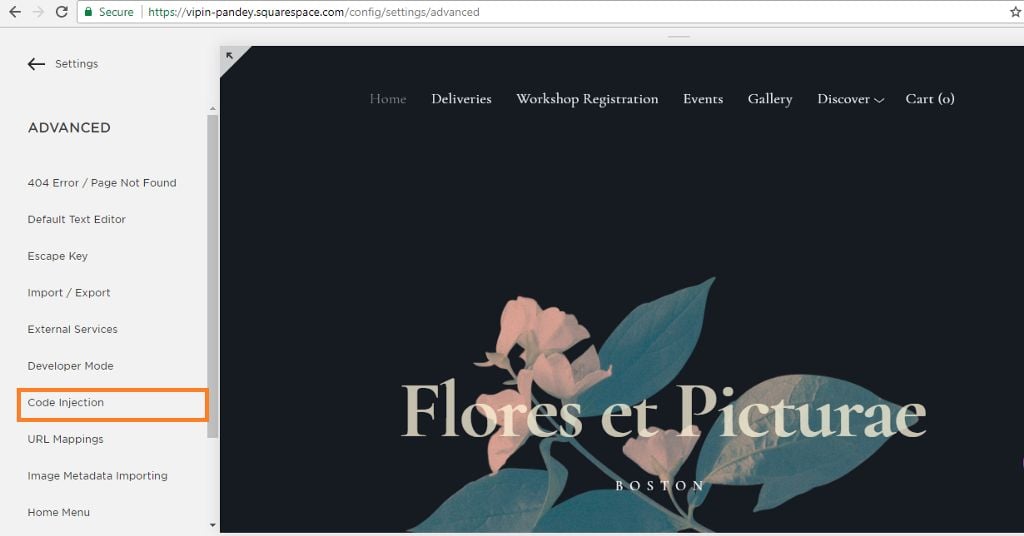
3. Navigate to Code Injection.
4. Paste the Facebook Messenger Widget script.
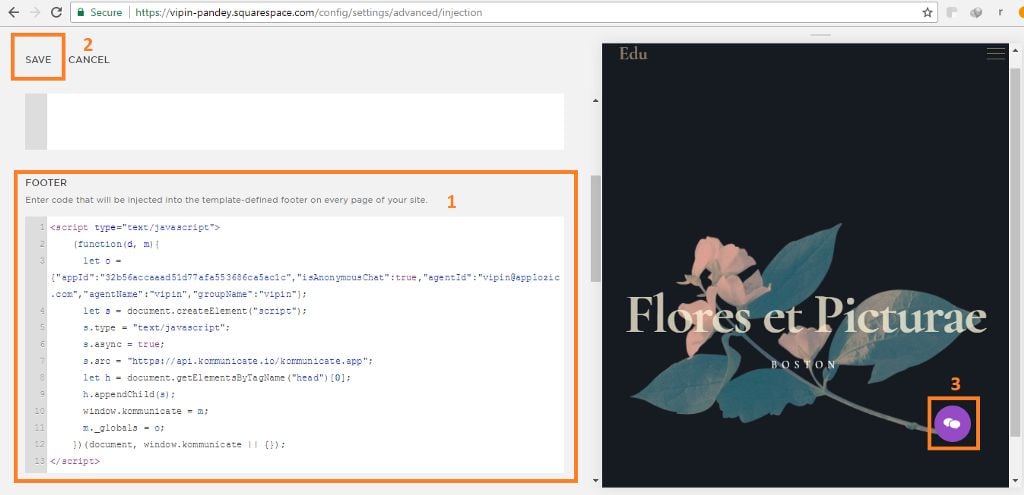
You have now added Facebook Messenger live chat to your website.
We’ve shown you how to create your Facebook chat widget code and install Facebook Chat widget on some of the most popular site builders. Want to chat with customers on Messenger widget and other channels, as well as access their contact details and chat history in a centralized inbox? Register for a respond.io account now.
Turn customer conversations into business growth with respond.io. ✨
Manage calls, chats and emails in one place!
Further Reading
And that’s how you get a Messenger widget to add Facebook Messenger to your website. If you enjoyed reading about how to grow your business with the ultimate chat widget, learn more about instant messaging for business with these blog posts:


 Electronics
 Fashion & Apparel
 Furniture
 Jewelry and Watches
 Afterschool Activities
 Sport & Fitness
 Beauty Center
 Dental Clinic
 Medical Clinic
 Home Cleaning & Maid Services
 Photography & Videography
 Car Dealership
 Travel Agency & Tour Operator


