


 Elettronica
 Moda E Abbigliamento
 Mobili
 Gioielli e Orologi
 Attività dopo scuola
 Sport e fitness
 Centro benessere
 Clinica dentale
 Clinica medica
 Servizi di pulizia domestica e governante
 Fotografia e videografia
 Concessionaria auto
 Agenzia di viaggio e operatore turistico

TL;DR - Come ottenere l'API di WhatsApp
L'API di WhatsApp è pensata per le aziende a cui non basta più l'app standard WhatsApp Business e che hanno bisogno di funzionalità avanzate per più utenti Ottenerla tramite un Business Solution Provider (BSP) come respond.io semplifica il processo
Scegli un numero di telefono: Hai bisogno di un numero di telefono che non sia già collegato a un account WhatsApp, oppure puoi usare un numero esistente con la Coesistenza di WhatsApp.
Collega i tuoi account: Collega il tuo account Facebook per creare un nuovo profilo WhatsApp Business all'interno di
respond.io.
Verifica il tuo numero: Verifica il numero di telefono scelto tramite SMS o chiamata per completare il processo di configurazione.
Ti stai chiedendo come ottenere l'API WhatsApp Business? Sei nel posto giusto. Anche se tuffarsi in un'integrazione dell'API di WhatsApp può sembrare scoraggiante, in realtà è facile se segui le linee guida corrette. In questo post del blog, ti mostreremo come ottenere rapidamente l'API di WhatsApp per la tua azienda senza problemi. Inoltre, ti aiuteremo a capire i prossimi passi dopo aver ottenuto un'integrazione dell'API di WhatsApp Business.
Integrazione API WhatsApp: un'introduzione
L'API di WhatsApp Business – nota anche come Piattaforma per le Aziende di WhatsApp – è progettata per le aziende che necessitano di accesso multi-utente alla piattaforma e funzionalità di messaggistica avanzate su larga scala. È il passo successivo pratico per le aziende che superano l'app WhatsApp Business gratuita.

L'aggiornamento all'API di WhatsApp Business comporta alcuni costi, inclusi.
Il prezzo per messaggio di WhatsApp addebita
Una casella di messaggi di terze parti per ricevere e inviare messaggi
Quell'ultima parte è fondamentale perché Meta non fornisce un'interfaccia integrata per l'API di WhatsApp Business. Per utilizzarla realmente, avrai bisogno di una casella di messaggi come respond.io per gestire le tue conversazioni e interazioni con i clienti.
Per le aziende che cercano di espandersi, questi costi sono ampiamente superati dai benefici. Integrando l'API di WhatsApp con una casella di messaggi, un software per la conversazione con i clienti, o WhatsApp CRM, puoi centralizzare i dati dei clienti e le conversazioni sfruttando automazioni avanzate per massima efficienza.
Quindi, può qualsiasi azienda ottenere l'API WhatsApp? Non proprio. Prima della richiesta, le aziende devono assicurarsi di essere idonee secondo le Politiche Commerciali di WhatsApp. Ad esempio, WhatsApp non consente la vendita di prodotti medici e sanitari sulla piattaforma.
Ora che sei a conoscenza dei requisiti, come iniziare con l'API di WhatsApp?
Come Scegliere il Miglior BSP per l'Accesso all'API di WhatsApp?
Un BSP (Business Solution Provider) è un partner ufficiale di WhatsApp che collega le aziende all'API di WhatsApp Business e fornisce le infrastrutture, gli strumenti e il supporto necessari per utilizzarla.
Ci sono molti BSP disponibili, incluso respond.io, un partner ufficiale di Meta che rende facile la configurazione. Con respond.io, puoi iniziare con l'API di WhatsApp in meno di 10 minuti.
Perché scegliere Respond.io come la tua casella per l'API WhatsApp Business
Quando selezioni un BSP per l'API WhatsApp, è importante ricordare che non sono tutti uguali. Ottenere l'API WhatsApp Business tramite respond.io offre diversi vantaggi chiave, tra cui:
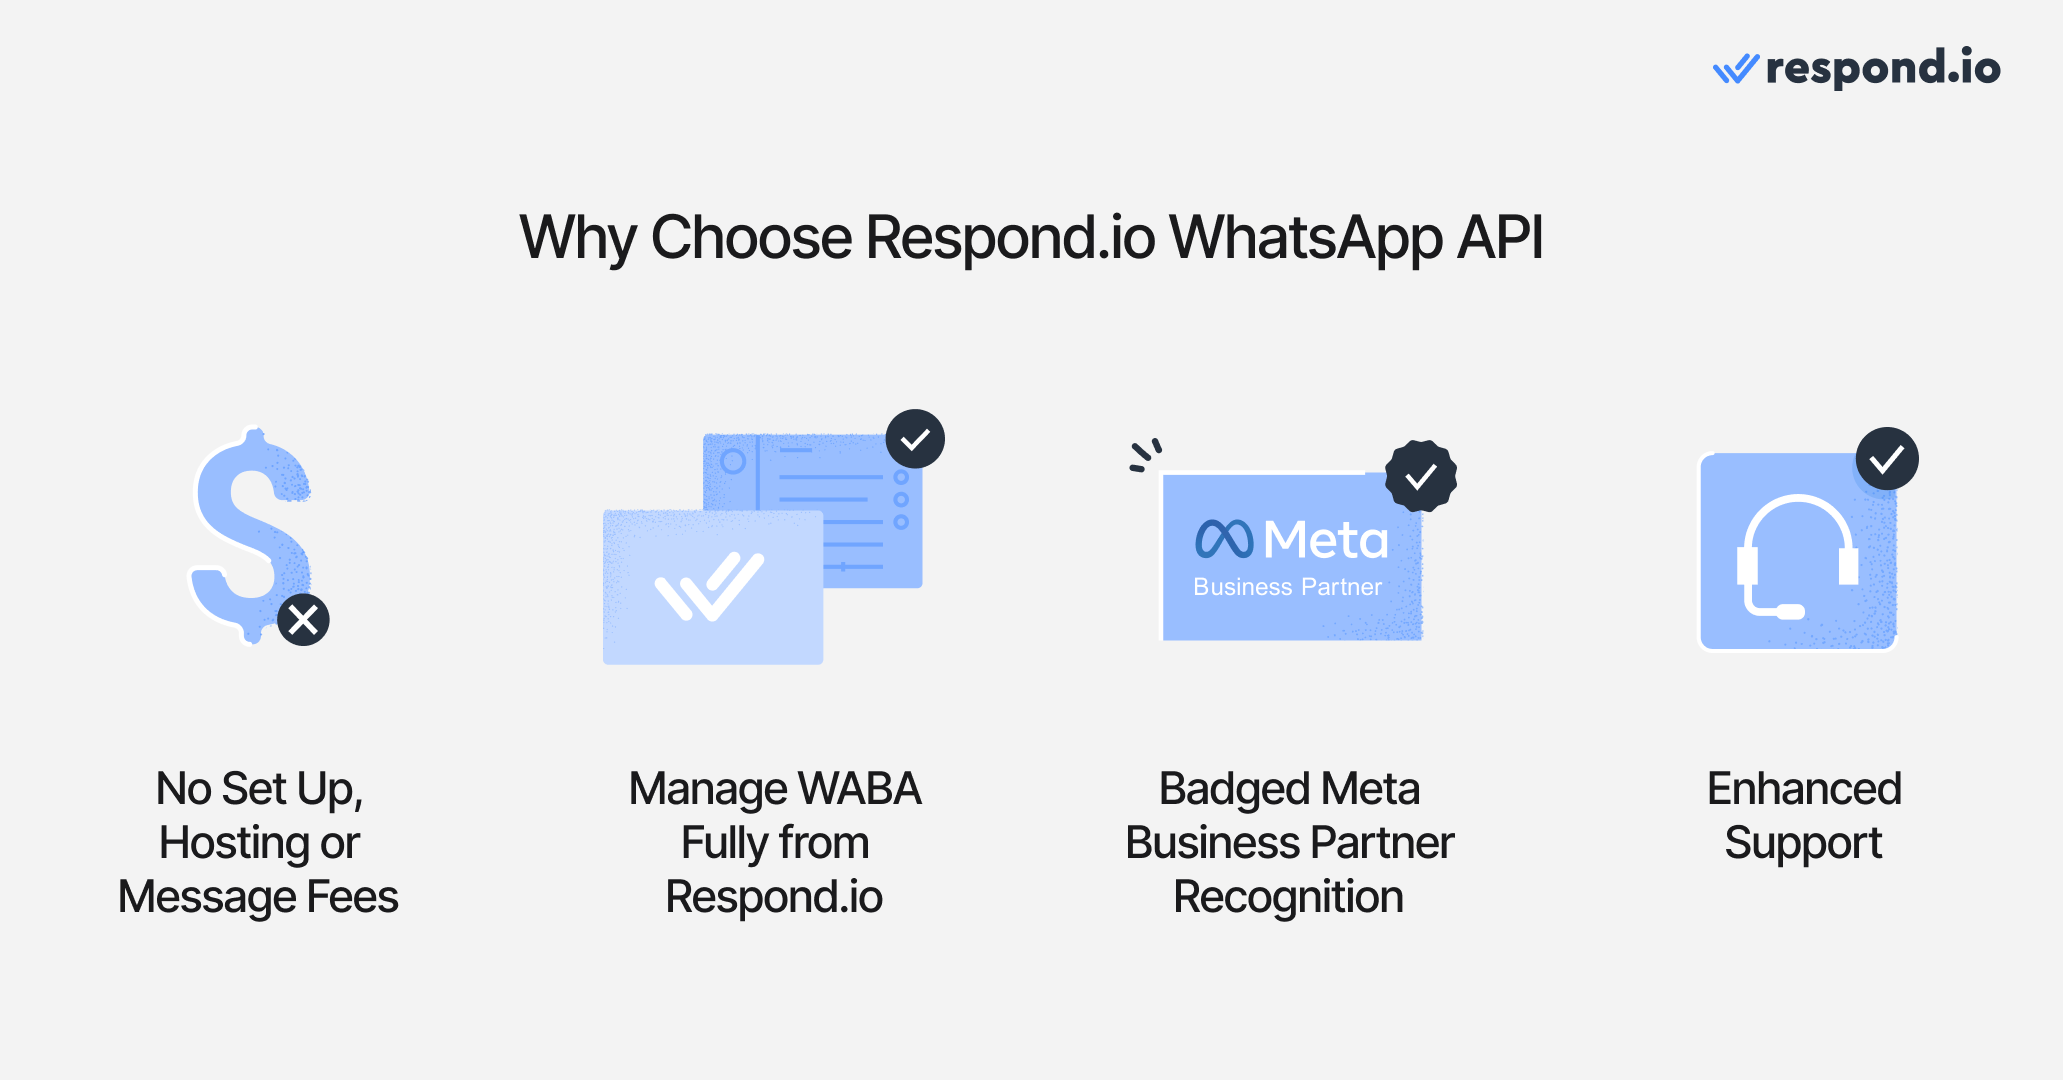
Nessun costo aggiuntivo per configurazione, hosting o messaggi: Paghi solo le commissioni per messaggio di Meta oltre al piano mensile di respond.io. Utilizza il nostro calcolatore dei costi per stimare le tue spese.
Gestione dell'account WhatsApp Business: Gestisci il tuo Account WhatsApp Business (WABA) senza sforzi su respond.io. Ad esempio, puoi creare e inviare modelli di messaggi per approvazione e monitorare il tuo saldo WABA tramite il Modulo sulle Tariffe di WhatsApp specializzato.
Riconoscimento di Partner Commerciale Meta Certificato: Respond.io ha superato la valutazione di Meta per competenza nei prodotti Meta come WhatsApp, Facebook Messenger e Instagram DM.
Supporto migliorato: In qualità di Partner Commerciale di Meta, respond.io riceve supporto migliorato da Meta. Questo contribuisce a un elevato livello di servizio per gli utenti di respond.io.
Supporta le chiamate vocali: Respond.io è tra i primi a supportare WhatsApp Business Calling API, le chiamate VoIP e Messenger, consentendoti di effettuare, ricevere, trasferire e riassumere le chiamate vocali direttamente nella stessa casella che usi per le chat.
Pronto a iniziare? Ecco come configurare l'integrazione API WhatsApp con respond.io.
Trasforma le conversazioni in clienti con l'API WhatsApp ufficiale di respond.io ✨
Gestisci chiamate e chat WhatsApp in un unico posto!
Integrazione dell'API di WhatsApp nel Modo Facile: Come Ottenere un Account per l'API di WhatsApp con Respond.io
Per iniziare, registrati per un account su respond.io. Puoi provare respond.io gratuitamente e successivamente abbonarti a un piano che soddisfi le esigenze della tua azienda. Per rendere le cose più facili, abbiamo raccolto tutte le informazioni utili in questo blog per aiutarti a ottenere la tua API di WhatsApp.
Ci sono quattro passaggi per ottenere un Account API di WhatsApp.
Passo 1: trasferisci o acquista un numero di telefono oppure collega il tuo account WhatsApp Business esistente
Hai bisogno di un numero di telefono per impostare il tuo account API di WhatsApp Business. Puoi portare un numero esistente se può ricevere chiamate o SMS, assicurati solo che non sia collegato a nessun account WhatsApp, WhatsApp Business App o API di WhatsApp. In alternativa, puoi ottenere un numero virtuale gratuito da Meta per la configurazione della tua API di WhatsApp.
Ora, le aziende possono anche scegliere di collegare un Account WhatsApp Business esistente con WhatsApp Coesistenza, così puoi mantenere lo stesso numero di telefono e la tua cronologia conversazioni (solo nell'app).
Nota: La coesistenza non è consentita da Meta nell'UE, nello Spazio Economico Europeo, nel Regno Unito, in Sudafrica, in Russia, in Corea del Sud, in Australia, in Giappone, in Nigeria, nelle Filippine o in Turchia. Le aziende in queste aree dovranno prima eliminare il proprio account WhatsApp Business esistente per utilizzare lo stesso numero di telefono.
Utilizzare un numero di telefono legato a un account WhatsApp o WhatsApp Business App esistente comporterà una perdita permanente dei contatti e dei messaggi esistenti.
Passo 2: Collega il tuo account Facebook
Una volta che hai un numero di telefono e un account respond.io, è tempo di impostare l'integrazione dell'API di WhatsApp. Clicca su questo link e seleziona Crea e collega un NUOVO account della piattaforma WhatsApp Business (API). Poi, clicca su Inizia.
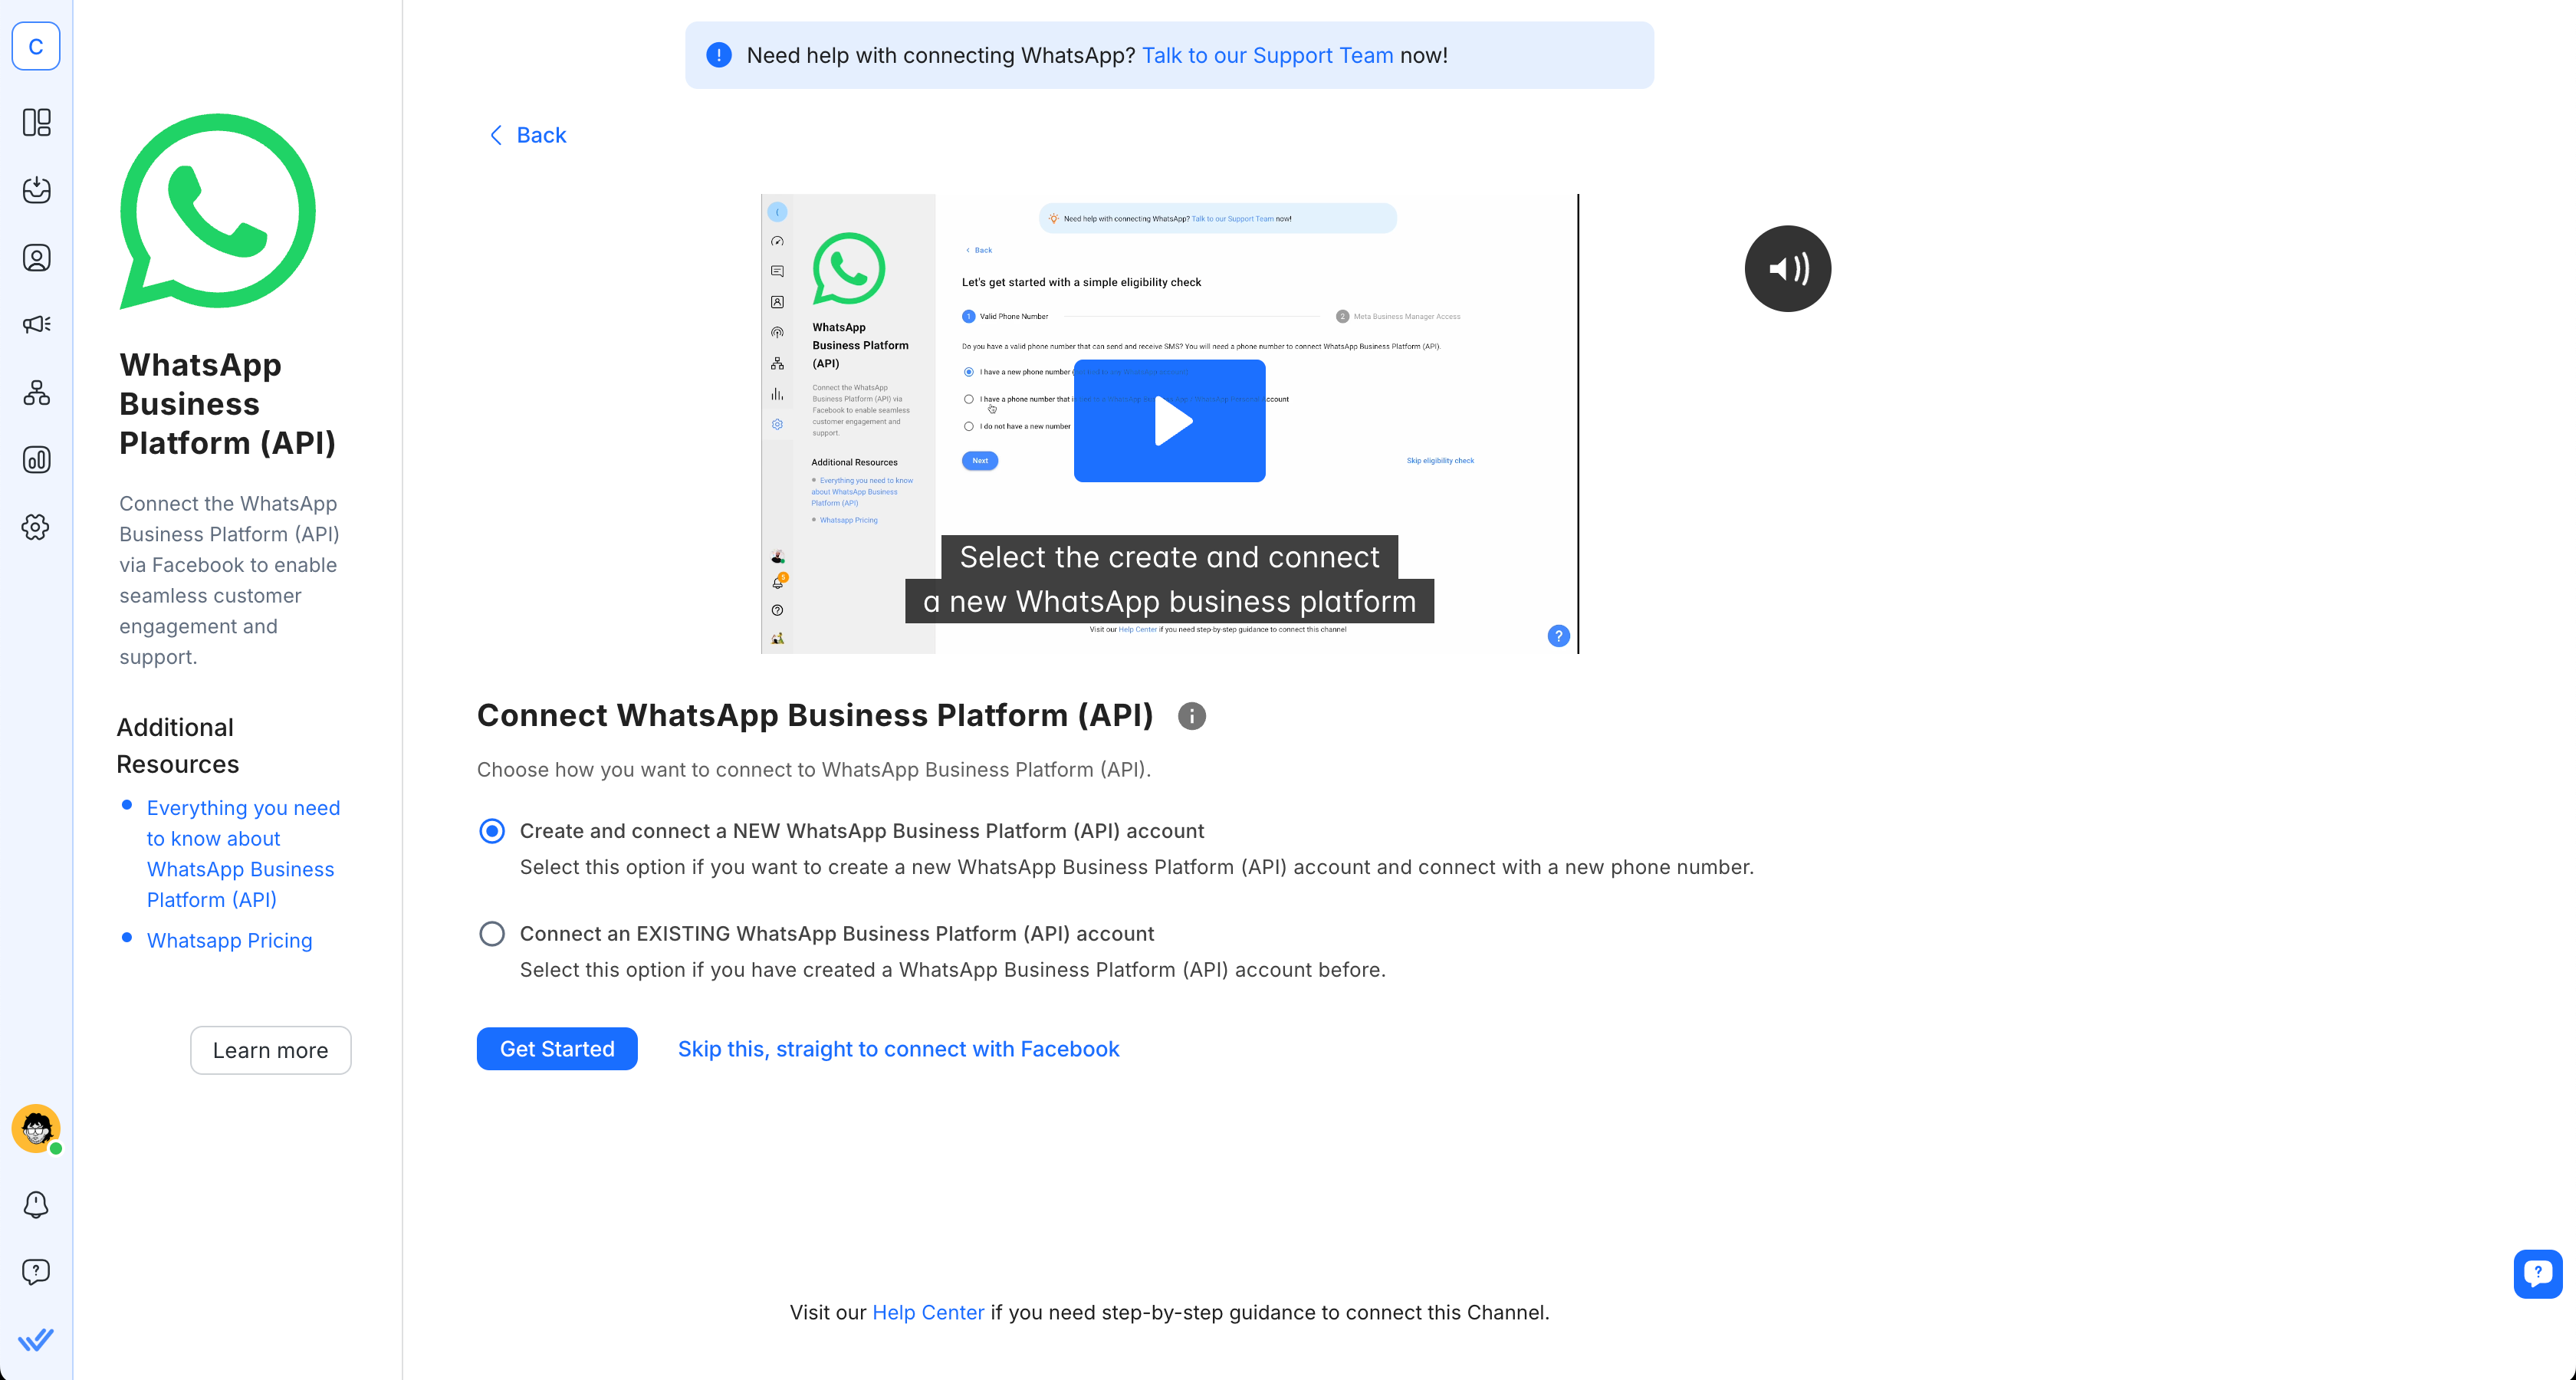
Procedi con i controlli di idoneità e fai clic sul pulsante Connettiti con Facebook poiché dovrai accedere al tuo account Facebook per procedere.
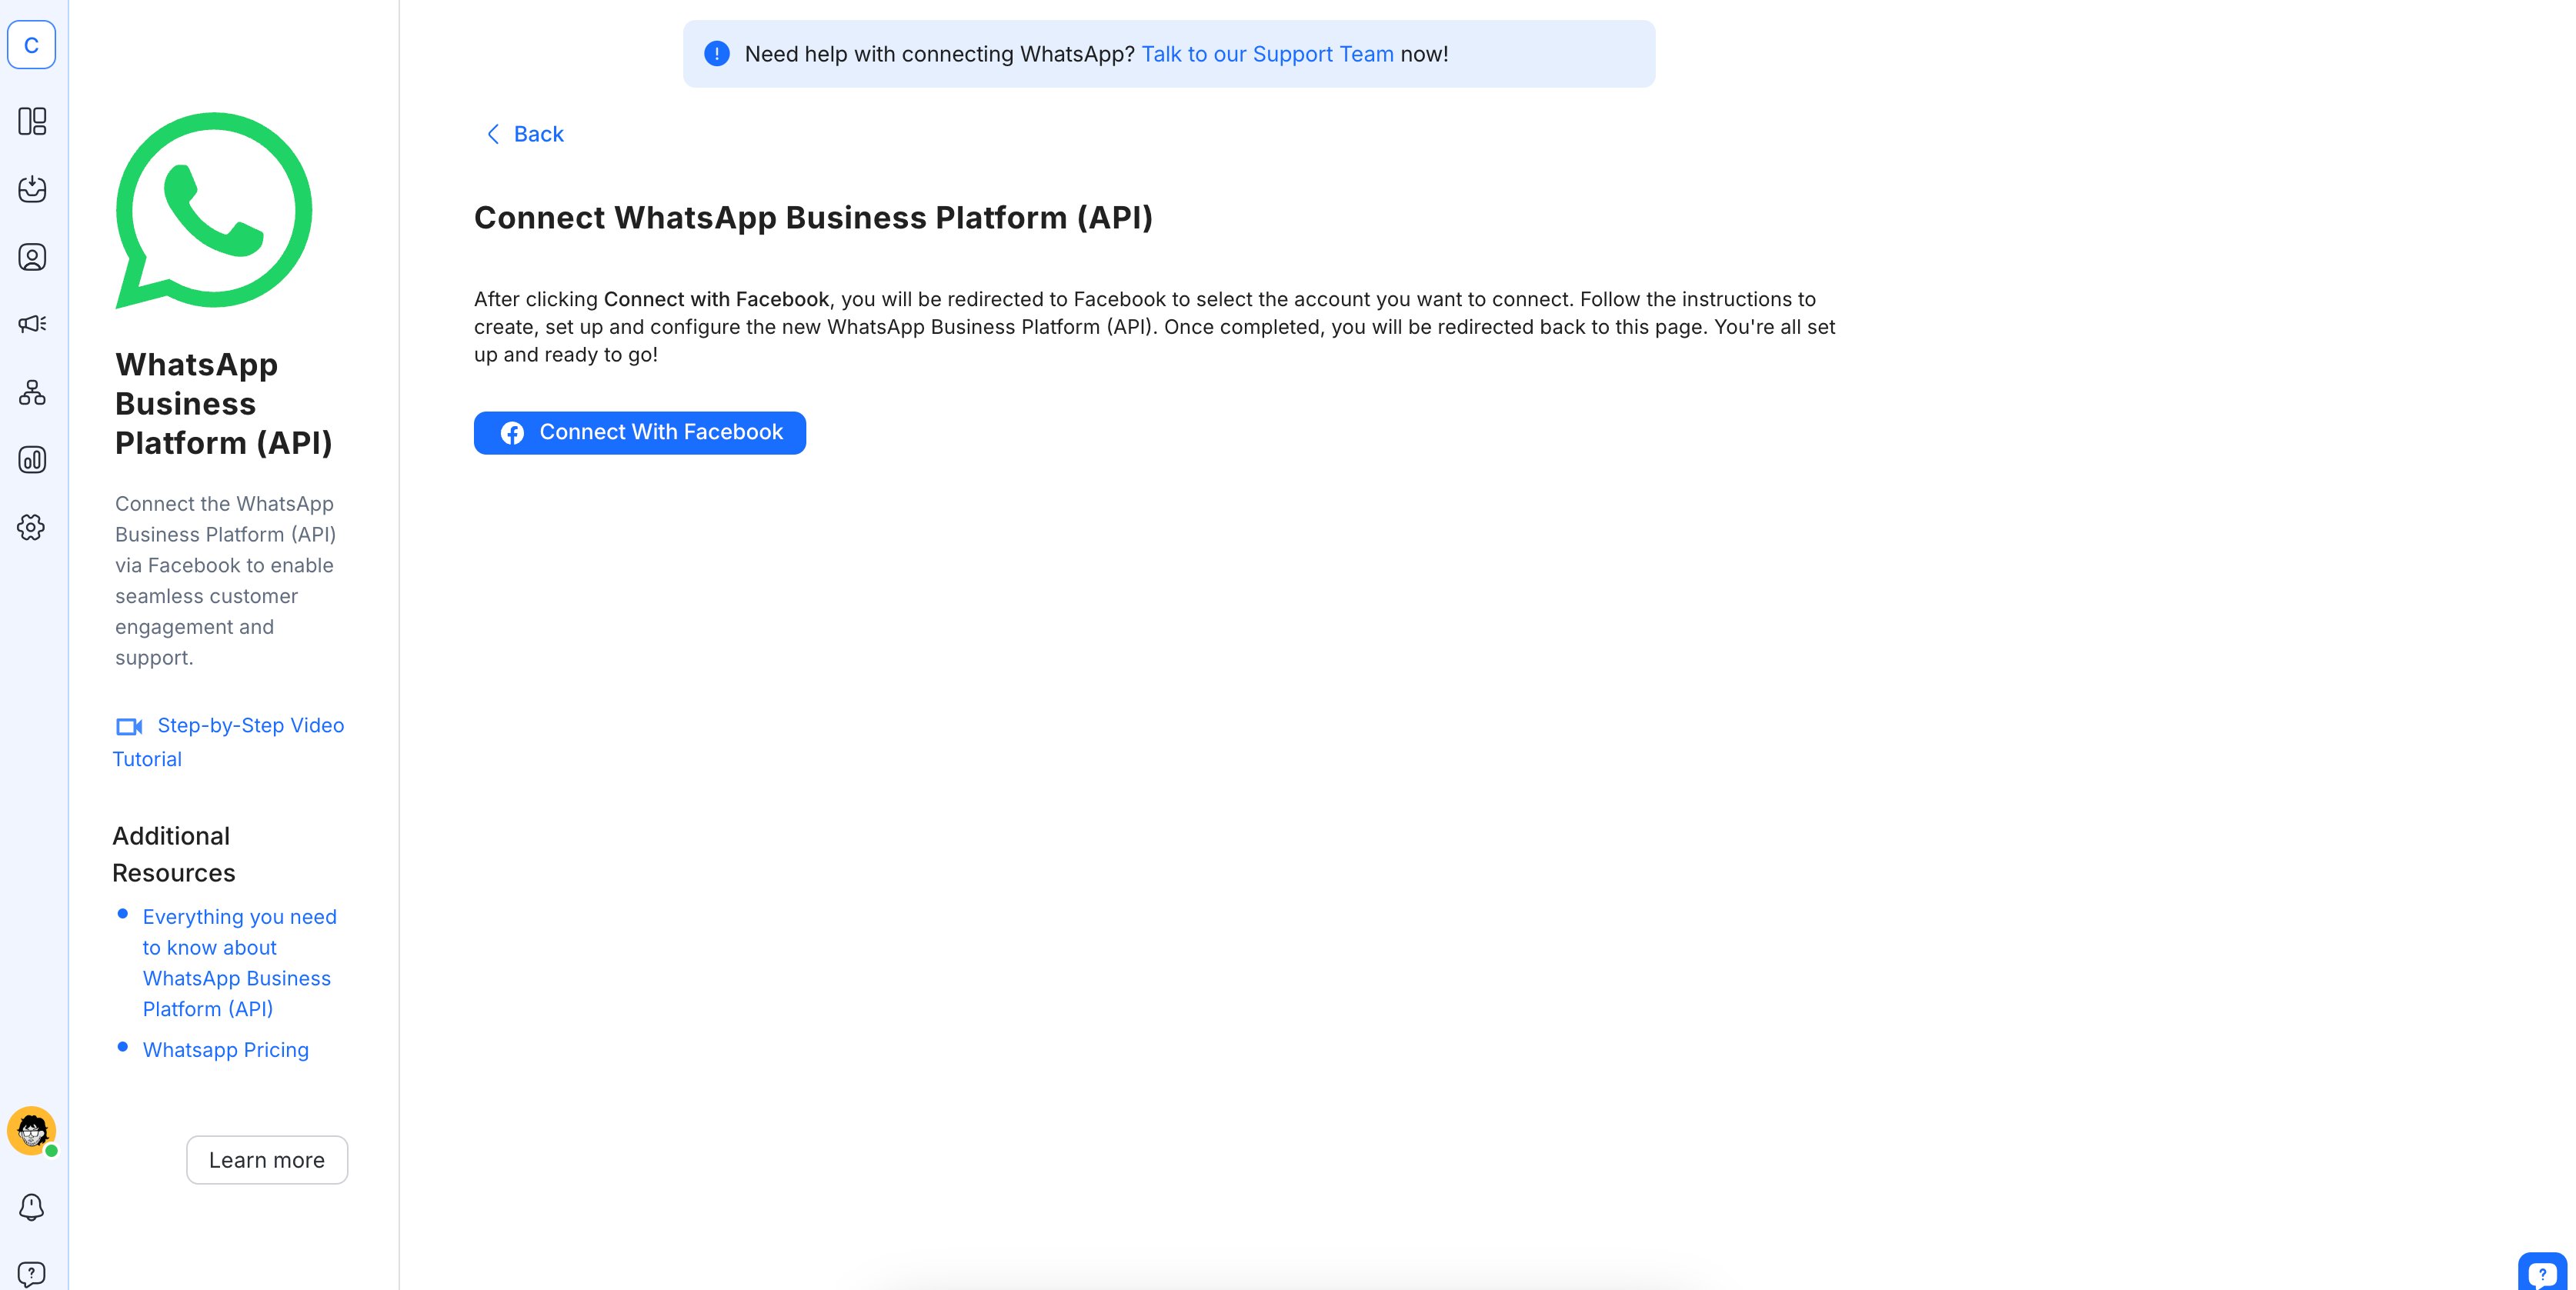
Clicca su Inizia per collegare il tuo account API di WhatsApp Business a respond.io.
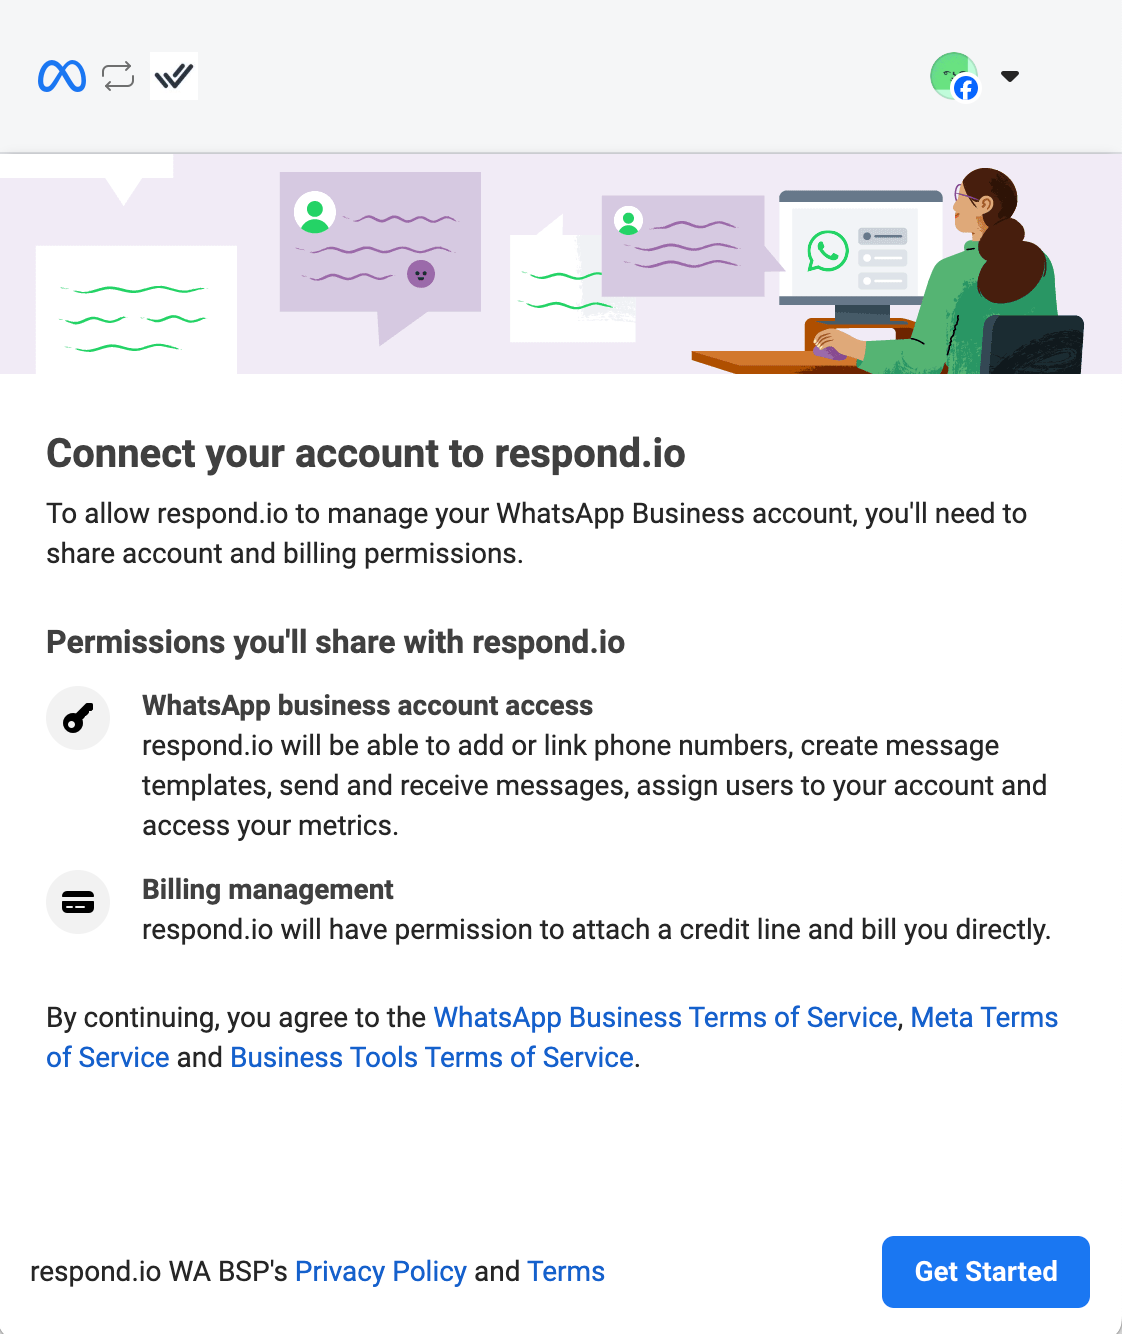
Fare ciò darà a respond.io il permesso di gestire il tuo account WhatsApp Business e gestire la fatturazione. Questo significa anche che accetti le Condizioni di Servizio di WhatsApp Business e le Condizioni di Servizio di Meta.
Passo 3: Collega il tuo Account WhatsApp Business API a Respond.io
Seleziona il tuo account Business Meta verificato — ora rinominato Meta Business Portfolio. Se non ne hai ancora uno, scegli Crea un account aziendale e segui le istruzioni.
Nota: se stai portando un numero WhatsApp da un account WhatsApp Business a un altro, seleziona un account aziendale esistente.
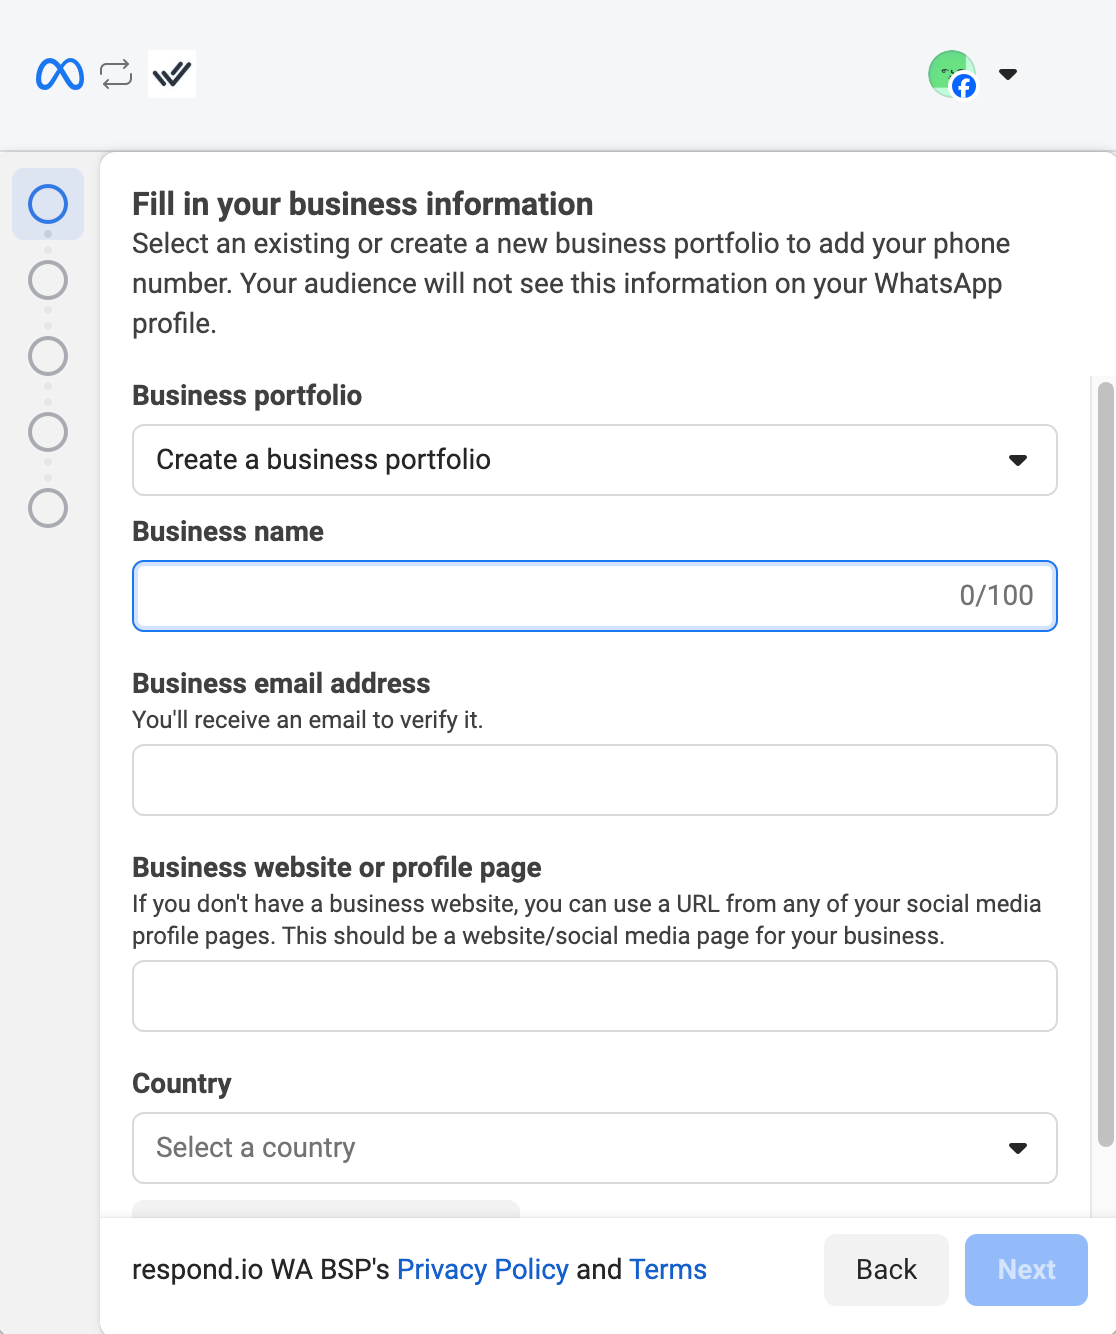
Una volta fatto ciò, scegli Crea un nuovo profilo WhatsApp Business e fai clic su Avanti. Per crearlo, fornisci prima tutti i dettagli necessari sulla tua azienda: un nome per il tuo account WhatsApp Business, un nome visualizzato, una categoria aziendale e il tuo fuso orario. La descrizione dell'azienda e il sito web sono facoltativi.
Ci sei quasi! Ora, tutto ciò che rimane è verificare il tuo numero di telefono WhatsApp Business. È piuttosto semplice se segui le istruzioni qui sotto.
Passo 4: Verifica il tuo Numero di Telefono WhatsApp Business
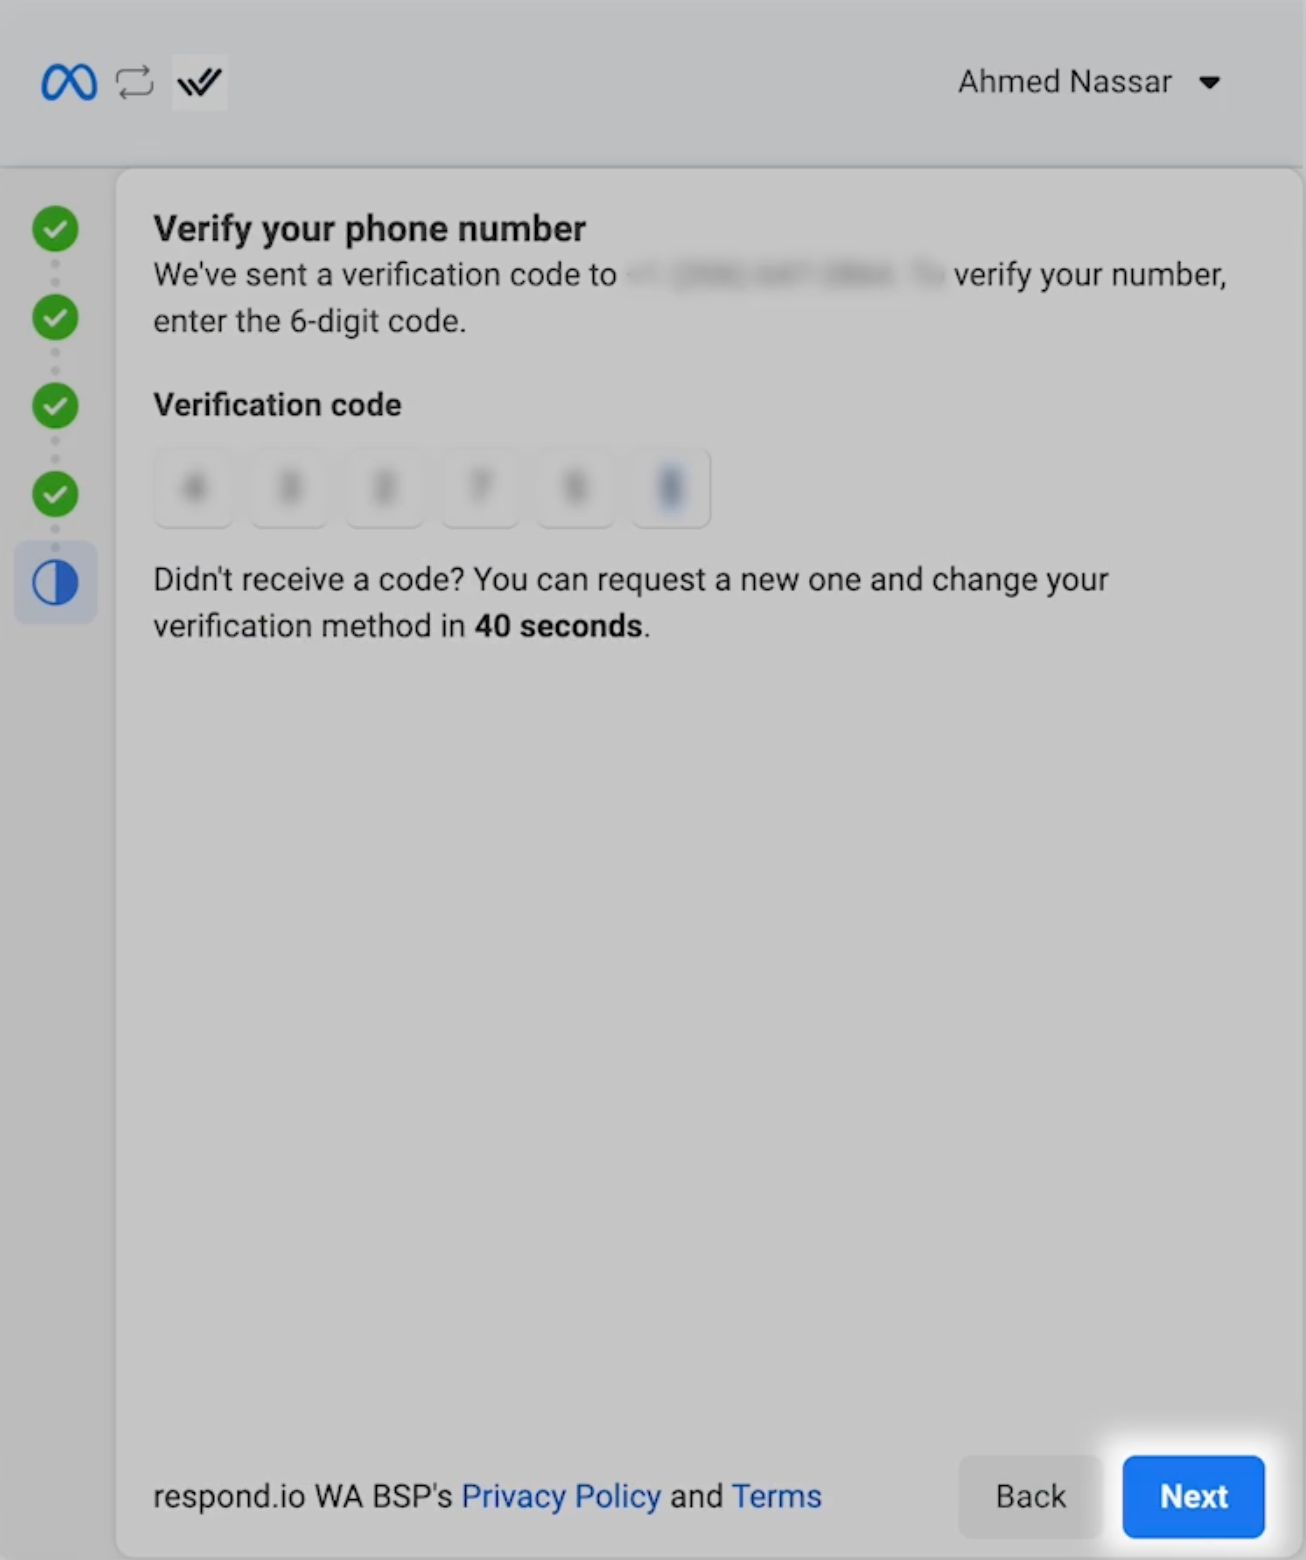
Aggiungi il tuo numero di telefono WhatsApp Business e scegli un metodo di verifica. Puoi verificare il tuo numero di telefono tramite un messaggio di testo o una chiamata, quindi assicurati di avere accesso al numero che hai utilizzato. Una volta ricevuto il codice di verifica, inseriscilo nei riquadri vuoti e fai clic su Avanti.
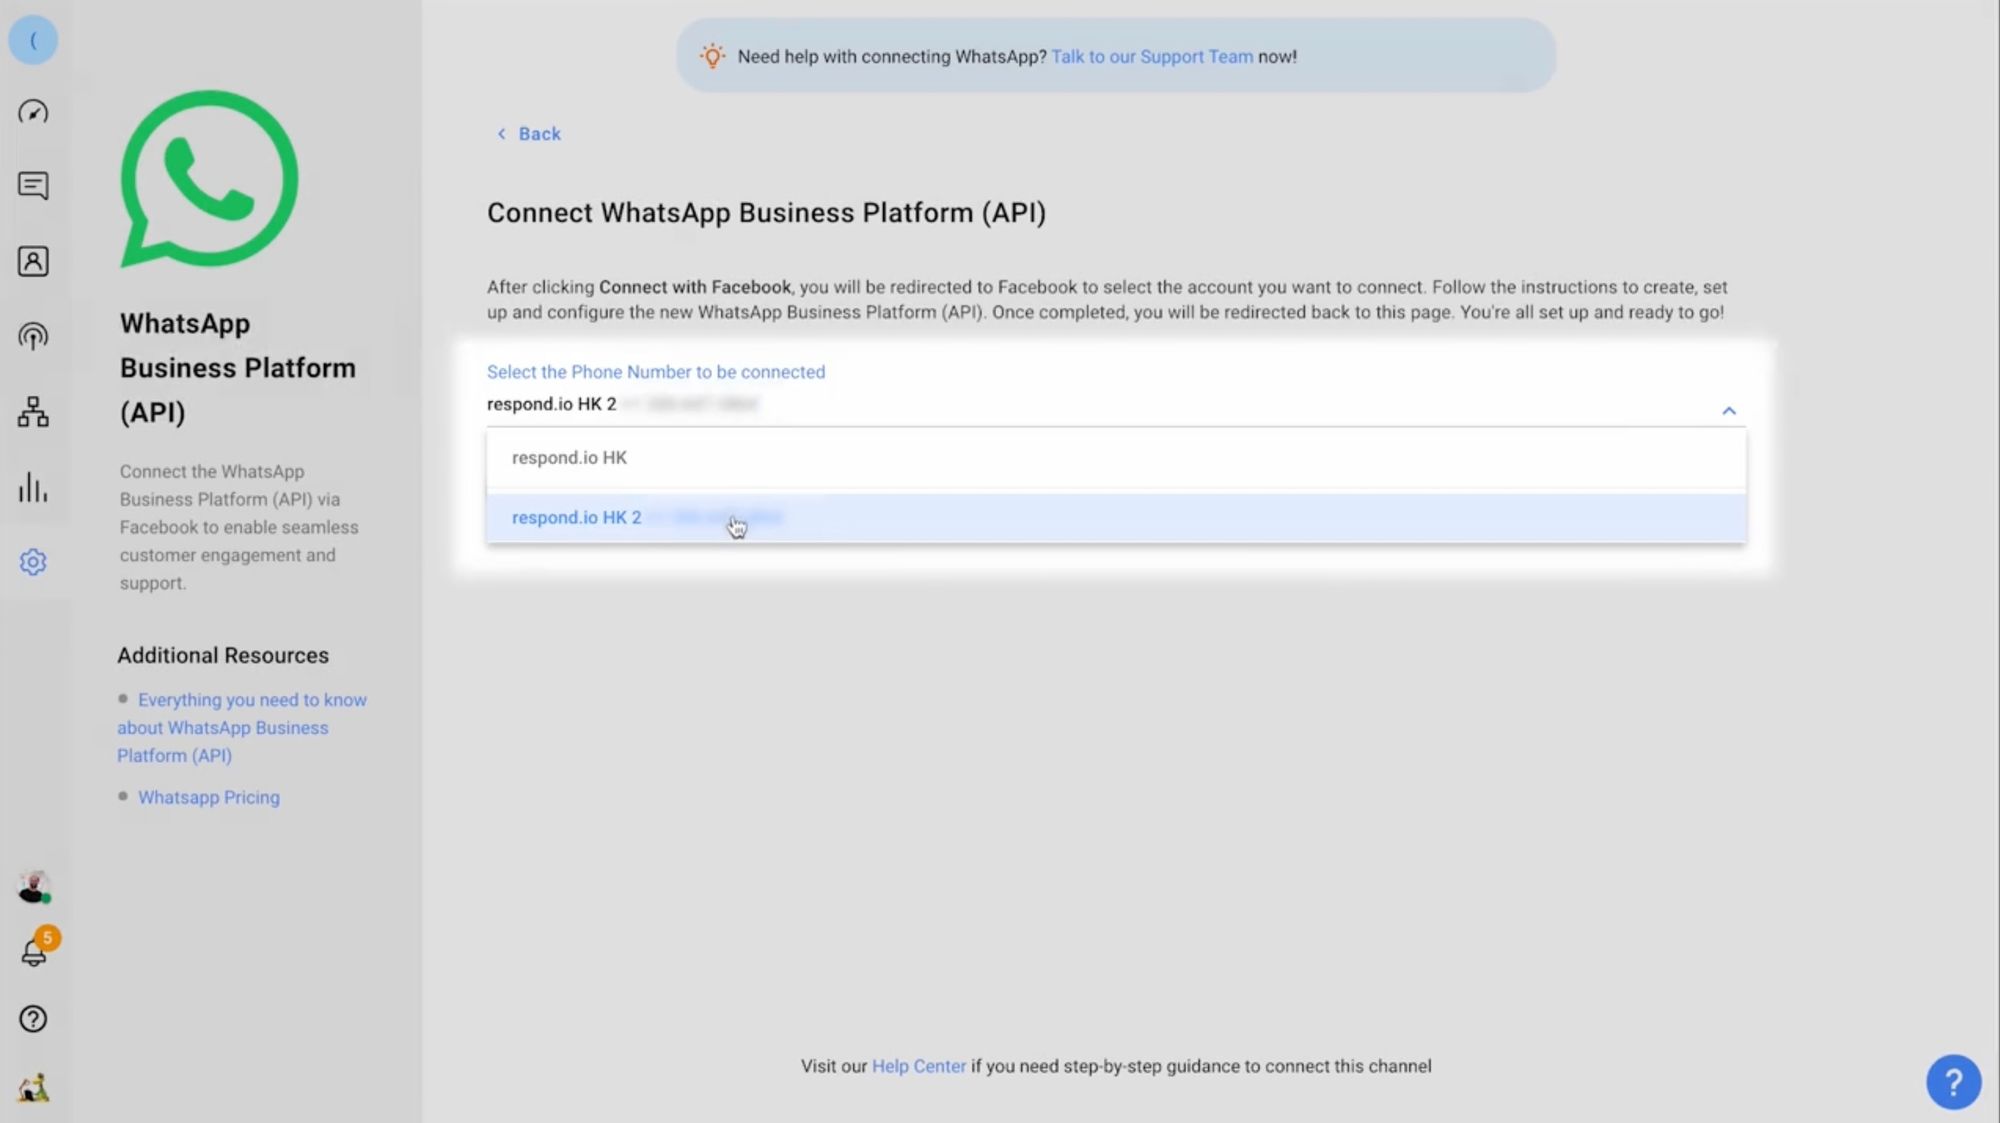
Una volta che il tuo numero di telefono è verificato, fai clic su Fine. Infine, seleziona il numero di telefono che vuoi collegare e fai clic su Completa per finire la configurazione. Ed eccoti, hai completato con successo il processo di registrazione!
Dopo aver completato l'integrazione della tua API di WhatsApp Business, la tua azienda avrà lo stato non verificato. Durante questo periodo, il controllo della Politica Commerciale di WhatsApp verrà condotto automaticamente in background.
WhatsApp blocca immediatamente gli account che non rispettano le proprie politiche. Puoi fare appello a questo inviando un ticket di supporto al tuo BSP di WhatsApp (Fornitore di Soluzioni Business). Se hai bisogno di ulteriore aiuto durante il processo, consulta il Centro Assistenza di respond.io.
Meta ha lanciato una nuova Guida all'Impostazione di WhatsApp direttamente all'interno del tuo Portfolio Business Meta. Questo nuovo hub fornisce istruzioni passo passo per semplificare l'impostazione della tua API e gestire l'idoneità ai messaggi. Ora puoi lanciare campagne più velocemente con modelli pre-approvati e controllare istantaneamente lo stato della revisione e degli appelli dei tuoi modelli.
Cosa Succede Dopo Aver Ottenuto l'API di WhatsApp?
Come azienda non verificata, il tuo account inizia nel Livello di Accesso Limitato, che consente 250 conversazioni avviate dalle aziende in una finestra mobile di 24 ore. Questo può risultare limitante per le aziende che devono inviare un elevato numero di messaggi avviati dall'azienda.
Per raggiungere un pubblico più ampio, devi verificare la tua azienda. Una volta verificata, potrai inviare 2.000 conversazioni avviate dall'azienda con clienti distinti.
Come aumentare i limiti di messaggistica del numero di telefono utilizzando l'API di WhatsApp
Dopo aver raggiunto questo traguardo, sbloccherai progressivamente limiti di messaggistica più elevati: 10.000, 100.000 e infine messaggi illimitati. Per salire al livello successivo ogni volta, devi soddisfare costantemente i seguenti criteri:
Stai inviando messaggi di alta qualità su tutti i tuoi numeri di telefono aziendali e modelli.
Negli ultimi 7 giorni la tua azienda ha utilizzato almeno la metà del suo limite di messaggistica attuale.
Se questi criteri sono soddisfatti, Meta aumenterà il limite del tuo Meta Business Portfolio di un livello entro 6 ore.
Importante: viene applicato all'intero portfolio aziendale un unico limite condiviso. Tutti i numeri di telefono appartenenti allo stesso Meta Business Portfolio condividono lo stesso limite di messaggistica.
Con il setup completato e i limiti di messaggistica in atto, sei pronto per iniziare a inviare messaggi, gestire campagne e gestire conversazioni con i clienti in modo efficiente. È qui che una piattaforma come respond.io può aiutarti a scalare e automatizzare efficacemente il tuo marketing su WhatsApp.
Risultati rapidi con l'API di WhatsApp su Respond.io
Respond.io si distingue da altri fornitori di soluzioni aziendali perché è fondamentalmente progettato per una comunicazione efficiente su tutti i canali. Da chiamate o messaggi su WhatsApp, a chat su Instagram DMs o SMS, respond.io fa tutto.
In qualità di partner ufficiale di Meta, rimaniamo aggiornati sulle ultime funzionalità di WhatsApp, insieme a tutti gli strumenti potenti disponibili sulla nostra piattaforma. Ecco uno sguardo a ciò che puoi ottenere con l'API di WhatsApp su respond.io.
Un'unica inbox omnichannel per ogni cliente, ogni canale
Respond.io comprende che le aziende si affidano a più di WhatsApp per comunicare, motivo per cui offriamo un'inbox omnichannel che riunisce tutti i canali di messaggistica popolari come TikTok, Messenger e Instagram in un unico posto.
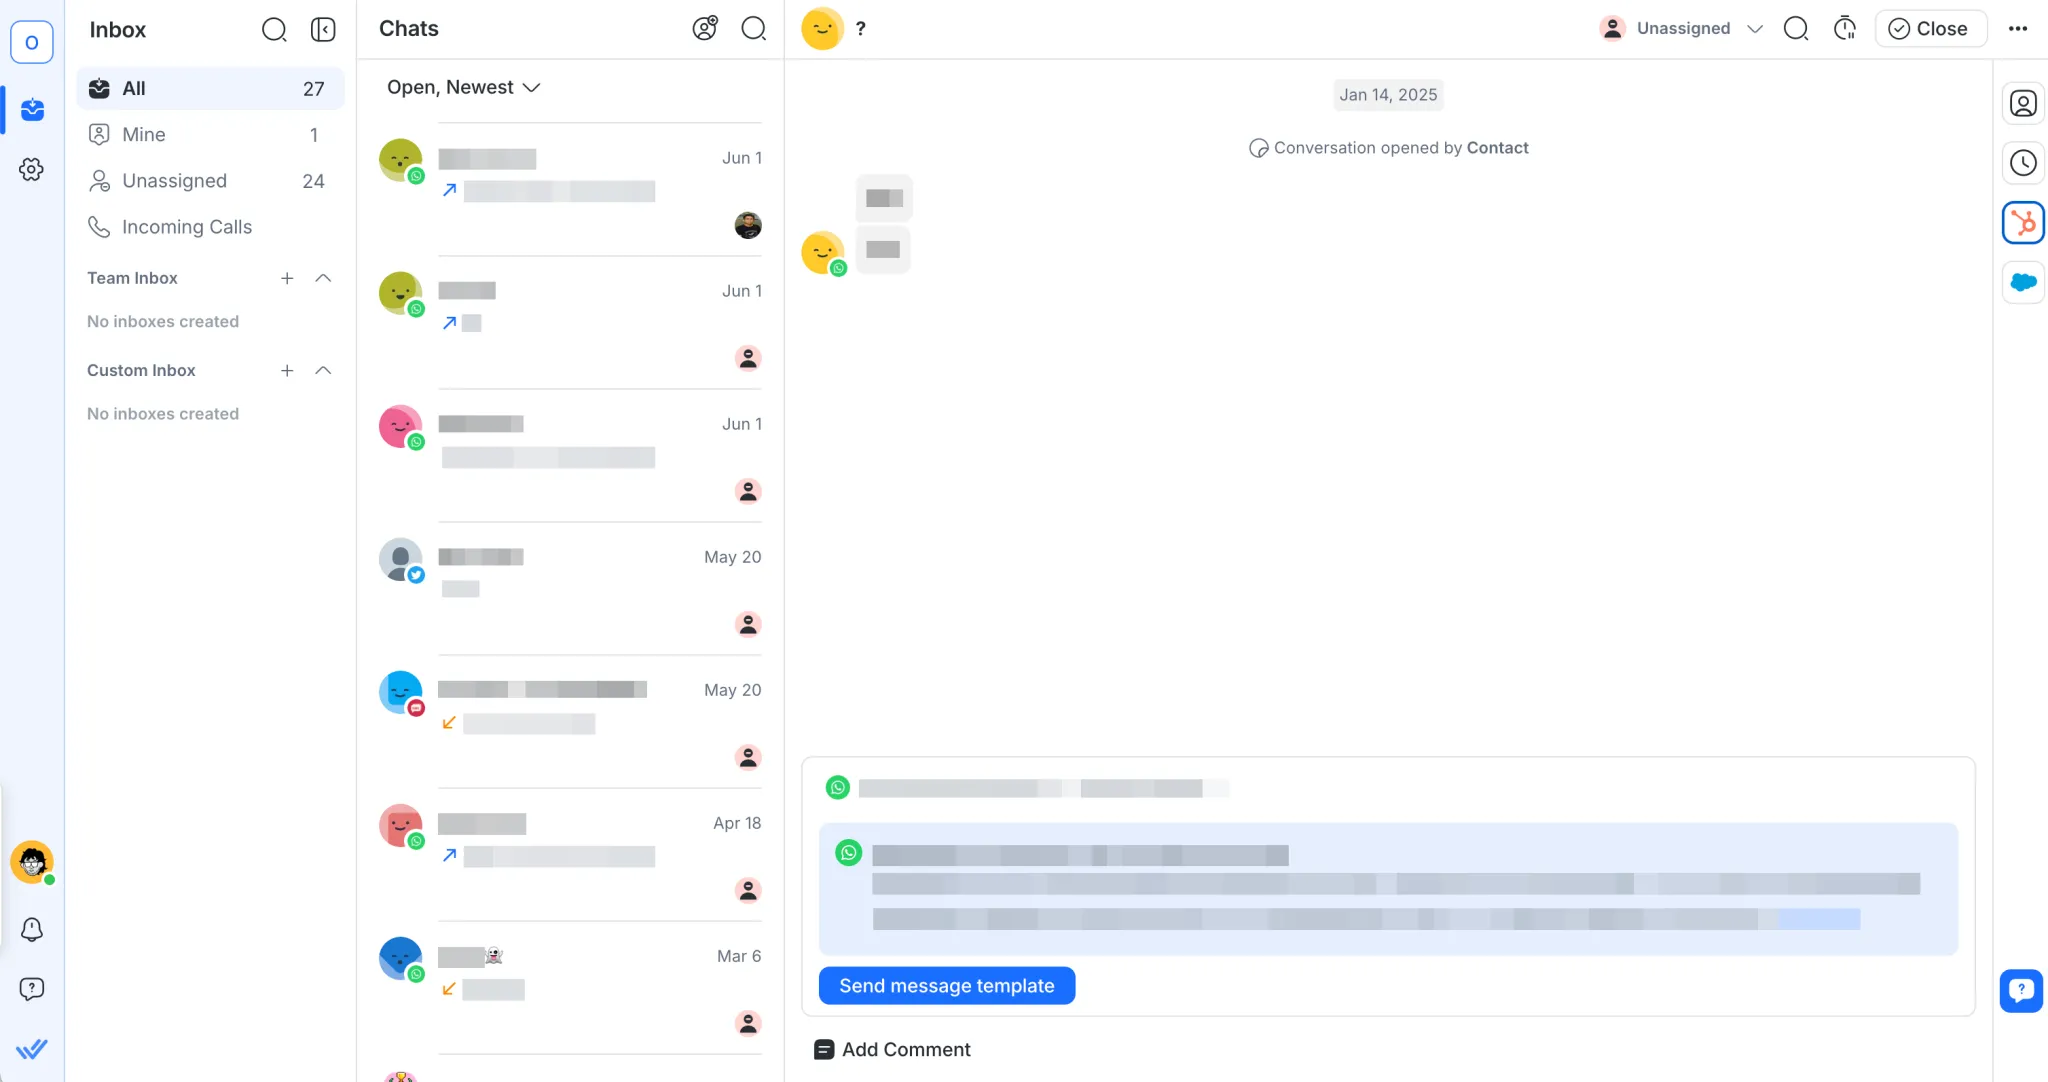
Oltre a un inbox completamente personalizzabile, puoi anche unire i contatti per prevenire duplicazioni e mantenere la cronologia completa delle conversazioni su ogni canale.
Dì la cosa giusta, ogni volta con l'AI
Gli Agenti IA di Respond.io ti aiutano a rimanere reattivo 24 ore su 24, rispondendo istantaneamente a domande frequenti, instradando chat al team giusto, aggiornando le fasi del ciclo di vita e i campi di contatto, e persino riassumendo le conversazioni al termine. Sono sempre attivi, gestendo compiti di routine affinché il tuo team possa concentrarsi su ciò che conta di più. Il follow-up degli AI Agents assicura che nessun lead o conversazione resti inattivo, inviando automaticamente promemoria o completando azioni quando le chat si silenziano.
E se gli agenti umani devono subentrare, l'IA può cedere loro la conversazione senza interruzioni. Inoltre, se un agente umano è disponibile e decide di unirsi alla conversazione, può prendere il controllo dall'agente IA senza ritardi o interruzioni.

Per interazioni più complesse, Respond AI offre supporto in tempo reale ai tuoi agenti all'interno di ogni chat. Con Suggerimenti e Assist, possono riformulare messaggi, tradurre risposte istantaneamente e ottenere aiuto nell'affrontare domande complicate - più rapidamente, in modo più chiaro e con più sicurezza che mai.
Il tuo CRM, direttamente dentro Respond.io
Respond.io non unifica solo i tuoi canali di messaggistica. Si integra anche con CRM popolari come HubSpot e Salesforce, dandoti accesso diretto alla tua fonte di verità senza lasciare la piattaforma. Questo assicura che tu abbia sempre le informazioni giuste sui clienti a portata di mano durante ogni conversazione.
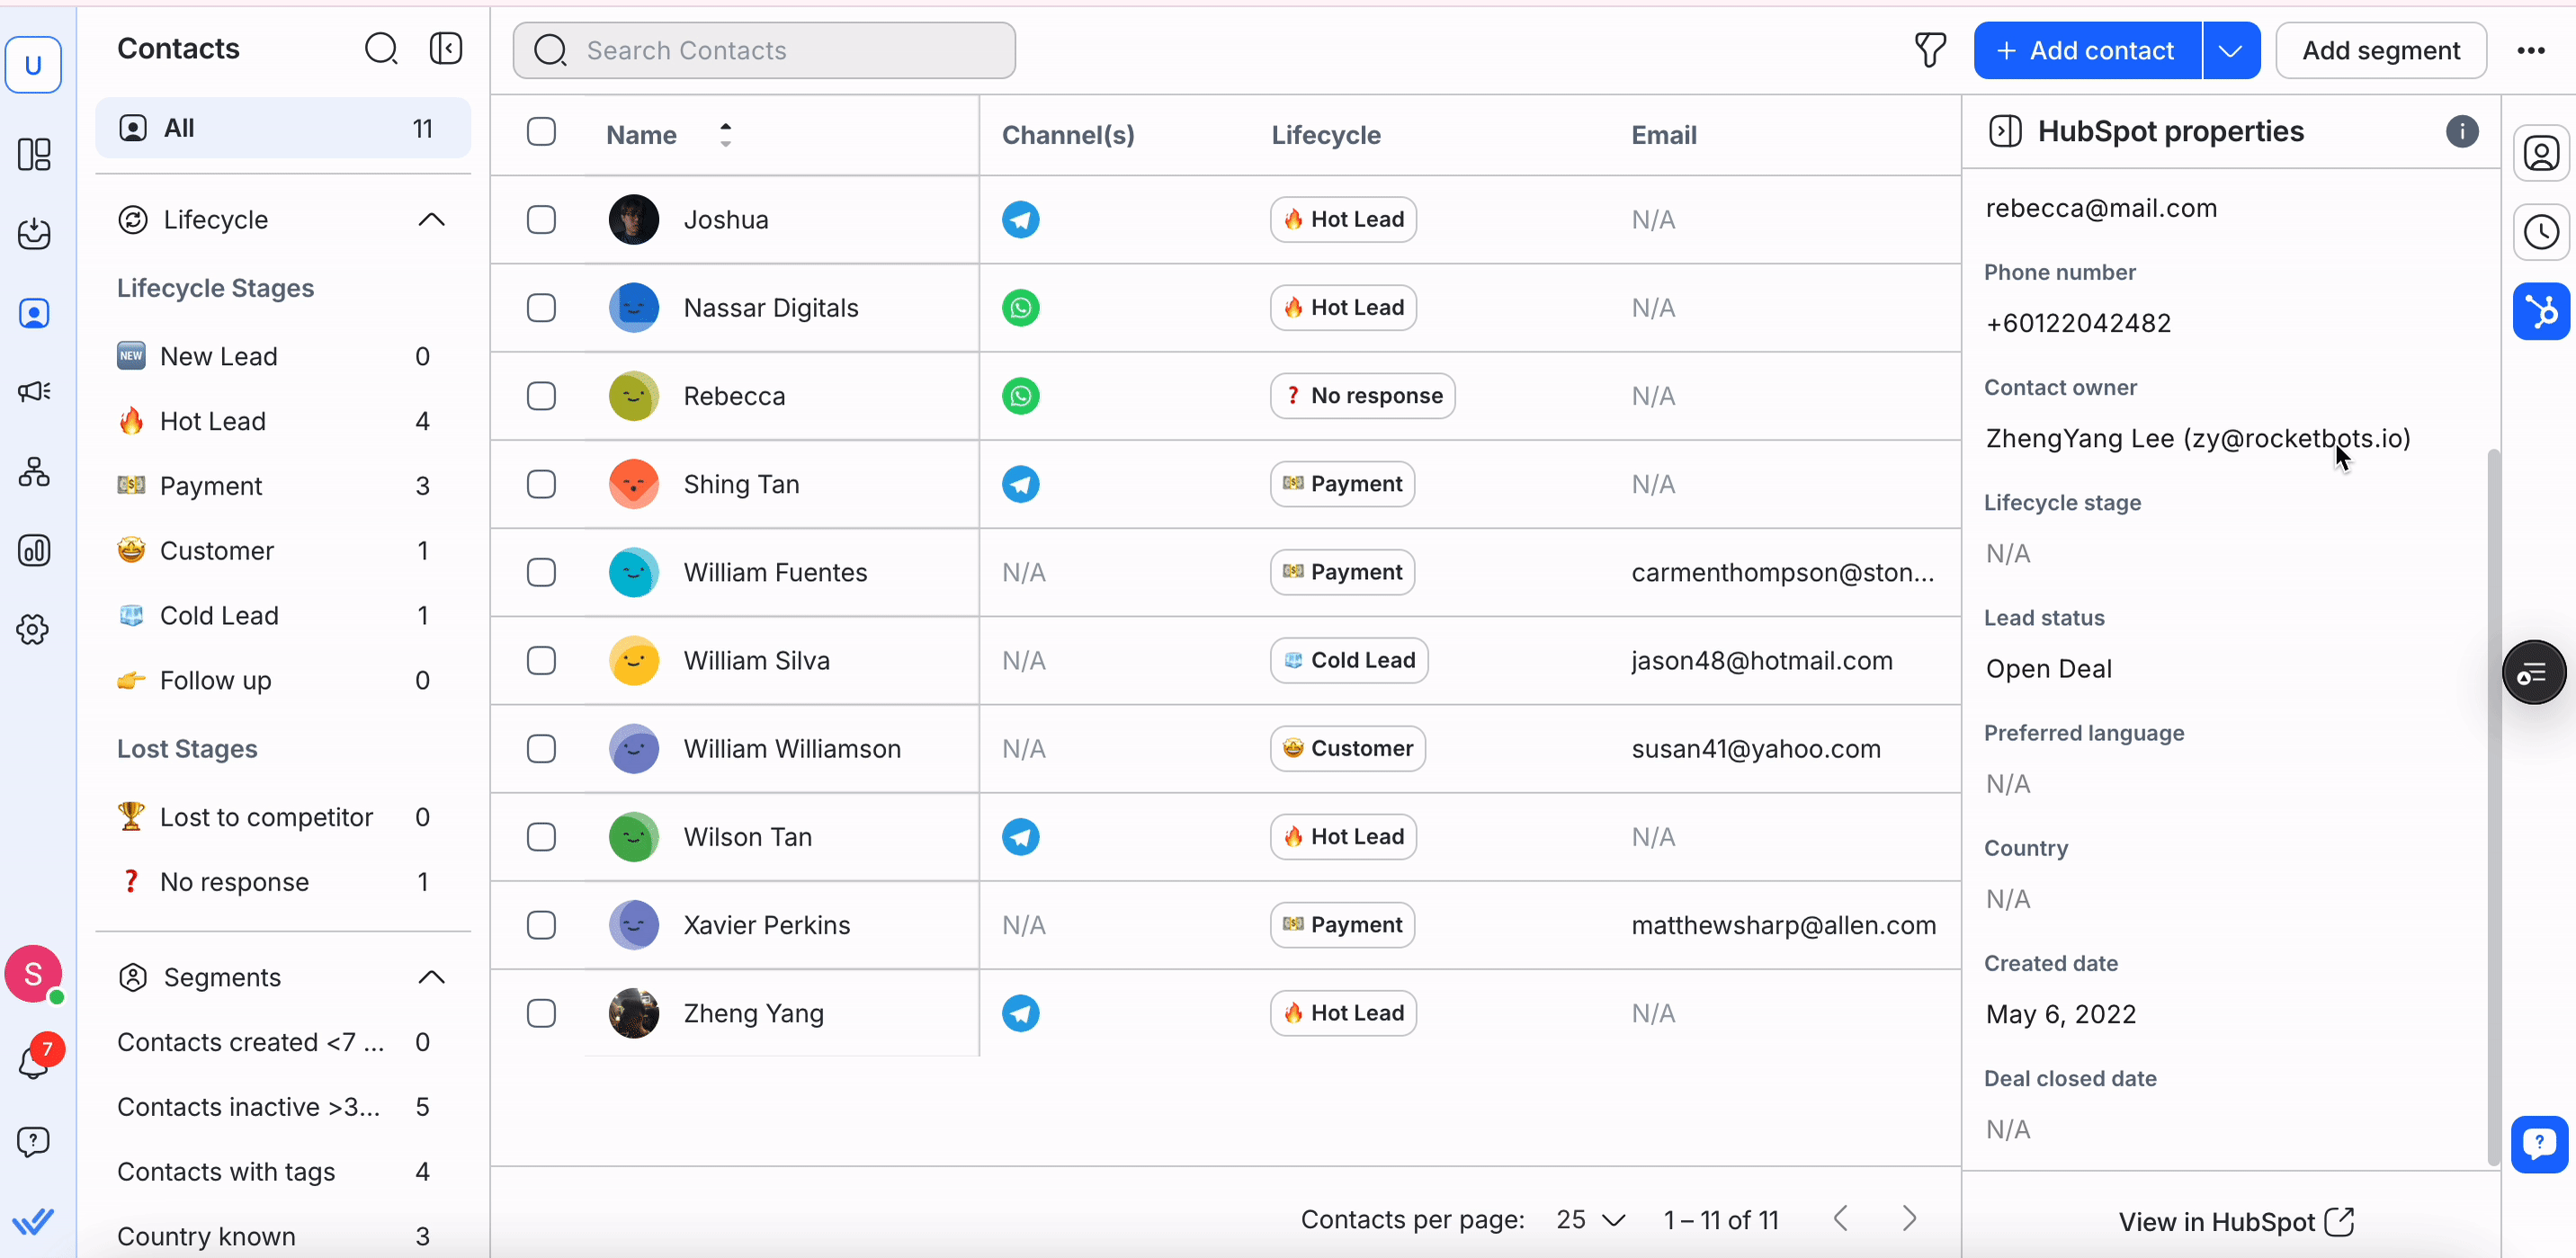
Niente più cambi di scheda, inserimenti manuali di dati o preoccupazioni riguardo a informazioni obsolete. Solo un contesto fluido e preciso per ogni chat, chiamata e follow-up. Questo significa che il tuo team può concentrarsi su ciò che conta di più: costruire relazioni più forti e concludere più affari.
Dal primo contatto a clienti abituali con il ciclo di vita
Per spingere le conversioni, è fondamentale coinvolgere i clienti al giusto stadio del loro percorso. Ecco perché respond.io offre il ciclo di vita, una funzionalità che aiuta le aziende a identificare e tenere traccia dei clienti mentre si spostano nel funnel.
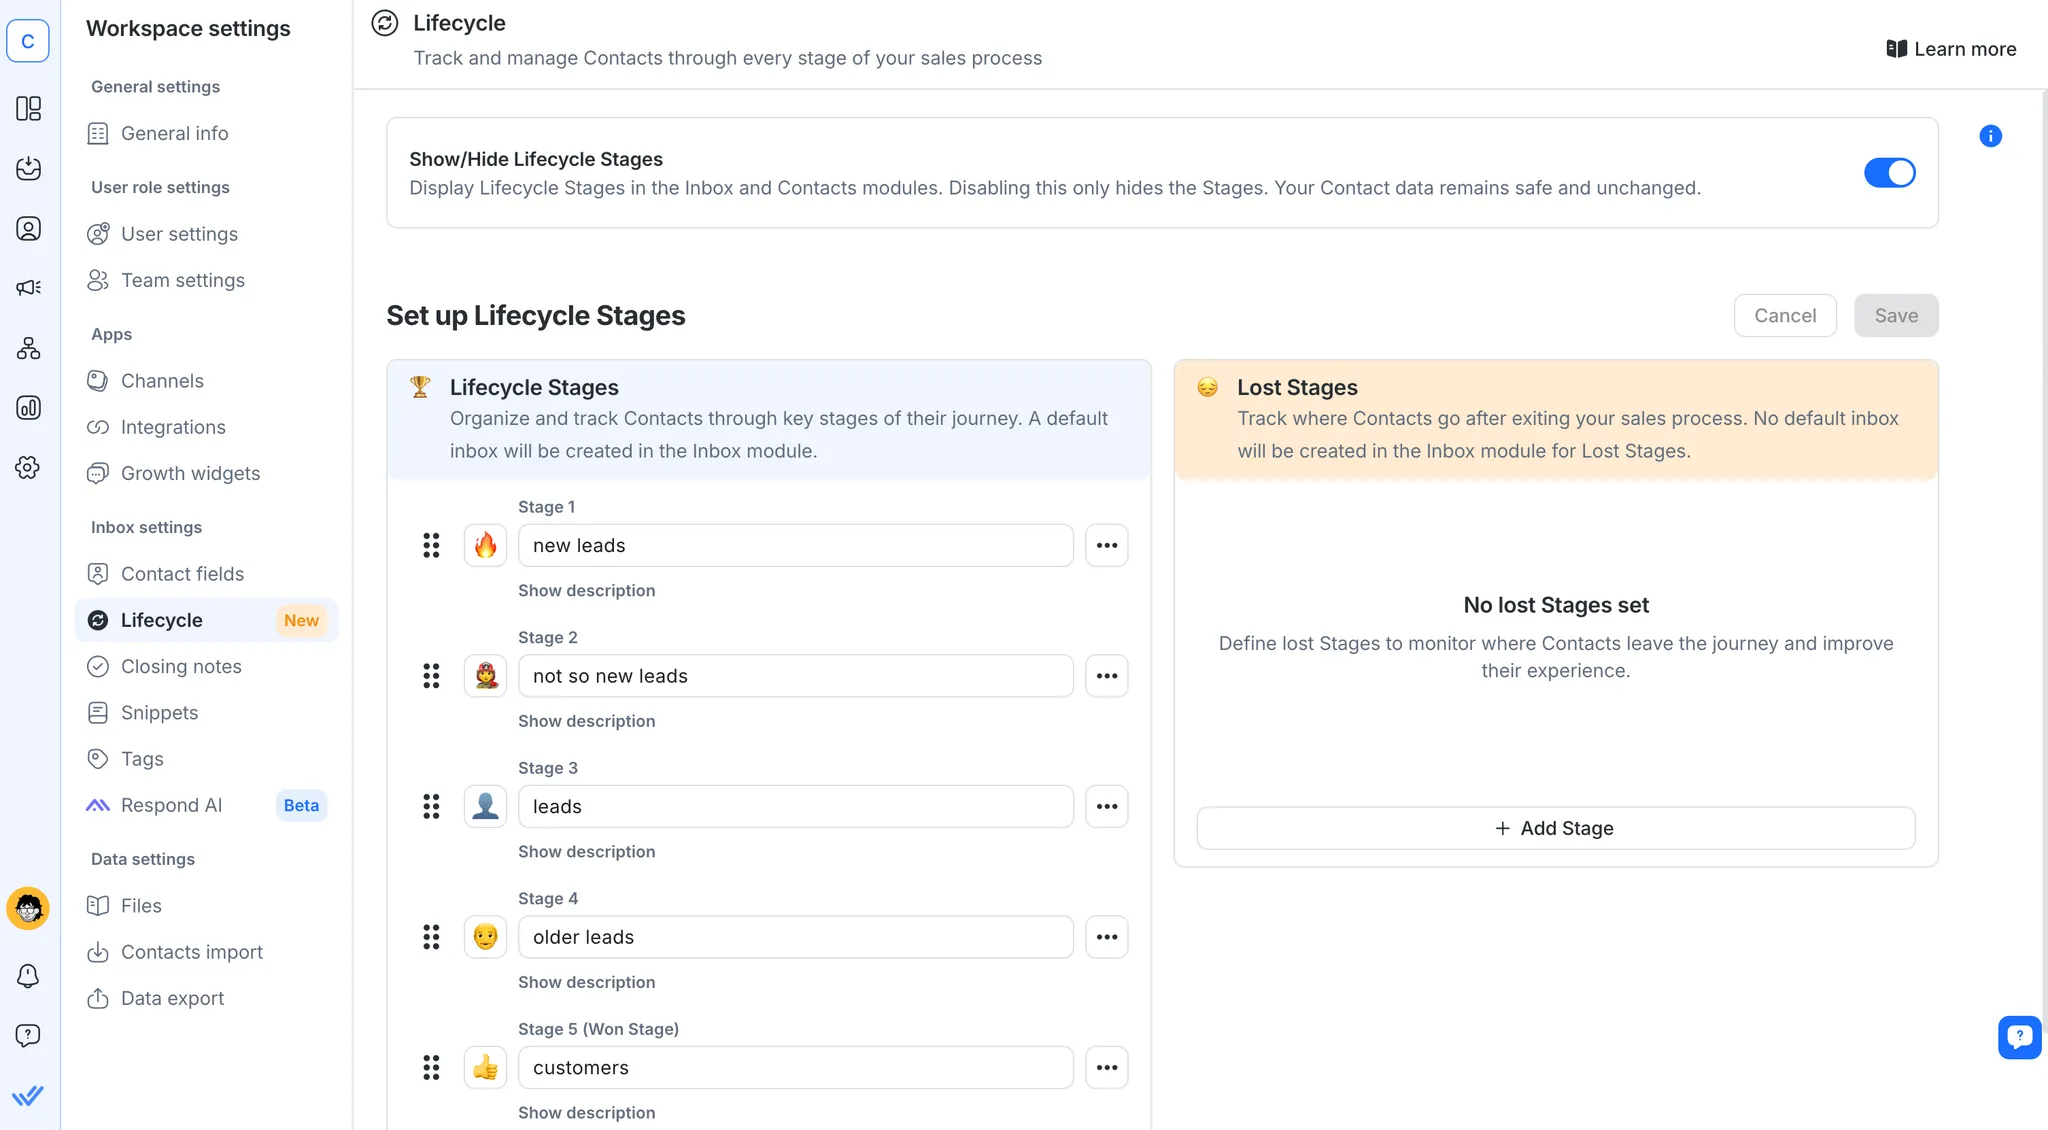
Con la possibilità di visualizzare e aggiornare lo stato di un cliente in pochi clic, le aziende possono gestire le conversazioni in modo più efficace e mantenere le opportunità in movimento.
Report e Analisi: Misura, Gestisci, Ottimizza
Il Modulo Report di respond.io fornisce una ricchezza di rappresentazioni grafiche, grafici e classifiche. I supervisori possono utilizzare questi strumenti per identificare tendenze e aree di miglioramento, migliorando la gestione e il processo decisionale.
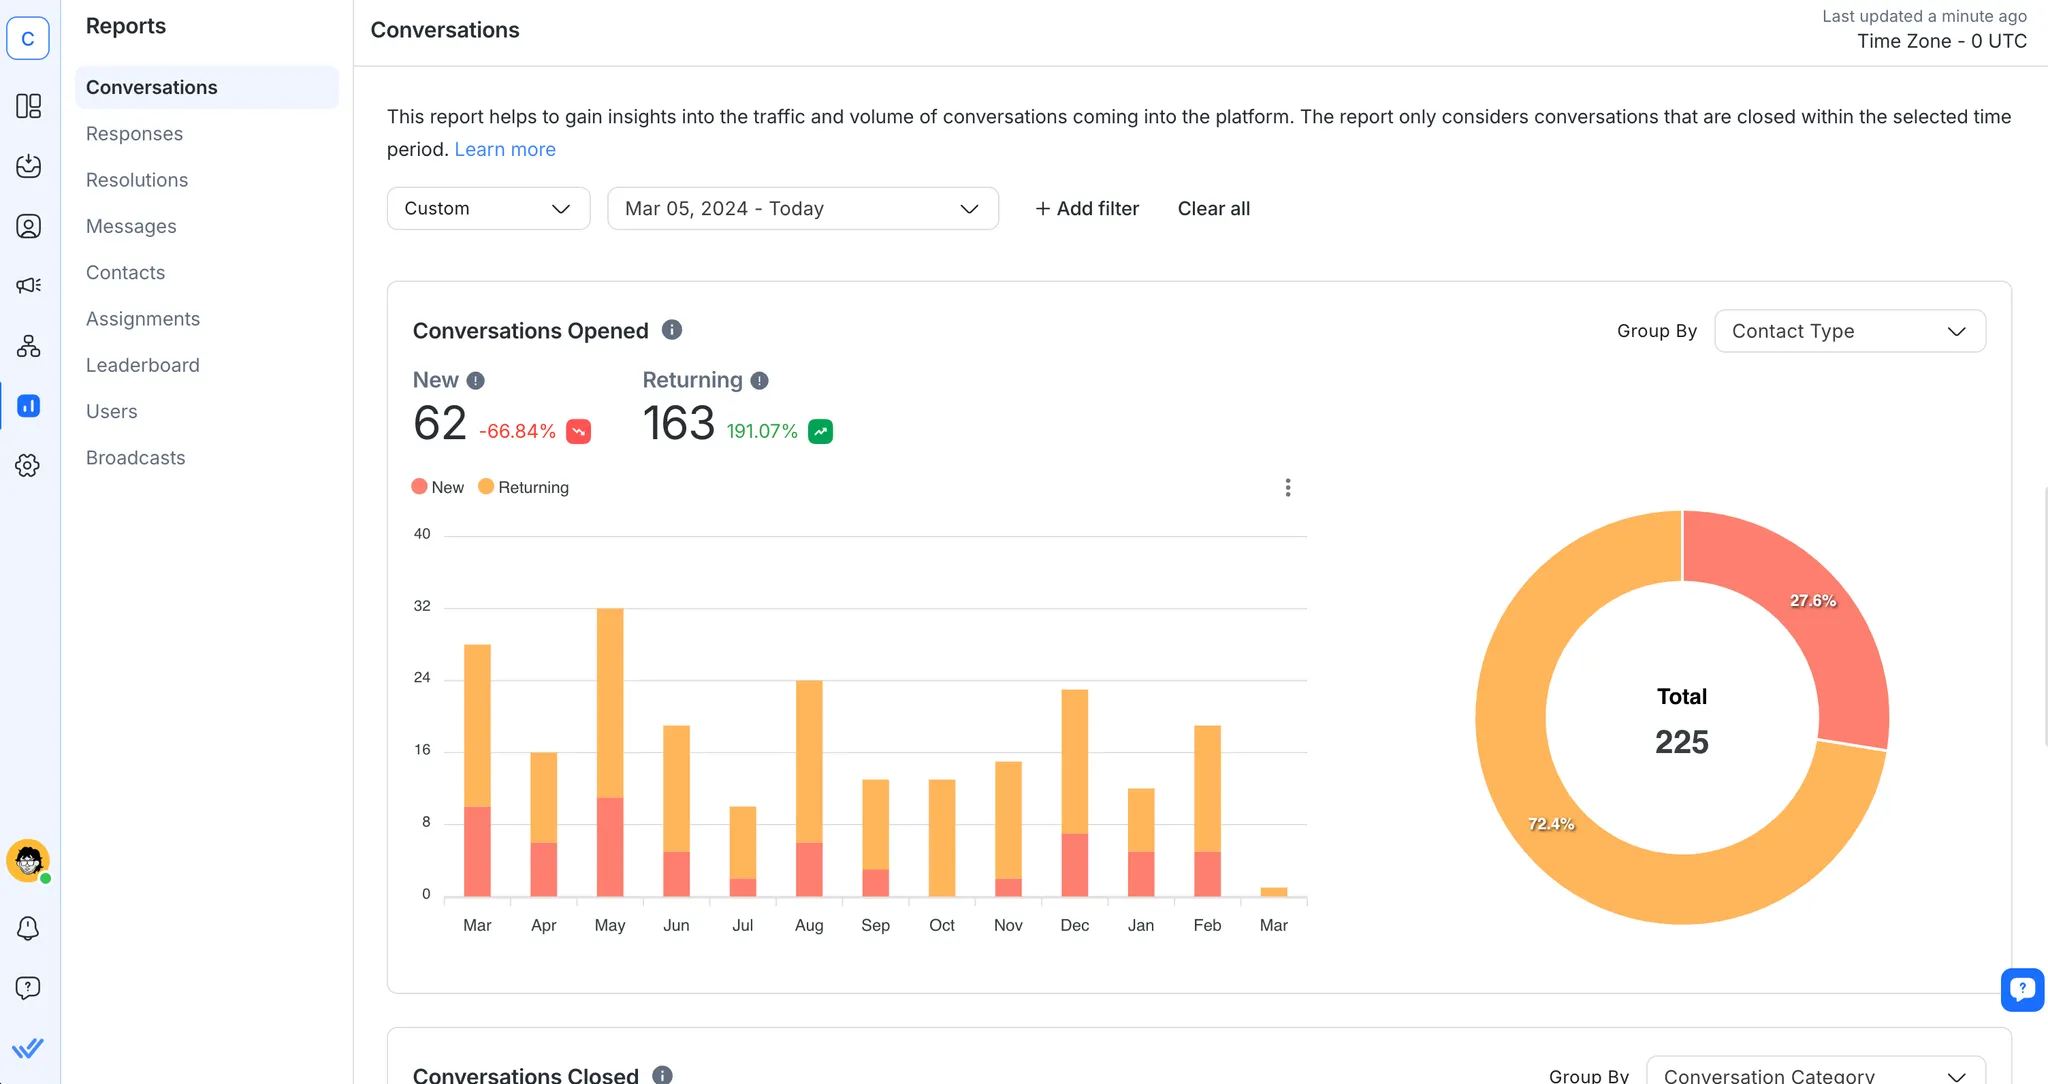
I risultati parlano da soli e chi meglio dei clienti di respond.io può raccontare la storia? Dopo essere passato a respond.io, Sleek ha guadagnato 3 volte più lead qualificati su WhatsApp. Sharwa, dal suo canto, ha incrementato i tassi di conversione su WhatsApp del 40%.
Nuovo: Usa WhatsApp Business App e API allo stesso tempo
Fino a poco tempo fa, le aziende dovevano scegliere tra l'utilizzo dell'app WhatsApp Business o dell'API WhatsApp. Ora, con la coesistenza di WhatsApp, puoi utilizzarli entrambi sullo stesso numero. Ciò significa che puoi mantenere il numero della tua app WhatsApp Business esistente e collegarlo alla Piattaforma WhatsApp Business (Cloud API) tramite respond.io, senza perdere l'accesso alla tua app o avere bisogno di un nuovo numero.
Perché è Importante per i Team
La coesistenza dà al tuo team la flessibilità di:
Utilizzare funzionalità avanzate API come più utenti, automazione, instradamento AI e integrazioni CRM tramite respond.io.
Continuare a utilizzare l'app WhatsApp Business per conversazioni semplici 1:1 o strumenti aziendali come cataloghi e risposte rapide.
Mantenere il tuo numero esistente, la cronologia delle chat con i clienti e l'accesso all'app, anche dopo aver collegato all'API.
Questa configurazione è ideale per le squadre in crescita che desiderano la potenza dell'API di WhatsApp senza sacrificare la comodità dell'app a cui sono abituate.
⚠️ Nota: alcune funzionalità dell'app WhatsApp Business, come le chat di gruppo, le liste broadcast e i messaggi effimeri, non funzioneranno sul lato API. Inoltre, se abiliti la coesistenza, perderai temporaneamente il segno di spunta verde (puoi richiederlo di nuovo dopo la configurazione).
Trasforma le conversazioni in clienti con l'API WhatsApp ufficiale di respond.io ✨
Gestisci chiamate e chat WhatsApp in un unico posto!
FAQ e risoluzione dei problemi
Posso ottenere WhatsApp API per uso personale?
Anche se tecnicamente potresti, è una soluzione progettata per aziende di medie e grandi dimensioni. Per uso personale, l'app WhatsApp è la tua migliore scelta.
L'API WhatsApp Business è facilmente accessibile e conveniente se ti iscrivi tramite respond.io. Sei pronto a fare marketing, vendere e supportare su scala su WhatsApp? Prova respond.io gratuitamente e ottieni l'API di WhatsApp oggi stesso.
L'API di WhatsApp è gratuita da usare?
No, non è gratuita. Utilizzare l'API WhatsApp Business comporta costi. Dovrai pagare le spese per i messaggi di template di Meta per determinati messaggi in uscita, che variano in base al tipo di messaggio inviato (marketing, utilità, servizio o autenticazione). Tuttavia, nota che a partire dal 1° luglio 2025, i messaggi di template per utilità sono gratuiti se inviati all'interno della finestra di servizio clienti di 24 ore.
Alcuni fornitori di soluzioni aziendali (BSP) impongono anche costi aggiuntivi sulla piattaforma. Ad esempio, SleekFlow addebita un costo extra per ciascun account WhatsApp connesso.
Con respond.io, paghi solo le spese ufficiali di conversazione di Meta: niente commissioni nascoste sulla piattaforma.
Ho bisogno di una chiave API per ottenere l'API di WhatsApp?
No, non ne hai bisogno se richiedi l'API WhatsApp Business tramite respond.io. Per saperne di più su tutti i requisiti, visita il nostro Centro assistenza.
Posso integrare WhatsApp con respond.io senza ripristinare il mio account?
Sì. Puoi integrare il tuo account WhatsApp Business esistente con respond.io senza ripristinare il tuo account esistente.
È possibile utilizzare un numero di rete fissa per ricevere l'OTP per la configurazione dell'API di WhatsApp?
Sì! Puoi utilizzare un numero di rete fissa per la configurazione dell'API di WhatsApp fintanto che può ricevere chiamate. Durante il processo di verifica, scegli l'opzione "Chiamami" per ricevere l'OTP tramite chiamata vocale al tuo numero di rete fissa.
Perderò la mia cronologia chat e i contatti quando mi connetto per la prima volta all'API di WhatsApp?
Quando ti connetti per la prima volta all'API WhatsApp Business, la tua cronologia chat e i contatti esistenti non vengono trasferiti automaticamente. È consigliabile eseguire il backup della tua cronologia chat prima di effettuare il passaggio!
Se esporti i contatti dal tuo account WhatsApp e li importi in respond.io, verrà trasferita anche la cronologia delle chat?
No. L'esportazione dei contatti da WhatsApp e l'importazione in respond.io trasferiranno le informazioni di contatto ma non la cronologia delle chat. Le cronologie delle chat non sono incluse nelle esportazioni dei contatti e devono essere salvate e trasferite separatamente.
Gli Agenti IA possono rispondere alle chiamate aziendali?
Sì, gli Agenti IA possono rispondere alle chiamate vocali se usi lo strumento giusto. Su respond.io puoi configurare la voce dell'agente IA, aggiungere istruzioni e testare l'esperienza prima di andare live. Questo ti dà pieno controllo su come vengono gestite le chiamate. A differenza dei voice bot standalone, l'AI Voice Agent di respond.io è completamente integrato in una inbox unificata, permettendo alle aziende di gestire messaggi e interazioni vocali in un thread unico per ogni cliente, con log e report condivisi.
Come posso trasferire le chiamate dei clienti a un altro agente?
Per trasferire una chiamata, hai bisogno di una piattaforma di comunicazione aziendale o di gestione delle chiamate che supporti il trasferimento di chiamate. Con essa, puoi spostare una conversazione in corso a un altro agente o numero di telefono senza disconnettere il cliente. Su respond.io, puoi trasferire chiamate sull'API di chiamata aziendale di WhatsApp e su altri canali VoIP ai tuoi colleghi o agenti in altri reparti. Le registrazioni delle chiamate e le trascrizioni rimangono intatte durante il trasferimento, quindi i clienti sperimentano un passaggio fluido mentre gli agenti ottengono l'intera cronologia delle conversazioni per avere il contesto.
Come posso usare gli Agenti IA per seguire le conversazioni con i clienti?
Se le conversazioni restano in sospeso in attesa di una risposta del cliente, puoi impostare il tuo agente IA per sollecitarli con una domanda di follow-up pertinente. Ad esempio, l'agente IA di Respond.io va oltre i semplici solleciti basati sul tempo o i trigger del workflow. Utilizza la cronologia delle conversazioni per comprendere il contesto e determinare quando e come seguire. Questa comprensione aiuta a evitare di contattare i clienti i cui problemi sono già stati risolti e a inviare solleciti personalizzati e simili a quelli umani al momento giusto.
Letture consigliate
Hai trovato questo articolo utile? Se sì, qui ci sono alcune letture che potrebbero interessarti.
WhatsApp Opt In: come ottenere l'autorizzazione dei clienti su WhatsApp
WhatsApp Business Name: una guida pratica per il nome visualizzato di WhatsApp


